
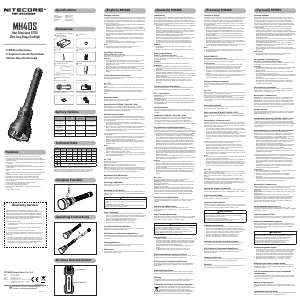
• Powered by 1 x AA Battery
• 240 Lumens Max Output
• White Light + Red Light
Features
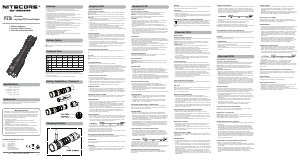
Specifications
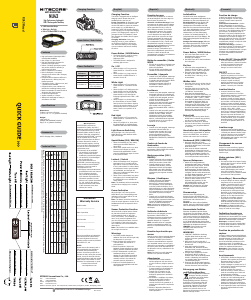
Battery Options
Technical Data
Quick Guide
Accessories
Warranty Service
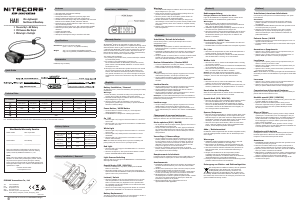
Battery Installation / Removal
Power Button / MODE Button
SYSMAX Innovations Co., Ltd.
TEL: +86-20-83862000
FAX: +86-20-83882723
Web: www.nitecore.com
Address: Unit 6355, 5/F, No. 1021 Gaopu Road,
Tianhe District, Guangzhou, 510653, Guangdong, China
Please nd us on facebook : NITECORE Flashlight
Made in China
HA19121122
• Ultra lightweight dual beam AA headlamp
• Max output of 240 lumens
• Red light illumination designed for preserving night vision
• Utilizes a unibody optical lens system with various facets
• Available with a wide voltage range and compatible with various AA
batteries such as alkaline, Ni-MH, and lithium batteries
• Designedwithtwobuttonsdierentinshapeandtouch,oering
easy one-handed operation
• 3 brightness levels, 2 light sources, and 3 special modes available
• Made from special PC plastic with impact and low temperature
resistance
• Compact and lightweight
• Impact resistant to 1 meter
• Waterproof and dustproof rating in accordance with IP66
Headband, Clip, AA Battery
Dimensions: 61.5mm x 36.2mm x 28.9mm
(2.42" x 1.43" x 1.14") (Bracket Included)
Weight: 36g (1.27 oz) (Bracket and Headband Included)
59g (2.08 oz) (Bracket, Headband and Battery Included)
(English)
(Deutsch)
(Francais)
Bedienungsanleitung
Einlegen/Entfernen der Batterie/des Akkus
Legen Sie die AA-Batterie wie abgebildet ein bzw. nehmen Sie sie
heraus,nachdemSiedasBatteriefachgeönethaben.
Warnungen:
1. Achten Sie darauf, dass die Batterie entsprechend der
Polaritätskennzeichnung eingelegt wird. Das Produkt funktioniert
nicht, wenn die Batterie falsch eingelegt ist.
2. VORSICHT! Mögliche gefährliche Strahlung! Schauen Sie nicht in
das Licht! Dies kann gefährlich für Ihre Augen sein.
3. Wenn das Produkt in einem Rucksack aufbewahrt oder für längere
Zeit nicht benutzt wird, entfernen Sie bitte die Batterie, um eine
versehentliche Aktivierung der Lampe oder ein Auslaufen der
Batterie zu verhindern.
Einschalttaste / MODE-Taste
• Die Einschalttaste dient zum Ein- und Ausschalten des Lichts und
zum Einstellen der Helligkeit.
• Die MODE-Taste ist für das Umschalten der Lichtquelle vorgesehen.
Ein / Aus
• Wenn das Licht ausgeschaltet ist, halten Sie die EIN-/AUS-Taste 1
Sek lang gedrückt, um auf LOW zuzugreifen.
• Wenn das Licht eingeschaltet ist, drücken Sie die EIN-/AUS-Taste
oder die MODE-Taste 1 Sek lang, um es auszuschalten.
Weißes Licht
• Wenn das Licht aus ist, drücken Sie die EIN/AUS-Taste 1 Sek lang,
um auf LOW zu schalten.
• Wenn das Licht aus ist, drücken Sie zweimal auf die EIN/AUS-Taste,
um zu ULTRALOW zu gelangen.
• Wenn das Licht eingeschaltet ist, drücken Sie kurz auf die EIN/AUS-
Taste, um zwischen LOW und HIGH zu wechseln.
Hinweis: Die Stufe HIGH wird heruntergeschaltet, um eine
Überhitzung zu vermeiden und die Lebensdauer der Batterie zu
verlängern, wenn sie über einen längeren Zeitraum läuft.
Rotlicht
• Wenn das Licht aus ist, halten Sie die MODE-Taste 1 Sek lang
gedrückt, um das rote Licht einzuschalten.
• Wenn das rote Licht an ist, drücken Sie kurz die Ein/Aus-Taste, um
zwischen „DAUERLICHT“ und „langsames Blinken“ zu wechseln.
Umschalten der Lichtquellen
Wenn das Licht eingeschaltet ist, drücken Sie kurz die MODE-Taste,
um zwischen weißem und rotem Licht zu wechseln.
Spezial-Modi (SOS / BEACON)
• WennsichdieLampeineinembeliebigenStatusbendet,drücken
Sie zweimal die MODE-Taste, um den SOS-Mode aufzurufen.
• Wenn einer der beiden Spezial-Modi eingeschaltet ist, drücken
Sie kurz auf die EIN-/AUS-Taste, um zwischen SOS und BEACON
umzuschalten. Drücken Sie die MODE-Taste erneut doppelt, um
zum vorherigen Status zurückzukehren.
Sperren/Entsperren
• Wenn die Lampe ausgeschaltet ist, drücken Sie beide Tasten 2 Sek
lang,bisdieLampedreimalblinkt,umdenZugriaufdenSperr-
Mode anzuzeigen. Im Sperr-Mode sind keine Helligkeitsstufen oder
Spezial-Mode verfügbar. Die Lampe blinkt einmal, um diesen Status
anzuzeigen, wenn eine der beiden Tasten gedrückt wird.
• WennSiesichimSperr-Modebenden,haltenSiebeideTasten
erneut 2 Sek lang gedrückt, bis die Lampe im ULTRALOW-Mode
leuchtet, um den Entsperrungsstatus anzuzeigen.
Akku- / Batteriewechsel
Die Batterien sollten ausgetauscht oder die Akkus aufgeladen werden,
wenn der Lichtkegel dunkel erscheint oder die Taschenlampe nicht
mehr reagiert.
Warnungen
1. VORSICHT! Mögliche gefährliche Strahlung! Nicht in das Licht
schauen! Dies kann gefährlich für Ihre Augen sein.
2. Bitte entfernen Sie die Batterie, wenn das Produkt längere Zeit
nicht benutzt wird, um ein Auslaufen der Batterie zu verhindern.
3. Wenn das Produkt im Rucksack aufbewahrt wird, aktivieren Sie
bitte den Sperr-Mode, um eine versehentliche Aktivierung zu
verhindern.
4.ZerlegenodermodizierenSiedieLampeNICHT,dadies
zu Schäden führt und die Produktgarantie ungültig wird.
VollständigeInformationenzurGarantiendenSieimAbschnitt
"Garantiebedingungen" in der Bedienungsanleitung.
5. Entsorgen Sie das Gerät/die Batterien in Übereinstimmung mit den
geltenden örtlichen Gesetzen und Vorschriften.
Entsorgung von Elektro- und Elektronikgeräten
Die durchgestrichene Mülltonne bedeutet, dass Sie gesetzlich
verpichtetsind,dieseGeräteeinervomunsortierten
Siedlungsabfall getrennten Erfassung zuzuführen. Die
Entsorgung über die Restmülltonne oder die gelbe Tonne
ist untersagt. Enthalten die Produkte Batterien oder Akkus, die nicht
fest verbaut sind, müssen diese vor der Entsorgung entnommen und
getrennt als Batterie entsorgt werden.
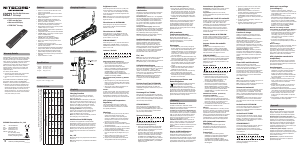
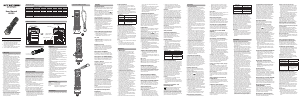
Battery Installation / Removal
As illustrated, insert / remove the AA battery after opening the battery
compartment.
Warnings:
1. Ensure the battery is inserted according to the polarity labels. The
product will not work if the battery is incorrectly inserted.
2. CAUTION! Possible dangerous radiation! Don't look into the light!
May be dangerous for your eyes.
3. When the product is kept in a backpack or left unused for
prolonged time, please remove the battery to prevent accidental
activation or battery leakage.
Power Button / MODE Button
•
ThePowerButtonisusedforturningon/othelightand
adjusting brightness levels.
•
The MODE Button is designed for switching light sources.
On / Off
•
Whenthelightiso,longpressthePowerButtonfor1secondto
access LOW.
•
When the light is on, long press the Power Button or MODE Button
for1secondtoturnito.
White Light
•
Whenthelightiso,longpressthePowerButtonfor1secondto
access LOW.
•
Whenthelightiso,doublepressthePowerButtontoaccess
ULTRALOW.
•
When the light is on, short press the Power Button to switch
between LOW and HIGH.
Note: The HIGH Level will step down to prevent overheating and
prolong battery life when it runs for a prolonged period.
Red Light
•
Whenthelightiso,longpresstheMODEButtonfor1secondto
turn on the red light.
•
When the red light is on, short press the Power Button to switch
between CONSTANT-ON and SLOW FLASHING.
Light Sources Switching
When the light is on, short press the MODE Button to switch between
white light and red light.
Special Modes (SOS / BEACON)
•
When the headlamp is in any status, double press the MODE
Button to access SOS.
•
When either special mode is on, short press the Power Button to
switch between SOS and BEACON. Double press the MODE Button
again to return to the previous status.
Lockout / Unlock
•
Whentheheadlampiso,longpressbothbuttonsfor2seconds
untilthelightashes3timestoindicateaccesstotheLockout
Mode. In Lockout Mode, any brightness levels or special modes
areunavailable,andthelightwillashoncetoindicatethisstatus
when pressing either button.
•
When in the Lockout Mode, long press both buttons for 2 seconds
again until the ULTRALOW is on to indicate the unlock status.
Battery Replacement
The battery should be replaced when the output appears to be dim or
the headlamp becomes unresponsive due to low power.
Installation / Retrait de la batterie
Comme illustré, insérez / retirez la pile AA après avoir ouvert le
compartiment à piles .
Avertissements :
1. Assurez-vous que la batterie est insérée conformément aux
indications de polarité. Le produit ne fonctionnera pas si la batterie
est mal insérée.
2. ATTENTION ! Radiations dangereuses possibles ! Ne regardez pas
directement la lumière dans les yeux ! Peut causer des troubles
oculaires.
3. Lorsque le produit est conservé dans un sac à dos ou laissé inutilisé
pendant une période prolongée, veuillez retirer la batterie pour
éviter toute activation accidentelle ou fuite de batterie.
Bouton d’alimentation / Bouton MODE
• Le bouton d’alimentation est utilisé pour allumer / éteindre la
lampe et régler les niveaux de luminosité.
• Le bouton MODE est conçu pour changer les sources lumineuses.
ON / OFF
• Lorsque la lampe est éteinte, appuyez longuement sur le bouton
d’alimentation pendant 1 seconde pour accéder à LOW.
• Lorsque la lampe est allumée, appuyez longuement sur le bouton
d’alimentation ou le bouton MODE pendant 1 seconde pour
l’éteindre.
Lumière blanche
• Lorsque la lampe est éteinte, appuyez longuement sur le bouton
d’alimentation pendant 1 seconde pour accéder à LOW.
• Lorsque la lampe est éteinte, appuyez deux fois sur le bouton
d’alimentation pour accéder à ULTRALOW.
• Lorsque la lampe est allumée, appuyez brièvement sur le bouton
d’alimentation pour basculer entre LOW et HIGH.
Remarque :LeniveauHIGHdiminuerapouréviterlasurchaueet
prolonger la durée de vie de la batterie lorsque la lampe fonctionnera
pendant une période prolongée.
Lumière rouge
• Lorsque la lampe est éteinte, appuyez longuement sur le bouton
MODE pendant 1 seconde pour allumer la lumière rouge.
• Lorsque la lumière rouge est allumée, appuyez brièvement sur le
bouton d’alimentation pour basculer entre FIXE et CLIGNOTEMENT
LENT.
Changement de sources lumineuses
Lorsque la lampe est allumée, appuyez brièvement sur le bouton
MODE pour basculer entre la lumière blanche et la lumière rouge.
Modes spéciaux (SOS / BALISE)
• Peu importe le mode de la lampe frontale, appuyez deux fois sur le
bouton MODE pour accéder à SOS.
• Lorsque l’un des modes spéciaux est activé, appuyez brièvement
sur le bouton d’alimentation pour basculer entre SOS et BALISE.
Appuyez à nouveau deux fois sur le bouton MODE pour revenir à
l’état précédent.
Verrouillage / Déverrouillage
• Lorsque la lampe est éteinte, appuyez longuement sur les deux
boutons pendant 2 secondes jusqu’à ce que la lampe clignote 3
fois pour indiquer l’accès au mode de verrouillage. En mode de
verrouillage, aucun niveau de luminosité ou mode spécial n’est
disponible, et la lampe clignote une fois pour indiquer cet état
lorsque vous appuyez sur l’un des deux boutons.
• En mode de verrouillage, appuyez longuement sur les deux
boutons pendant 2 secondes jusqu’à ce que l’ULTRALOW soit activé
pour indiquer l’état de déverrouillage.
Remplacement de la batterie
La batterie doit être remplacée lorsque la sortie semble faible ou que
la lampe frontale ne répond plus en raison d’une faible puissance.
Avertissements
1. ATTENTION ! Radiations dangereuses possibles ! Ne regardez pas
la lumière directement dans les yeux ! Peut causer des troubles
oculaires.
2. Veuillez retirer la batterie pour éviter toute fuite lorsque le produit
est laissé inutilisé pendant une période prolongée.
3. Lorsque le produit est conservé dans un sac à dos, veuillez activer
le mode de verrouillage pour éviter toute activation accidentelle.
4.NEPASdémonteroumodierlalampefrontalecarcela
l’endommagerait et rendrait la garantie du produit invalide. Veuillez
vous référer à la section garantie du manuel pour obtenir des
informations complètes sur la garantie.
5. Éliminez l’appareil/les piles conformément aux lois et
réglementations locales applicables.
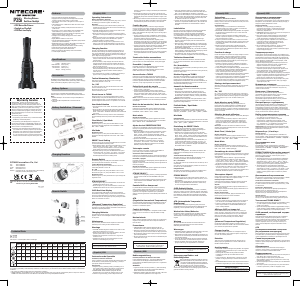
FL1 STANDARD
White Light Red Light
HIGH LOW ULTRALOW SOS BEACON CONSTANT-ON SLOW FLASHING
240 Lumens 60 Lumens 6 Lumens 240 Lumens 240 Lumens 5 Lumens 5 Lumens
4h 10h 40h ─ ─ 10h ─
90m 45m 10m ─ ─ 10m ─
1,600cd 460cd 30cd ─ ─
15cd
─
1m (Impact Resistance)
IP66
Note:Thestateddataismeasuredbyusing1x1.5ValkalineAAbatteryinaccordancewiththeinternationalashlighttestingstandardsANSI/NEMA
FL1.Thedatamayvaryinrealworlduseduetodierentbatteryusageorenvironmentalconditions.
Ultra Lightweight
Dual Beam AA Headlamp
Worldwide Warranty Service
Model number Date of purchase
————————————— —————————————
Serial number Store Stamp
————————————— —————————————
Thisisthecerticateofauthenticityifthisitemandwe
conrmthatithasbeensubjectedtothemostexacting
quality controls by SYSMAX Innovations Co., Ltd.
NOTE:
Please ensure this warranty card is fully completed by the
distributor or retailer after purchasing the product. Should
the product fail to operate correctly during the warranty
period, it may be returned with the completed warranty card
and original sales receipt to the retailer or local distributor for
replacement or repair.
Customer Service Email:
HA11
Type Nominal Voltage Compatibility
Primary Lithium
AA Battery
AA 1.5V
Y
(Recommended)
Primary Alkaline
AA Battery
AA 1.5V
Y
(Recommended)
Rechargeable
AA Battery
AA 1.2V
Y
(Recommended)
Rechargeable
Li-ion Battery
14500 3.7V N (Incompatible)
All NITECORE
®
products are warranted for quality. Any DOA /
defective product can be exchanged for a replacement through a local
distributor/dealer within 15 days of purchase. After that, all defective
/ malfunctioning NITECORE
®
products can be repaired free of charge
within 60 months from the date of purchase. Beyond 60 months, a
limited warranty applies, covering the cost of labor and maintenance,
but not the cost of accessories or replacement parts.
Thewarrantywillbenulliedif
1.theproduct(s)is/arebrokendown,reconstructedand/ormodied
by unauthorized parties;
2. the product(s) is/are damaged due to improper use.
For the latest information on NITECORE
®
products and services,
please contact a local NITECORE
®
distributor or send an email to
※Allimages,textsandstatementsspeciedhereinthisusermanual
are for reference purposes only. Should any discrepancy occur
betweenthismanualandinformationspeciedonwww.nitecore.
com, Sysmax Innovations Co., Ltd. reserves the rights to interpret
and amend the content of this document at any time without prior
notice.
Warnings
1. CAUTION! Possible dangerous radiation! Don't look into the light!
May be dangerous for your eyes.
2. Please remove the battery to prevent battery leakage when the
product is left unused for prolonged time.
3. When the product is kept in the backpack, please activate the
Lockout Mode to prevent accidental activation.
4. DO NOT disassemble or modify the headlamp as doing so will
cause damage to it and render the product warranty invalid. Please
refer to the warranty section in the manual for complete warranty
information.
5. Dispose of the device/batteries in accordance with applicable local
laws and regulations.
(Italiano)
Installazione/rimozione della batteria
Come illustrato, inserire/rimuovere la batteria AA dopo aver aperto
il vano batteria.
Avvertenze:
1. Assicurarsi che la batteria sia inserita secondo le etichette di
polarità. Il prodotto non funziona se la batteria non è inserita
correttamente.
2. ATTENZIONE! Possibili radiazioni pericolose! Non guardare la luce!
Può essere pericoloso per gli occhi.
3. Quando il prodotto viene conservato in uno zaino o lasciato
inutilizzato per un periodo di tempo prolungato, si prega di
rimuovere la batteria per evitare l'attivazione accidentale o la
perdita della batteria.
Pulsante Power / MODE
• Il pulsante di accensione serve ad accendere/spegnere la luce e a
regolare i livelli di luminosità.
• Il pulsante MODE è progettato per la commutazione delle sorgenti
luminose.
Accensione e Spegnimento
• Quando la luce è spenta, premere a lungo il pulsante Power per
almeno 1 secondo per accedere a LOW.
• Quando la luce è accesa, premere a lungo il pulsante Power o il
pulsante MODE per almeno 1 secondo per spegnerla.
Luce bianca
• Quando la luce è spenta, premere a lungo il pulsante Power per
almeno 1 secondo per accedere a LOW.
• Quando la luce è spenta, premere due volte il pulsante Power per
accedere a ULTRALOW.
• Quando la luce è accesa, premere brevemente il pulsante Power
per passare da LOW ad HIGH.
Nota: il livello HIGH con un utilizzo prolungato cala automaticamente
di intensità per evitare il surriscaldamento e prolungare la durata della
batteria.
Luce rossa
• Quando la luce è spenta, premere a lungo il pulsante MODE per
almeno 1 secondo per accendere la luce rossa.
• Quando la luce rossa è accesa, premere brevemente il pulsante
Power per passare dall'accensione costante al lampeggio lento.
Commutazione delle sorgenti luminose
Quando la luce è accesa, premere brevemente il pulsante MODE per
passare dalla luce bianca alla luce rossa.
Modalità speciali (SOS / BEACON)
• Quando la lampada frontale è in qualsiasi stato, premere due volte
il pulsante MODE per accedere a SOS.
• Quando una delle due modalità speciali è attiva, premere
brevemente il pulsante Power per passare da SOS a BEACON.
Premere nuovamente due volte il pulsante MODE per tornare
allo stato precedente.
Blocco e Sblocco
• Quando la lampada frontale è spenta, premere a lungo entrambi
ipulsantiper2secondinchélalucenonlampeggia3volteper
indicare l'accesso alla modalità Lockout. In modalità Lockout, tutti
i livelli di luminosità o le modalità speciali non sono disponibili e
la luce lampeggia una volta per indicare questo stato quando si
preme uno dei due pulsanti.
• Quando si è in modalità di Lockout, premere di nuovo a lungo
entrambiipulsantiper2secondinchél'indicatoreULTRALOWnon
si accende per indicare lo stato di sblocco.
Sostituzione della batteria
Consigliamo di sostituire o ricaricare la batteria quando la potenza
luminosaappareocaodebolaeditastidiselezionediventano
irresponsivi a causa della scarsa potenza residua.
Avvertenze
1. ATTENZIONE! Possibili radiazioni pericolose! Non guardare la luce!
Può essere pericoloso per gli occhi.
2. Rimuovere la batteria dalla torcia per evitare perdite quando il
prodotto rimane inutilizzato per un periodo di tempo prolungato.
3. Quando il prodotto viene tenuto nello zaino, attivare la modalità di
blocco per evitare un'attivazione accidentale.
4.NONsmontareomodicarelatorciaperevitaredidanneggiarlaed
invalidare la garanzia del prodotto. Per informazioni complete sulla
garanzia, consultare la sezione del manuale dedicata.
5. Smaltire il dispositivo/batterie in conformità alle leggi ed alle
normative locali vigenti.

Dołącz do dyskusji na temat tego produktu
Tutaj możesz podzielić się swoją opinią na temat Nitecore HA11 Latarka. Jeśli masz pytanie, najpierw dokładnie przeczytaj instrukcję. Zapytanie o instrukcję można złożyć za pomocą naszego formularza kontaktowego.