These additives can corrode the
device supports, leaving resi-
dues on the furniture surfaces
which can be difficult or impos-
sible to remove.
▪
Only use the device in a moder-
ate climate.
▪
Do not use any cleaning agent,
as this may damage the casing.
Clean the device with a clean,
moist leather cloth.
▪
Do not expose the back-up bat-
tery to extreme heat, caused for
example by direct sunlight, heat-
ers or fire.
▪
Never open the device casing.
No warranty claims are ac-
cepted for damage caused by
incorrect handling.
Compliance with RoHS Directive
The product you have purchased complies with EU
RoHS Directive (2011/65/EU). It does not contain
harmful and prohibited materials specified in the
Directive.
Package information
Packaging materials of the product are
manufactured from recyclable materials in
accordance with our National
Environment Regulations. Do not dispose
of the packaging materials together with the domes-
tic or other wastes. Take them to the packaging mate-
rial collection points designated by the local authori-
ties.
This device is noise-suppressed according to the
applicable EU directives. This product fulfils the
European directives 2014/53/EU, 2009/125/EC
and 2011/65/EU. You can find the CE declaration
of conformity for the device in the form of a pdf file
on the Grundig Homepage
www.grundig.com/downloads/doc
SCN 120 Power supply:
Manufacturer of AC Adaptor: Dongguan Turnmax
Electronic Co., Ltd.
Adress: Erxiafang Industrial Zone, Xiansha, Gabou
Town, Dongguan, Guangdong Province 523287,
P.R. China
Model: TM-K006VA-00501000PE-02
AC Adaptor Input: 100 - 240V
~
50/60 Hz 0.2A;
Output: 5V 1.0A 5.0W
Average active efficiency: 73,62%
No-load power consumption: <0.1 W
Max. Power consumption:
<4.5W (operation)
<1W (standby)
SCN 130 Power supply:
Manufacturer of AC Adaptor: Dongguan Turnmax
Electronic Co., Ltd.
Adress: Erxiafang Industrial Zone, Xiansha, Gabou
Town, Dongguan, Guangdong Province 523287,
P.R. China
Model: TM-K007VC-00501500PE-02
AC Adaptor Input:100 - 240V
~
, 50/60 Hz 0.25A;
Output: 5V 1.5A 7.5W
Average active efficiency: 76,65%
No-load power consumption: <0.1W
Max. Power consumption:
<10.5 W (operation)
<1W (standby)
Output:
USB host (For SCN 130 only):
5V 1A charge out
Back up micro batteries:
Back up DC Batt: 2 x 1.5 V UM4/R03/AAA
Frequency bands:
FM 87.5 ...108.0 MHz
Circuit features:
Loudspeaker: 2 - 1/4 inch
Output Power: 1 W
Dimensions:
W x H x L 166 x 67 x 102 mm
Weight: 350 gr
Technical and design modifications reserved.
POWER SUPPLY
Mains operation
Check that the mains voltage on the type plate (on
the bottom of the device) corresponds to your local
mains supply. If this is not the case, contact your spe-
cialist dealer.
1 Plug the power adaptor into the socket
(100 - 240V
~
, 50/60 Hz).
Caution:
▪
The device is connected to the mains with the
power plug. To fully disconnect the device from
the mains, pull out the plug.
▪
The mains plug is used to disconnect the device. It
shall remain readily operable and should not be
obstructed during intended use.
Inserting the back-up battery
The back-up batteries ensure that the stored set¬tings
are not lost in the case of a power failure.
1 Open the battery compartment by pressing the
area market and pushing down the cover.
2 Observe the polarity marked on the base of the
battery compartment when inserting the batteries
(micro batteries, 2 x 1.5 V, R03/ UM 4/ AAA).
3 Close the battery compartment.
Note:
▪
Remove the back-up battery when it is flat or when
you know that the device will not be used for a
long period of time.
Environmental note:
▪
Batteries, including those which do not contain
heavy metal, should not be disposed of with
household waste. Always dispose of used batter-
ies in accordance with local environmental regu-
lations.
RADIO MODE
Antenna
For the best FM (UHF) reception it is sufficient to align
the wire antenna accordingly.
Switching on and o
1 Switching the device from standby with
»ON/OFF« button.
2 Switch the device to standby with »ON/OFF«
button.
Searching for and saving radio sta-
tions - automatically
You can store 10 radio stations on presets.
1 Activate the station search by pressing
»TUNING+/HR« or »TUNING-/MIN« buttons
until the frequency display changes to rapid run-
through.
The search stops when a station is found.
Note:
▪
To move the frequency forward in steps, briefly
press »TUNING+/HR« or »TUNING-/MIN«
several times.
2 Press and hold the »PRESET« button to activate
the memory function.
3 Press »TUNING+/HR« or »TUNING-/MIN«
buttons to select the preset.
4 Press the »PRESET« button to save the station.
Note:
▪
If the stations are already stored on the presets,
they are overwritten when new stations are stored.
5 To store more stations, repeat the steps 1 to 4.
Selecting stored stations
1 Select the preset by pressing the »PRESET« button
to select the preset stations one after another.
Adjusting the volume
1 Adjust the volume with »VOLUME -/AL 1« or
»VOLUME +/AL 2« buttons.
Setting the brightness of the display
Press the »SLEEP/SNOOZE/DIMMER« button to
adjust brightness levels in high, middle and low
levels.
TIMER MODE
Setting the time
1 Switching the device to standby with
»ON/OFF« button.
2 Press and hold the »TIME/MODE« button for
two seconds to activate the setting. The current
day of the week will be flashing on the LCD. »d1«
is Monday, and »d7« is Sunday.
3 Then press the »TIME/MODE« button again for
setting the current time.
4 Press »TUNING-/MIN« to set the minutes;
5 Press »TUNING+/HR« to set the hours;
6 Press the »TIME/MODE« button again to con-
firm the settings.
▪
The device wakes you up at the set alarm time, the
alarm duration is 60 minutes.
Interrupting the alarm
▪
Press the »SLEEP/SNOOZE/DIMMER« while
the alarm is sounding.
Note:
▪
The alarm signal will be stopped, and the alarm
will be sounded again after nine minutes.
Cancelling the alarm
1 Press »ON/OFF« while the alarm is sounding.
Note:
▪
The alarm will be sounded again at the next set
alarm time.
Activating and deactivating the alarm
1 In standby mode, press »VOLUME -/AL 1« or
»VOLUME +/AL 2« button to activate the alarm
with last used alarm settings.
2 For example, if pressed »VOLUME -/AL 1« but-
ton, the last used alarm time would be displayed;
3 By repeatedly pressing the »VOLUME -/AL 1«
button, the radio will display last set alarm time,
the » « and the » « icons.
Sleep timer
Setting the alarm time
1 Switch the device to standby with »ON/OFF« but-
ton;
2 Press and hold the »VOLUME -/AL 1« button
for alarm 1 or »VOLUME +/AL 2« for alarm 2;
3 For example, press and hold
»VOLUME -/AL 1« button to Then the alarm
days will be flashing on the LCD (1 - 7, 1 - 5 or
6 - 7).
▪
Descriptions of alarm days are as follows:
1 - 7 (Alarm is active during the week)
1 - 5 (Alarm is active on weekdays)
6 - 7 (Alarm is active at the weekend)
4 Press the »TUNING-/MIN« or
»TUNING+/HR« buttons to adjust the alarm
days.
5 Press the »VOLUME -/AL 1« button to confirm;
6 Press the »TUNING-/MIN« button to set the
alarm minutes;
7 Press the »TUNING+/HR« button to set the
alarm hours;
8 Press the »VOLUME -/AL 1« button to finish the
alarm 1 settings.
Note:
SETUP AND SAFETY EN
▪
This device is designed for the
playback of audio signals. Any
other use is expressly prohibited.
▪
Protect the device from moisture
(water drops or splashes). Do
not place any vessels such as
vases on the device. These may
be knocked over and spill fluid
on the electrical components,
thus presenting a safety risk.
▪
Do not place any naked flames
such as candles on the device.
▪
Thunderstorms are a danger to
all electrical devices. Even if the
device is switched off, it can be
damaged by a lightning strike to
the mains cable.
1 Press and hold the
»SLEEP/SNOOZE/DIMMER« button for about
2 seconds to activate the sleep timer.
2 Then repeatedly press the
»SLEEP/SNOOZE/DIMMER« button to select
the auto switch-off timer from 10 minutes to 90
minutes.
▪
The type plate is located on the
bottom of the device.
▪
Do not expose the device to ex-
treme heat, caused for example
by direct sunlight, heater fire.
Compliance with the WEEE Directive
and Disposing of the Waste Product:
This product complies with EU WEEE Directive
(2012/19/EU). This product bears a classification
symbol for waste electrical and electronic equipment
(WEEE).
This symbol indicates that this product
shall not be disposed with other house-
hold wastes at the end of its service life.
Used device must be returned to offical
collection point for recycling of electrical
and electronic devices. To find these collection sys-
tems please contact to your local authorities or re-
tailer where the product was puchased. Each house-
hold performs important role in recovering and recy-
cling of old appliance. Appropriate disposal of used
appliance helps prevent potential negative conse-
quences for the environment and human health.
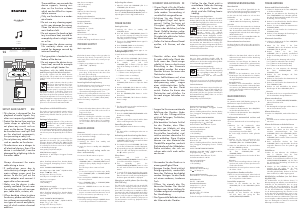
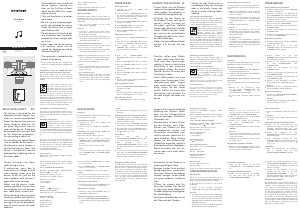
TUNING+/HR VOL+/AL 2
VOL-/AL 1
TUNING-/MIN
ON/OFF
PRESET
TIME
Always disconnect the mains
cable during a storm.
▪
If malfunctions occur due to
static electricity charges or brief
mains voltage surges, reset the
device. To do this, pull out the
mains adapter and connect it
again after a few seconds.
▪
Make sure the device is ade-
quately ventilated. Do not cover
the ventilation slots with newspa-
pers, table cloths, curtains, etc.
▪
When deciding where to place
the device, please note that furni-
ture surfaces are covered by var-
ious types of varnish and plastic,
most of which contain chemical
additives.
SLEEP
SNOOZE
DIMMER
USB
(SCN 130)
SICHERHEIT UND AUFSTELLEN DE
▪
Dieses Gerät ist für die Wieder-
gabe von Tonsignalen bestimmt.
Jede andere Verwendung ist
ausdrücklich ausgeschlossen.
▪
Schützen Sie das Gerät vor
Feuchtigkeit (Tropf- und Spritz-
wasser). Stellen Sie keine mit
Flüssigkeit gefüllten Gefäße
(Vasen oder ähnliches) auf das
Gerät. Gefäße könnten umkip-
pen und mit der auslaufenden
Flüssigkeit die elektrische Sicher-
heit beeinträchtigen.
▪
Stellen Sie keine offenen Brand-
quellen, z.B. Kerzen, auf das
Gerät.
▪
Gewitter stellen eine Gefahr
für jedes elektrische Gerät dar.
Auch wenn das Gerät ausge-
schaltet ist, kann es durch einen
Blitzschlag in das Stromnetz
beschädigt werden. Bei einem
Gewitter müssen Sie immer den
Netzstecker ziehen.
▪
Treten Fehlfunktionen auf, etwa
wegen einer kurzzeitigen Netz-
überspannung oder wegen
einer elektrostatischen Aufla-
dung, setzen Sie das Gerät
zurück. Ziehen Sie hierzu den
Netzstecker und schließen Sie
ihn nach einigen Sekunden wie-
der an.
▪
Sorgen Sie für eine ausreichende
Belüftung des Gerätes. Bede-
cken Sie die Lüftungsschlitze
nicht mit Zeitungen, Tischtücher,
Vorhängen, etc.
▪
Bitte beachten Sie beim Aufstel-
len des Gerätes, dass Ober-
flächen von Möbeln mit den
verschiedensten Lacken und
Kunststoffen beschichtet sind,
welche meistens chemische Zu-
sätze enthalten. Diese Zusätze
können u.a. das Material der
Gerätefüße angreifen, wodurch
Rückstände auf der Möbelober-
fläche entstehen, die sich nur
schwer oder nicht mehr entfer-
nen lassen.
▪
Verwenden Sie das Gerät nur in
einem gemäßigten Klima.
▪
Reinigen Sie das Gerät nicht mit
Reinigungsmitteln; andernfalls
kann das Gehäuse beschädigt
werden. Reinigen Sie das Gerät
mit einem sauberen, trockenen
Tuch.
▪
Öffnen Sie niemals das Ge-
häuse des Gerätes. Der Herstel-
ler übernimmt keine Haftung für
Schäden aufgrund unsachgemä-
ßer Handhabung.
▪
Das Typenschild befindet sich an
der Unterseite des Gerätes.
▪
Stellen Sie das Gerät nicht in
unmittelbare Nähe der Heizung
oder in die pralle Sonne; da-
durch wird die Kühlung beein-
trächtigt.
Entsorgung von Altgeräten:
Dieses Produkt erfüllt die Vorgaben der EU-WEEE-
Direktive (2012/19/EU). Das Produkt wurde mit ei-
nem Klassifizierungssymbol für elektrische und elekt-
ronische Altgeräte (WEEE) gekennzeichnet.
Dieses Symbol zeigt an, dass dieses
Gerät am Ende seiner Einsatzzeit nicht mit
anderem Hausmüll entsorgt werden darf.
Altgeräte müssen an offizielle
Sammelstellen zum Recycling elektrischer
und elektronischer Geräte abgegeben werden.
Nähere Angaben zu diesen Sammelstellen erhalten
Sie von Ihrer Stadtverwaltung oder dem Händler, bei
dem Sie das Gerät erworben haben. Der Beitrag je-
des Haushalts zum Umweltschutz ist wichtig. Eine
angemessene Entsorgung von Altgeräten hilft bei der
Verhinderung negativer Auswirkungen auf Umwelt
und menschliche Gesundheit.
Einhaltung von RoHS-Vorgaben:
Das von Ihnen erworbene Produkt erfüllt die
Vorgaben der EU-RoHS Direktive (2011/65/EU). Es
enthält keine in der Direktive angegebenen gefährli-
chen und unzulässigen Materialien.
Informationen zur Verpackung
Die Verpackung des Produkts wurde ge-
mäß unserer nationalen Gesetzgebung
aus recyclingfähigen Materialien herge-
stellt. Entsorgen Sie die
Verpackungsmaterialien nicht mit dem Hausmüll
oder anderem Müll.
Bringen Sie sie zu einer von der Stadtverwaltung be-
reitgestellten Sammelstelle für Verpackungsmaterial.
Technische Daten
Dieses Gerät ist funkentstört entsprechend den gel-
tenden EU-Richtlinien. Dieses Produkt erfüllt die eu-
ropäischen Richtlinien 2014/53/EU, 2009/125/
EC und 2011/65/EU. Den genauen Wortlaut der
Konformitätserklärung (DOC) finden Sie auf der
GRUNDIG Homepage
www.grundig.com/downloads/doc.
Spannungsversorgung SCN 120:
Hersteller von AC-Adapter: Dongguan Turnmax
Electronic Co., Ltd.
Adresse: Erxiafang Industrial Zone, Xiansha, Gabou
Town, Dongguan, Guangdong Province 523287,
P.R. China
Modell: TM-K006VA-00501000PE-02
AC-Adaptor Input:100 - 240V
~
, 50/60 Hz 0.2A
Ausgangsleistung: 5V 1.0A 5.0W
Durchschnittliche aktive Effizienz: 73,62%
Leerlaufstromverbrauch: <0.1W
Max. Leistungsaufnahme:
<4.5 W (im Betrieb)
<1 W (Stand-by)
Spannungsversorgung SCN 130:
Hersteller von AC-Adapter: Dongguan Turnmax
Electronic Co., Ltd.
Adresse: Erxiafang Industrial Zone, Xiansha, Gabou
Town, Dongguan, Guangdong Province 523287,
P.R. China
Modell: TM-K007VC-00501500PE-02
AC Adaptor Input:100 - 240V
~
, 50/60 Hz 0.25A;
Ausgangsleistung: 5V 1.5A 7.5W
Durchschnittliche aktive Effizienz: 76,65%
Leerlaufstromverbrauch: <0.1W
Max. Leistungsaufnahme:
<10,5 W (im Betrieb)
<1 W (Stand-by)
Ausgangsleistung:
USB host (For SCN 130 only):
5V 1A charge out
Reserve-Mikrobatterien:
Reservebatterie: 2 x 1.5v UM4/R03/AAA
Wellenbereich:
FM 87.5 ...108.0 MHz
Stromkreisfunktionen:
Lautsprecher: 2 - 1/4 inch
Ausgangsleistung: 1 W
Abmessungen:
W x H x L 166 x 67 x 102 mm
Gewicht: 350 gr
Technische und optische Änderungen vorbehalten!
STROMVERSORGUNG
Netz-Betrieb
Prüfen Sie, ob die auf dem Typenschild (an der
Unterseite des Gerätes) angegebene Netzspannung
mit der örtlichen Netzspannung übereinstimmt.
Ist dies nicht der Fall, wenden Sie sich an Ihren
Fachhändler.
1 Netzteil an die Steckdose anschließen
(100 bis 240 V Wechselspannung, 50/60 Hz).
Vorsicht:
▪
Nur durch Ziehen des Netzsteckers ist das Gerät
vom Stromnetz getrennt! Sorgen Sie daher dafür,
dass der Netzstecker während des Betriebes frei
zugänglich bleibt und nicht durch andere Gegen-
stände behindert wird.
▪
Die Steckdose sollte sich in unmittelbarer Nähe des
Gerätes befinden und frei zugänglich sein.
Reservebatterien einsetzen
Die Reservebatterien stellen sicher, dass gespeicher-
te Einstellungen bei einem Stromausfall nicht verloren
gehen.
1 Öffnen Sie das Batteriefach, indem Sie auf den
markierten Bereich drücken und die Abdeckung
nach unten schieben.
2 Beachten Sie beim Einlegen der Batterien die
am Boden des Batteriefachs gekennzeichnete
Polarität (Mikrobatterien, 2 x 1,5 V, R03/ UM 4/
AAA).
3 Schließen Sie das Batteriefach.
Hinweis:
▪
Entfernen Sie die Stützbatterie, wenn Sie das
Gerät längere Zeit nicht betreiben. Für Schäden,
die durch ausgelaufene Batterien entstehen, kann
nicht gehaftet werden.
Umwelthinweis:
▪
Die Batterie – auch schwermetallfreie – darf nicht
im Hausmüll entsorgt werden. Verbrauchte Batte-
rien müssen in die Altbatteriesammelgefäße bei
Handel und öffentlich-rechtlichen Entsorgungsträ-
gern gegeben werden.
RADIOMODUS
Antenne
Für optimalen UKW- (UHF) Empfang genügt es, die
Kabelantenne entsprechend auszurichten.
Ein- und ausschalten
1 Schalten Sie das Gerät mit der Taste »ON/OFF«
aus dem Bereitschaftsmodus ein.
2 Schalten Sie das Gerät mit der Taste »ON/OFF«
in den Bereitschaftsmodus.
Radiosender automatisch suchen und
speichern
Sie können 10 Radiosender in Voreinstellungen spei-
chern.
1 Aktivieren Sie die Sendersuche, indem
Sie die Tasten »TUNING+/HR« oder
»TUNING-/MIN« drücken, bis die
Frequenzanzeige schnell durchläuft.
Die Suche stoppt, sobald ein Sender gefunden
wird
Hinweis:
▪
Drücken Sie für einen stufenweisen Vor-
lauf der Frequenz mehrmals kurz die Taste
»TUNING+/HR« oder »TUNING-/MIN«.
2 Halten Sie zum Aktivieren der Speicherfunktion
die Taste »PRESET« gedrückt.
3 Drücken Sie zur Auswahl der Voreinstellung
die Taste »TUNING+/HR« oder
»TUNING-/MIN« .
4 Drücken Sie zum Speichern des Senders die Taste
»PRESET«.
Hinweis:
▪
Falls in den Voreinstellungen bereits Sender ge-
speichert sind, werden Sie beim Speichern neuer
Sender überschrieben.
5 Wiederholen Sie zum Speichern weiterer Sender
die Schritte 1 bis 4.
Gespeicherte Sender aufrufen
1 Rufen Sie eine Voreinstellung auf, indem Sie durch
Drücken der Taste »PRESET« schrittweise durch
die voreingestellten Sender blättern.
Lautstärke anpassen
1 Passen Sie die Lautstärke mit der Taste
»VOLUME -/AL 1« oder »VOLUME +/AL 2«
an.
Anzeigehelligkeit einstellen
1 Drücken Sie zum Einstellen der Helligkeit
auf hoch, mittel oder gering die Taste
»SLEEP/SNOOZE/DIMMER«.
TIMER-BETRIEB
Datum und Uhrzeit einstellen
1 Schalten Sie das Gerät mit der Taste »ON/OFF«
in den Bereitschaftsmodus.
2 Halten Sie zum Aktivieren der Einstellung die
Taste »TIME/MODE« zwei Sekunden gedrückt.
Der aktuelle Wochentag blinkt im LCD. »d1« steht
für Montag, »d7« für Sonntag.
3 Drücken Sie zum Einstellen der aktuellen Uhrzeit
dann erneut die Taste »TIME/MODE«.
4 Drücken Sie zum Einstellen des Minutenwertes
»TUNING-/MIN«.
5 Drücken Sie zum Einstellen des Stundenwertes
»TUNING+/HR«.
6 Drücken Sie zum Bestätigen der Einstellungen er-
neut die Taste »TIME/MODE«.
Alarmzeit einstellen
1 Schalten Sie das Gerät mit der Taste »ON/OFF«
in den Bereitschaftsmodus.
2 Halten Sie für Alarm 1 die Taste
»VOLUME -/AL 1« oder für Alarm 2 die Taste
»VOLUME +/AL 2« gedrückt.
3 Beispiel: Halten Sie die Taste
»VOLUME -/AL 1« gedrückt, anschließend
blinken die Alarmtage am LCD (1 - 7, 1 - 5 oder
6 - 7).
▪
Beschreibungen der Alarmtage sind wie folgt:
1 bis 7 (Alarm ist während der Woche aktiv)
1 bis 5 (Alarm ist an Wochentagen aktiv)
6 bis 7 (Alarm ist am Wochenende aktiv)
4 Drücken Sie zum Anpassen der Alarmtage
die Taste »TUNING-/MIN« oder
»TUNING+/HR«.
5 Drücken Sie zum Bestätigen die Taste
»VOLUME -/AL 1«.
6 Drücken Sie zum Einstellen der Alarmminuten die
Taste »TUNING-/MIN«.
7 Drücken Sie zum Einstellen der Alarmstunden die
Taste »TUNING+/HR«.
8 Drücken Sie zum Abschließen der Alarm-1-
Einstellungen die Taste »VOLUME -/AL 1«.
Hinweis:
▪
Das Gerät weckt Sie zur eingestellten Alarmzeit
auf. Die Alarmdauer beträgt 60 Minuten.
Alarm unterbrechen
▪
Drücken Sie »SLEEP/SNOOZE/DIMMER«,
während der Alarm ertönt.
Hinweis:
▪
Das Alarmsignal wird gestoppt und der Alarm er-
tönt nach neun Minuten erneut.
Alarm abbrechen
1 Drücken Sie »ON/OFF«, während der Alarm er-
tönt.
Hinweis:
▪
Der Alarm ertönt zur nächsten eingestellten Alarm-
zeit erneut.
Alarm aktivieren und deaktivieren
1 Drücken Sie im Bereitschaftsmodus zum
Aktivieren des Alarms mit den zuletzt ver-
wendeten Alarmeinstellungen die Taste
»VOLUME -/AL 1« oder »VOLUME +/AL 2«.
2 Beispiel: Bei Betätigung der Taste
»VOLUME -/AL 1« wird die zuletzt verwendete
Alarmzeit angezeigt.
3 Durch wiederholtes Drücken der Taste
»VOLUME -/AL 1« zeigt das Radio die zuletzt
eingestellte Alarmzeit sowie die Symbole » «
und » « an.
Schlaftimer
1 Halten Sie zum Aktivieren des Schlaftimers
etwa 2 Sekunden lang die Taste
»SLEEP/SNOOZE/DIMMER« gedrückt.
2 Drücken Sie anschließend wiederholt die Taste
»SLEEP/SNOOZE/DIMMER«, um den Timer
der automatischen Abschaltung auf 90 bis 10
Minuten einzustellen.
3 Schalten Sie den Schlaftimer vor der ein-
gestellten Zeit ab, indem Sie die Taste
»SLEEP/SNOOZE/DIMMER« etwa 2
Sekunden gedrückt halten. Drücken Sie die Taste
dann wiederholt, bis »OFF« angezeigt wird.
Mobiltelefon auaden (nur bei Grun-
dig SCN 130)
Der USB-Anschluss an der Rückseite bietet 5 V
Gleichspannung zum Aufladen eines Mobiltelefons.
Verbinden Sie das Mobiltelefon über ein geeig-
netes Kabel mit dem USB-Anschluss. Die USB-
Stromversorgung ist in allen Betriebsmodi, einschließ-
lich des Bereitschaftsmodus, verfügbar. Beachten
Sie die Bedienungsanleitung oder wenden Sie sich
an den Hersteller des Mobiltelefons, wenn Sie wis-
sen möchten, ob Ihr Gerät die Aufladung per USB-
Anschluss unterstützt. Der USB-Anschluss eignet sich
nur zur Ausgabe von Gleichspannung und kann nicht
bspw. zur Wiedergabe von Musik von einem USB-
Datenträger verwendet werden.
3 To switch off the sleep timer before the set time
press and hold »SLEEP/SNOOZE/DIMMER«
button for about 2 seconds, then repeatedly press
the button again until »OFF« is displayed.
Charging a mobile phone (For Grundig
SCN 130 only)
The USB socket on the back side can provide DC
power of 5V for charging a mobile phone. Connect
the mobile phone to the USB socket with an appro-
priate cable. The USB power is available in all the
operating modes and including standby mode. Refer
to the user manual or the manufacturer of the mobile
phone to verify if it supports charging from an USB
power. The USB socket is suitable for DC power-out
only and cannot be used for e.g. playback of music
from a USB stick.
SCN 120
SCN 130
DE - EN - FR - PL - ES
User Manual
Clock Radio
01M-GCR1010-4320-03
01B-8870371600-4320-03
01M-GCR1020-4320-03
01B-8870381600-4320-03


Dołącz do dyskusji na temat tego produktu
Tutaj możesz podzielić się swoją opinią na temat Grundig SCN 120 Radiobudzik. Jeśli masz pytanie, najpierw dokładnie przeczytaj instrukcję. Zapytanie o instrukcję można złożyć za pomocą naszego formularza kontaktowego.
odpowiedz | To było pomocne (17) (Przetłumaczone przez Google)
odpowiedz | To było pomocne (5) Czytaj więcej (Przetłumaczone przez Google)
To było pomocne (4) (Przetłumaczone przez Google)