
English
1 Your multicooker
Congratulations on your purchase, and welcome to Philips!
To fully benet from the support that Philips offers, register your
product at www.Philips.com/welcome.
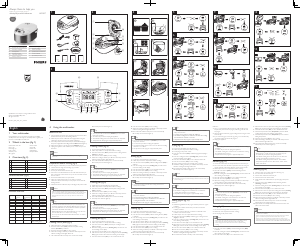
2 What’s in the box (fig. 1)
Multicooker main unit Steam basket
Rice scoop Soup ladle
Measuring cup Power cord
User manual Safety leaet
Warranty card Recipe booklet
Silica gloves
3 Overview (fig. 2)
a
Lid
f
Power socket
b
Inner pot
g
Heating element
c
Lid release button
h
Water level indications
d
Control panel
i
Cooker handle
e
Main body
j
Detachable steam vent cap
Controls overview (g. 3)
k
Cooking functions
p
Hour button
l
Display
q
Minute button
m
Off/Warm button
r
Cooking time button
n
Menu button
s
Temperature button
o
Preset button
t
Start button
Functions overview
Program Temperature
regulation
Temperature
(Approximately)
Time regulation Default time
Rice No 135°C No 40 minutes
Risotto No 135°C No 40 minutes
Pilaf No 135°C No 40 minutes
Jam No 90°C 1-4 hours 2 hours
Boil No 95°C 5-30 minutes 30 minutes
Stew No 90°C 20 minutes-10
hours
1 hour
Fry No 150°C 5-59 minutes 42 minutes
Yogurt No 40°C 6-12 hours 8 hours
Reheat No 90°C 8-25 minutes 25 minutes
Bake Ye s 40, 60, 80, 100,
120, 150, 180°C
20 minutes -2
hours
45 minutes
Steam No 95°C 5 minutes -2
hours
30 minutes
Warm No 73°C
Turn on automaticlly after functions
nished (excluding Yogurt)
4 Using the multicooker
Before rst use
1 Take out all the accessories from the inner pot. Remove the sheet
between the inner pot and the heating element.
2 Clean the parts of the multicooker thoroughly before using the
multicooker for the rst time (see chapter ‘Cleaning’).
3 Add a half pot full of water in the inner pot, close the lid and plug in
the power supply. Select the boiling funtion; the Boil indicator lights up.
4 After water boils for 5 minutes, press the Off/Warm button.
5 Unplug the appliance, wait until the pot has cooled and pour out
the water.
Note
• Make sure all parts are completely dry before you start using the
multicooker.
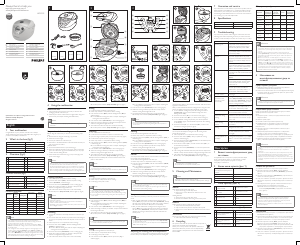
Preparations before cooking (g. 4)
Before using the multicooker, you need to follow below preparations:
1 Measure the rice using the measuring cup provided.
2 Wash the rice thoroughly.
3 Put the pre-washed rice in the inner pot.
4 Add water to the level indicated on the scale inside the inner pot
that corresponds to the number of cups of rice used. Then smooth
the rice surface.
5 Press the lid release button to open the lid.
6 Wipe the outside of the inner pot dry, then put it in the
multicooker. Check if the inner pot is in proper contact with the
heating element.
7 Close the lid of the multicooker, and put the plug in the power socket.
Note
• Make sure that the outside of the inner pot is dry and clean, and that
there is no foreign residue on the heating element or the magnetic switch.
• Do not exceed the volume indicated nor exceed the maximum water
level indicated in the inner pot, as this may cause the multicooker to
overow.
Tip
• The level marked inside the inner pot is just an indication. You
can always adjust the water level for different types of rice and
your own preference. Do not exceed the maximum quantities
indicated on the inside of the inner pot.
• Besides following the water level indications, you may also add
rice and water at 1:1-1.2 ratio for rice cooking.
• For 4 cups of rice, the water level should reach the “4” mark in
the inner pot.
Cooking rice or pasta (g. 5)
1 Follow the steps in “Preparations before cooking”.
2 Press the menu button (Menu) until the rice/pasta cooking
function (Rice/Pasta) is selected.
3 Press the start button (Start) to start cooking.
4 When the cooking is nished, you will hear a few beeps and the
selected cooking function light will be off.
5 The multicooker will be in keep-warm mode automatically.
» The keep-warm indicator lights up.
Tip
• You can press the cancel button (Off/Warm) to turn off the
keep-warm function.
• To switch off, you need to unplug the appliance.
• The default cooking time is 40 minutes, and is not adjustable.
• Temperature for this program is approximately 135°C.
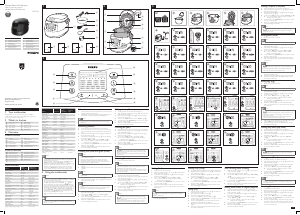
Cooking risotto (g. 6)
1 Put food and ingredients in the inner pot.
2 Follow steps 6 and 7 in “Preparations before cooking”.
3 Press the menu button (Menu) until the risotto cooking function
(Risotto) is selected.
4 Press the start button (Start) to start cooking.
5 When the cooking is nished, you will hear a few beeps and the
selected cooking function light will be off.
6 The multicooker will be in keep-warm mode automatically.
» The keep-warm indicator lights up.
Tip
• You can press the cancel button (Off/Warm) to turn off the
keep-warm function.
• To switch off, you need to unplug the appliance.
• The default cooking time is 40 minutes, and is not adjustable.
• Temperature for this program is approximately 135°C.
Cooking pilaf (g. 6)
1 Whisk the food and ingredients for the pilaf well.
2 Follow steps 6 and 7 in “Preparations before cooking”.
3 Press the menu button (Menu) until the pilaf cooking function
(Pilaf) is selected.
4 Press the start button (Start) to start cooking.
5 When the cooking is nished, you will hear a few beeps and the
selected cooking function light will be off.
6 The multicooker will be in keep-warm mode automatically.
7 The keep-warm indicator lights up.
Tip
• You can press the cancel button (Off/Warm) to turn off the
keep-warm function.
• To switch off, you need to unplug the appliance.
• The default cooking time is 40 minutes, and is not adjustable.
• Temperature for this program is approximately 135°C.
Cooking jam (g. 7)
1 Put food and ingredients in the inner pot.
2 Follow steps 6 and 7 in “Preparations before cooking”.
3 Press the menu button (Menu) until the jam cooking function
(Jam) is selected.
4 Press the cooking time button (Cooking time), and the hour unit
starts ashing on the display.
5 Press the hour button (Hr.) to set a desired hour unit.
6 After the hour unit is set, press the cooking time button (Cooking
time) again, and the minute unit starts ashing on the display.
7 Press the minute button (Min.) to set a desired minute unit.
Tip
• You can press the cancel button (Off/Warm) to turn off the
keep-warm function.
• To switch off, you need to unplug the appliance.
• The default cooking time is 1 hour. You can select the cooking
time between 20 minutes to 10 hours.
• Temperature for this program is approximately 90°C.
Frying (g. 10)
1 Put food and ingredients into the inner pot.
2 Follow step 6 in “Preparations before cooking”.
3 Put the plug in the power socket.
4 Press the menu button (Menu) until the frying function (Fry) is
selected.
5 Press the cooking time button (Cooking time), and the minute
unit starts ashing on the display.
6 Press the minute button (Min.) to set a desired minute unit.
7 Press the start button (Start) to start cooking.
8 During cooking, stir the food constantly using a spatula.
9 When the cooking is nished, you will hear a few beeps and the
selected cooking function light will be off.
10 The multicooker will be in keep-warm mode automatically.
» The keep-warm indicator lights up.
Note
• This function must be operated with the lid opened.
• This function may be not used for deep fry, and the amount of oil may not
exceed marking “2“.
Tip
• To switch off, you need to unplug the appliance.
• The default cooking time is 42 minutes. You can select the
cooking time between 5 to 59 minutes.
• Temperature for this program is approximately 150°C.
Making yogurt (g. 11)
Method 1:
1 Whisk the ingredients for the yogurt well and put them in a glass
container.
2 Put the glass container in the inner pot. Make sure that the
container is sealed.
3 Pour some water in the inner pot. Make sure that half of the
container is immersed in water.
4 Follow steps 6 and 7 in “Preparations before cooking”.
5 Press the menu button (Menu) until the yogurt making function
(Yogurt) is selected.
6 Press the cooking time button (Cooking time), and the hour unit
starts ashing on the display.
7 Press the hour button (Hr.) to set a desired hour unit.
8 After the hour unit is set, press the cooking time button (Cooking
time) again, and the minute unit starts ashing on the display.
9 Press the minute button (Min.) to set a desired minute unit.
10 Press the start button (Start) to start cooking.
11 When the cooking is nished, you will hear a few beeps and the
selected cooking function light will be off.
12 The multicooker will be in standby mode automatically.
8 Press the start button (Start) to start cooking.
9 When the cooking is nished, you will hear a few beeps and the
selected cooking function light will be off.
10 The multicooker will be in keep-warm mode automatically.
» The keep-warm indicator lights up.
Tip
• You can press the cancel button (Off/Warm) to turn off the
keep-warm function.
• To switch off, you need to unplug the appliance.
• The default cooking time is 2 hours. You can select the cooking
time from 1 to 4 hours.
• Temperature for this program is approximately 90°C.
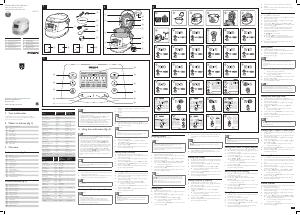
Boiling (g. 8)
1 Put the food and ingredients in the inner pot.
2 Follow steps 6 and 7 in “Preparations before cooking”.
3 Press the menu button (Menu) unitl the boiling function (Boil) is
selected.
4 Press the cooking time button (Cooking time), and the minute
unit starts ashing on the display.
5 Press the minute button (Min.) to set a desired minute unit.
6 Press the start button (Start) to start cooking.
7 When the cooking is nished, you will hear a few beeps and the
selected cooking function light will be off.
8 The multicooker will be in keep-warm mode automatically.
» The keep-warm indicator lights up.
Note
• The cooking time begins once the water is boiling, and the time is
displayed as a countdown.
Tip
• You can press the cancel button (Off/Warm) to turn off the
keep-warm function.
• To switch off, you need to unplug the appliance.
• The default cooking time is 30 minutes. You can select the
cooking time between 5 to 30 minutes.
• Temperature for this program is approximately 95°C.
Stewing (g. 9)
1 Put the food and ingredients in the inner pot.
2 Follow steps 6 and 7 in “Preparations before cooking”.
3 Press the menu button (Menu) until the stewing function (Stew)
is selected.
4 Press the cooking time button (Cooking time), and the hour unit
starts ashing on the display.
5 Press the hour button (Hr.) to set a desired hour unit.
6 After the hour unit is set, press the cooking time button (Cooking
time) again, and the minute unit starts ashing on the display.
7 Press the minute button (Min.) to set a desired minute unit.
8 Press the start button (Start) to start cooking.
9 When the cooking is nished, you will hear a few beeps and the
selected cooking function light will be off.
10 The multicooker will be in keep-warm mode automatically.
» The keep-warm indicator lights up.
Method 2:
1 Pour 1 L of pasteurized milk into the pot (milk should be room
temperature) and add natural yogurt (180-200 g). Stir the milk
and yogurt.
2 Close the lid and select the yogurt-making function. Program starts
automatically.
3 If you want fruit yogurt, add fruits (eg. 200 g of cut strawberries)
30 minutes before the end of the program.
4 Unplug the appliance.
Tip
• You can unplug the multicooker immediately after the cooking
is nished.
• To switch off, you need to unplug the appliance.
• The default cooking time is 8 hours. You can select the cooking
time between 6 to 12 hours.
• Temperature for this program is approximately 40°C.
Reheating (g. 12)
1 Loosen the cooled dish and evenly distribute it in the inner pot.
2 Pour some water onto the dish to prevent it from becoming too
dry. The quantity of the water depends on the amount of dish.
3 Follow steps 6 and 7 in “Preparations before cooking”.
4 Press the menu button (Menu) until the reheating function
(Reheat) is selected.
5 Press the cooking time button (Cooking time), and the minute unit
starts ashing on the display.
6 Press the minute button (Min.) to set a desired minute unit.
7 Press the start button (Start) to start cooking.
8 When the cooking process is nished, you will hear a few beeps
and the selected cooking function light will be off.
9 The multicooker will be in keep-warm mode automatically.
» The keep-warm indicator lights up.
Tip
• You can press the cancel button (Off/Warm) to turn off the
keep-warm function.
• To switch off, you need to unplug the appliance.
• The default cooking time is 25 minutes. You can select the
cooking time between 8 to 25 minutes..
• Temperature for this program is approximately 90°C.
Baking (g. 13)
1 Put the food and ingredients in the inner pot.
2 Follow step 6 in “Preparations before cooking”.
3 Put the plug in the power socket.
Note
• When baking cake, keep the lid closed during cooking. Baking cake at
130°C and by 45 minutes usually delivers best cooking result.
• When baking food other than cake, the lid must be opened during
cooking.
1 Press the menu button (Menu) until the baking function (Bake)
is selected.
2 Press the cooking time button (Cooking time), and the hour unit
starts ashing on the display.
3 Press the hour button (Hr.) to set a desired hour unit.
4 After the hour unit is set, press the cooking time button (Cooking
time) again, and the minute unit starts ashing on the display.
5 Press the minute button (Min.) to set a desired minute unit.
6 Press the temperature button (Temperature), and the default
cooking temperature starts ashing on the display.
7 Press the temperature button (Temperature) to set a desired
baking temperature.
8 Press the start button (Start) to start cooking.
9 When the baking is nished, you will hear a few beeps and the
selected function light will be off.
10 The multicooker will be in keep-warm mode automatically.
» The keep-warm indicator lights up.
Tip
• When removing the inner pot from the multicooker, use a
kitchen glove or a cloth, as the inner pot will be very hot.
• To switch off, you need to unplug the appliance.
• The default cooking time is 45 minutes. You can select the
cooking time between 20 minutes to 2 hours.
• The default cooking temperature is 60°C. The available
temperature options are 40°C, 60°C, 80°C, 100°C, 120°C,
150°C, and 180°C.
Steaming (g. 14)
1 Measure a few cups of water with the measuring cup.
2 Pour the water into the inner pot.
3 Put the steam basket into the inner pot.
4 Put the food into the steam basket.
5 Close the lid of the multicooker, and put the plug in the power
socket.
6 Press the menu button (Menu) until the steaming function
(Steaming) is selected.
7 Press the cooking time button (Cooking time), and the hour unit
starts ashing on the display.
8 Press the hour button (Hr.) to set a desired hour unit.
9 After the hour unit is set, press the cooking time button (Cooking
time) again, and the minute unit starts ashing on the display.
10 Press the minute button (Min.) to set a desired minute unit.
11 Press the start button (Start) to start cooking.
12 When the steaming is nished, you will hear a few beeps and the
selected cooking function light will be off.
13 The multicooker will be in keep-warm mode automatically.
» The keep-warm indicator lights up.
14 Open the lid and carefully take out the steamed food from the
plate or the steam basket.
Note
• The cooking time begins once the water is boiling, and the time is
displayed as a countdown.
• When removing the steamed food from the steam basket, use a kitchen
glove or a cloth, as the plate and steam basket will be very hot.
• When you cook rice and steam food at the same time, make sure you
measure out an amount of rice that leaves enough room for the steam tray.
• Water level should be between 2 and 4 water level marked inside inner pot.
Fry
Specifications are subject to change without notice
© 2013 Koninklijke Philips N.V.
All rights reserved.
HD3037_UM_CEE_V2.0_130904
HD3037
Register your product and get support at
www.philips.com/welcome
Always there to help you
Question?
Contact
Philips
www.philips.com/welcome
Safety leaflet
www.philips.com/welcome
User manual
www.philips.com/welcome
Warranty
4
1
Rice/ Pasta
Reheat
Bake Steam
Boil
Stew
Fry
Yogurt
Risotto
Pilaf
Jam
3
2 5
6
7
8
9
12
11
10
13
a
b
d
e
f
g
h
j
c
i
kl
m
n
o p q r
s
t
Rice/ Pasta
Jam
Bake
14
15
Rice/ Pasta
Pilaf
Jam
Boil
Stew
EN User manual
BG Ръководство за потребителя
CS Příručka pro uživatele
ET Kasutusjuhend
HR Korisnički priručnik
HU Felhasználói kézikönyv
LT Vartotojo vadovas
LV Lietotāja rokasgrāmata
PL Instrukcja obsługi
RO Manual de utilizare
RU Руководство пользователя
SK Príručka užívateľa
SL Uporabniški priročnik
Pilaf
Reheat
www.philips.com/welcome
Recipe


Dołącz do dyskusji na temat tego produktu
Tutaj możesz podzielić się swoją opinią na temat Philips HD3037 Kuchenka ryżu. Jeśli masz pytanie, najpierw dokładnie przeczytaj instrukcję. Zapytanie o instrukcję można złożyć za pomocą naszego formularza kontaktowego.