
• 1,400 Lumens Max Output
• White Light + Red Light
• Built-in 4,000mAh 21700 Li-ion Battery
Features
Specifications
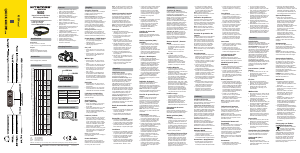
Technical Data
Accessories
Power Indication
Charging Function
Power Button / Mode Button
Sensor Protection Function
SYSMAX Innovations Co., Ltd.
TEL: +86-20-83862000
FAX: +86-20-83882723
Web: www.nitecore.com
Address: Unit 6355, 5/F, No. 1021 Gaopu Road, Tianhe District, Guangzhou, 510653, Guangdong, China
Please nd us on facebook : NITECORE Flashlight
Made in China
NU23045023
• Superior performance high capacity
USB-C rechargeable headlamp
• Max output of 1,400 lumens
• Red light illumination designed for
preserving the night vision
• Utilizes a unibody optical lens system
with various facets for reecting a
uniform and soft light
• Built-in 4,000mAh Li-ion battery
• Built-in intelligent Li-ion battery
charging circuit with a USB-C charging
port (5V⎓2A)
• Designed with two buttons dierent in
shape and touch, oering easy one-
handed operation
• 5 brightness levels, 2 light sources, and
3 special modes available
• Designed with 4 power indicators to
inform the remaining battery power
• Made from durable PC material with an
aluminum alloy front housing
• Compact and lightweight
• Impact resistant to 2 meters
• Waterproof and dustproof rating in
accordance with IP68
USB-C Charging Cable, Headband
Dimensions:
83.4mm x 48.5mm x 43.9mm
(3.28" x 1.91" x 1.73") (Bracket Included)
Weight:
146g (5.15 oz)
(Bracket and Headband Included)
122g (4.30 oz) (Bracket Included)
Status of
Indicators
Power Level
4 Constant-on Approx. 100%
3 Constant-on Approx. 75%
2 Constant-on Approx. 50%
1 Constant-on
Approx. 25% (Please
charge the product as
soon as possible)
(English)
(Deutsch)
(Francais)
NU50 Manual
White Light Red Light White Light
TURBO HIGH MID LOW ULTRALOW CONSTANT-ON SLOW FLASHING SOS BEACON
Brightness
1,400
Lumens
600
Lumens
300
Lumens
100
Lumens
8
Lumens
5
Lumens
10
Lumens
1,400
Lumens
1,400
Lumens
Runtime – 11h 16h 31h 180h 100h 100h ─ ─
Beam Distance 130m 77m 53m 30m 8m 5m – ─ ─
Peak Beam Intensity 3,800cd 1,500cd 700cd 230cd 17cd 7cd – ─ ─
Impact Resistance 2m
Water Resistance IP68, 2m (Waterproof and Submersible)
Note: The stated data is measured by using the built-in Li-ion battery (3.6V 4,000mAh) under laboratory conditions. The data may
vary in real world use due to dierent environmental conditions.
Superior Performance High Capacity
USB-C Rechargeable Headlamp
(Español)
Charging Function
The NU50 is equipped with an intelligent
charging system. Please charge the
headlamp before rst use.
Power Connection: As illustrated,
rotate the USB protection cover clockwise
and use the USB cable to connect an
external power supply (e.g. a USB
adapter or other USB charging devices) to
the charging port to begin the charging
process. The charging time is approx.
2.5h (charged via the 5V/2A adapter).
When fully charged, the standby time is
approx. 12 months.
Charging Indication: During the
charging process, 4 power indicators on
the bottom will ash to inform the user.
When the battery is fully charged, 4 power
indicators will become steadily turned on.
Power Button / MODE Button
•
The Power Button is used for turning
on / o the light and adjusting
brightness levels.
•
The MODE Button is designed for
switching light sources.
On / Off
•
When the light is o, long press the
Power Button for 1 second to access
LOW.
•
When the light is on, long press the
Power Button or MODE Button for 1
second to turn it o.
White Light
•
When the light is o, long press the
Power Button for 1 second to access
LOW.
•
When the light is o, double press the
Power Button to access ULTRALOW.
•
When the light is on, short press the
Power Button to cycle through the
following brightness levels: LOW –
MID – HIGH.
•
When the light is on, double press the
Power Button to access TURBO. Short
press the Power Button again to return to
the previous status, or it will automatically
return to the previous status if there is no
operation in 30 seconds.
Red Light
•
When the light is o, long press the
MODE Button for 1 second to turn on
the red light.
•
When the red light is on, short press
the Power Button to switch between
CONSTANT-ON and SLOW FLASHING.
Light Sources Switching
When the light is on, short press the
MODE Button to switch between white
light and red light.
Special Modes
(SOS / BEACON)
•
When the headlamp is in any status,
double press the MODE Button to
access SOS.
•
When either special mode is on, short
press the Power Button to switch
between SOS and BEACON. Double
press the MODE Button again to return
to the previous status.
Lockout / Unlock
•
When the headlamp is o, long press
both buttons for 2 seconds until the
light ashes 3 times to indicate access
to the Lockout Mode. In the Lockout
Mode, any brightness levels or special
modes are unavailable, and the light
will ash once to indicate this status
when pressing either button.
•
When in the Lockout Mode, long press
both buttons for 2 seconds again until
the ULTRALOW is on to indicate the
unlock status.
Note: The headlamp will be
automatically unlocked when charging in
the Lockout Mode.
Power Indication
When the light is o, short press the
MODE Button, the corresponding power
indicators on the bottom will light up in
turn and go o after 2 seconds.
Función de carga
La NU50 está equipada con un sistema
de carga inteligente. Por favor cargue la
linterna antes del primer uso.
Conexión a la fuente de carga: Como
se muestra en la imagen, gire la cubierta
de protección del puerto USB en sentido
de las manecillas del reloj y utilice el
cable USB para conectar a una fuente de
alimentación externa (Por ejemplo, un
adaptador USB, u otros dispositivos de
carga USB) al puerto para iniciar el proceso
de carga. El tiempo aproximado de carga es
de aproximadamente 2.5 horas. (cargando
con un adaptador 5V/2A). Cuando está
completamente cargada, el tiempo en
espera es de aproximadamente 12 meses.
Indicador de carga: Durante el
proceso de carga, 4 indicadores en la
parte inferior parpadearán para informar
al usuario. Cuando la batería esté
completamente cargada, los 4 indicadores
permanecerán encendidos
Botón de encendido / Botón
MODE
•
El botón de encendido es utilizado para
encender / apagar la luz y ajustar los
niveles de intensidad.
•
El botón MODE está diseñado para
cambiar las fuentes de iluminación.
Encendido / Apagado
•
Cuando la luz está apagada, mantenga
presionado el Botón de encendido por
1 segundo para acceder al modo BAJO.
•
Cuando la luz está encendida, mantenga
presionado el Botón de encendido o el
Botón MODE por 1 segundo para apagar.
Luz blanca
•
Cuando la luz está apagada, mantenga
presionado el Botón de encendido por
1 segundo para acceder al modo BAJO.
•
Cuando la luz está apagada, presione
el Botón de encendido 2 veces para
acceder al modo ULTRABAJO.
•
Cuando la luz está encendida, presione
ligeramente el Botón de encendido para
cambiar entre los siguientes niveles de
intensidad: BAJO – MEDIO – ALTO.
Note: The battery should be recharged
when the light appears to be dim, or the
headlamp becomes unresponsive due to
low power.
Sensor Protection Function
When the built-in optical sensor detects
an obstruction ahead, the brightness will
automatically lower to the LOW Level
(100 Lumens). The headlamp will return
to its previous brightness level once
the obstruction has been removed. The
sensitivity of the sensor may vary due to
dierent colors and materials of obstructions.
Note: This function is not available when
the red light, SOS, or BEACON is on.
Warnings
1. CAUTION! Possible dangerous
radiation! Don't look into the light! May
be dangerous for your eyes.
2. Please recharge the product every
6 months when left unused for a
prolonged time.
3. When the product is kept in the
backpack, please turn on the Lockout
Mode to prevent accidental activation.
4. DO NOT disassemble or modify the
headlamp as doing so will cause
damage to it and render the product
warranty invalid. Please refer to the
warranty section in the manual for
complete warranty information.
5. Dispose of the device/batteries in
accordance with applicable local laws
and regulations.
6. DO NOT cover the headlamp or put it
close to other objects when turned on
to avoid accidents.
7. The product will produce massive heat
when it runs for a prolonged period.
Please pay attention to safety when
using it to prevent scalds.
•
Cuando la luz está encendida, presione
el Botón de encendido 2 veces para
acceder al modo TURBO. Presione
ligeramente el Botón de encendido
nuevamente para regresar al estado
anterior, o automáticamente regresará
al estado anterior si no hay ninguna
operación en 30 segundos.
Luz roja
•
Cuando la luz está apagada, mantenga
presionado el Botón MODE por 1
segundo para encender la luz roja.
•
Cuando la luz roja está encendida,
presione ligeramente el Botón
de encendido para cambiar entre
ENCENDIDO CONSTANTE y
PARPADEO LENTO.
Cambio de fuente de
iluminación
Cuando la luz está encendida, presione
ligeramente el Botón MODE para cambiar
entre luz blanca y luz roja.
Modos especiales (SOS /
BALIZA)
•
Cuando la linterna está en cualquier
estado, presione dos veces el Botón
MODE para acceder al modo SOS.
•
Cuando cualquiera de los modos
especiales está activado, presione
ligeramente el Botón de encendido para
cambiar entre SOS y BALIZA. Presione
dos veces el Botón MODE nuevamente
para regresar al estado anterior.
Bloqueo / Desbloqueo
•
Cuando la linterna está apagada,
mantenga presionados ambos botones
por 2 segundos hasta que la luz
parpadee 3 veces para indicar el acceso
al Modo de Bloqueo. En el Modo de
Bloqueo, no estará disponible ninguna
intensidad o modo especial, y la luz
parpadeará una vez para indicar este
estado al presionar cualquier botón.
•
Cuando esté en el Modo de Bloqueo,
mantenga presionados ambos botones
por 2 segundos nuevamente hasta que
el modo ULTRABAJO encienda para
indicar el estado de desbloqueo.
Nota: La linterna se desbloqueará
automáticamente al cargarla en el Modo
de Bloqueo.
Indicador de batería
Cuando la luz está apagada, presione
ligeramente el Botón MODE, los
indicadores de carga correspondientes en
la parte inferior encenderán sucesivamente
y se apagarán después de 2 segundos.
Nota: La batería debe ser recargada
cuando la intensidad luzca débil o la linterna
no responda debido a la baja potencia.
Función de protección por
sensor
Cuando el sensor óptico integrado
detecta un obstáculo enfrente, la
intensidad se reducirá al nivel BAJO (100
lúmenes). La linterna automáticamente
regresará a su intensidad anterior una
vez que la obstrucción sea removida.
La sensibilidad del sensor puede variar
dependiendo de los diferentes colores y
materiales de los obstáculos.
Nota: Esta función no está disponible
cuando la luz roja, SOS o BALIZA están
encendidos.
Advertencias
1. ¡PRECAUCIÓN! ¡Posible radiación
lumínica peligrosa! ¡No mire directo a la
luz! Puede ser peligroso para sus ojos.
2. Por favor recargue el producto cada
6 meses cuando no sea utilizado por
periodos prolongados de tiempo.
3. Cuando deje el producto en una mochila,
por favor active el Modo de Bloqueo para
prevenir activación accidental.
4. NO desarme o modique la linterna,
hacerlo causará daño al mismo e
invalidará la garantía. Por favor consulte
la sección de garantía en el manual para
información completa de la misma.
5. Elimine el dispositivo/baterías de
acuerdo con las leyes y reglamentos
locales aplicables.
6. NO cubra la linterna ni lo coloque
cerca de otros objetos cuando esté
encendido para evitar accidentes.
7. El producto producirá un calor masivo
cuando funcione durante un período
prolongado. Por favor, preste atención
a la seguridad al usarlo para evitar
quemaduras.
Fonction de charge :
La NU50 est équipée d'un système de
charge intelligent. Veuillez charger la lampe
frontale avant la première utilisation.
Connexion de l’alimentation : Comme
illustré, tourner le couvercle de protection
USB dans le sens des aiguilles d'une
montre et utiliser le câble USB pour
connecter une alimentation externe (par
exemple, un adaptateur USB ou d'autres
dispositifs de charge USB) au port de
charge pour commencer le processus de
charge. Le temps de charge est d'environ
2,5 heures (charge via l'adaptateur 5V/2A).
Lorsqu'elle est entièrement chargée,
l'autonomie en veille est d'environ 12 mois.
Indication de charge : Pendant le
processus de charge, 4 indicateurs de
puissance sur le dessous de la lampe
clignotent pour informer l'utilisateur.
Lorsque la batterie est complètement
chargée, les 4 indicateurs d'alimentation
s'allument en continu.
Bouton ON/OFF / Bouton
MODE
•
Le bouton d’alimentation ON-OFF
est utilisé pour allumer / éteindre
la lumière et régler les niveaux de
luminosité.
•
Le bouton MODE est conçu pour
changer les sources lumineuses.
On / Off
•
Lorsque la lumière est éteinte,
appuyez longuement sur le bouton
d'alimentation pendant 1 seconde pour
accéder au mode LOW.
•
Lorsque la lumière est allumée,
appuyez longuement sur le bouton
d'alimentation ou le bouton MODE
pendant 1 seconde pour l'éteindre.
Lumière Blanche
•
Lorsque la lumière est éteinte,
appuyez longuement sur le bouton
d'alimentation pendant 1 seconde pour
accéder au mode LOW.
•
Lorsque la lumière est éteinte, appuyez
deux fois sur le bouton marche/arrêt
pour accéder au mode ULTRALOW.
•
Lorsque la lumière est allumée, appuyez
brièvement sur le bouton marche/
arrêt pour faire déler les niveaux de
luminosité suivants : LOW - MID - HIGH.
•
Lorsque la lumière est allumée, appuyez
deux fois sur le bouton Marche/Arrêt
pour accéder au mode TURBO. Appuyez
brièvement sur le bouton Marche/
Arrêt pour revenir à l'état précédent.
La lampe reviendra automatiquement
à l'état précédent si aucune opération
n'est eectuée dans les 30 secondes.
Lumière rouge
•
Lorsque la lumière est éteinte,
appuyez longuement sur le bouton
MODE pendant 1 seconde pour
allumer la lumière rouge.
•
Lorsque la lumière rouge est allumée,
appuyez brièvement sur le bouton
Marche/Arrêt pour basculer entre la
lumière constante et le clignotement lent.
Changement de source
lumineuse
Lorsque la lumière est allumée, appuyez
brièvement sur le bouton MODE pour passer
de la lumière blanche à la lumière rouge.
Modes spéciaux (SOS /
BALISE)
•
Lorsque la lampe frontale est dans
n'importe quel état, appuyez deux fois
sur le bouton MODE pour accéder au
mode SOS.
•
Lorsque l'un des deux modes spéciaux
est activé, appuyez brièvement sur le
bouton d'alimentation pour passer de
SOS à BALISE. Appuyez à nouveau
deux fois sur le bouton MODE pour
revenir à l'état précédent.
Verrouillage/Déverrouillage
•
Lorsque la lampe frontale est éteinte,
appuyez longuement sur les deux
boutons pendant 2 secondes jusqu'à
ce que le voyant clignote 3 fois pour
indiquer l'accès au mode verrouillage.
En mode verrouillage, aucun niveau
de luminosité ou mode spécial n’est
disponible, et le voyant clignote une
fois pour indiquer cet état lorsque vous
appuyez sur l'un des boutons.
•
En mode de verrouillage, appuyez
longuement sur les deux boutons
pendant 2 secondes jusqu’à ce que
le mode ULTRALOW soit activé pour
indiquer l’état de déverrouillage.
Note: La lampe frontale sera
automatiquement déverrouillée lors de la
charge en mode verrouillage.
Indication de puissance
Lorsque la lumière est éteinte, appuyez
brièvement sur le bouton MODE. Les
indicateurs d'alimentation correspondants
sur le dessous de la lampe s'allument tour
à tour et s'éteignent après 2 secondes.
Note: La batterie doit être rechargée
lorsque la sortie semble faible ou que la
lampe frontale ne répond plus en raison
d’une faible puissance.
Fonction de protection du
capteur
Lorsque le capteur optique intégré détecte
un obstacle devant vous, la luminosité
baisse automatiquement au niveau LOW
(100 Lumens). La lampe frontale revient
à son niveau de luminosité précédent dès
que l'obstacle est écarté. La sensibilité
du capteur peut varier en fonction de la
couleur et du matériau des obstacles.
Note: Cette fonction n'est pas disponible
lorsque la lumière rouge, le mode SOS ou
BALISE est allumé.
Avertissements
1. ATTENTION ! Radiations dangereuses
possibles ! Ne regardez pas la lumière
directement dans les yeux ! Peut
causer des troubles oculaires.
2. Veuillez recharger le produit tous les 6
mois lorsqu’il n’est pas utilisé pendant
une période prolongée.
3. Lorsque le produit est conservé
dans un sac à dos, veuillez activer le
mode de verrouillage pour éviter tout
fonctionnement accidentel.
4. NE PAS démonter ou modier la lampe
frontale car cela l’endommagerait et
rendrait la garantie du produit invalide.
Veuillez vous référer à la section
garantie du manuel pour obtenir des
informations complètes sur la garantie.
5. Jetez l’appareil/les piles conformément
aux lois et réglementations locales
applicables.
6. NE couvrez PAS la lampe frontale ou
ne la placez pas à proximité d'autres
objets inammables lorsqu'elle est
allumée pour éviter les accidents.
7. Le produit produira une chaleur
importante lors d'une utilisation
prolongée. Soyez vigilants lors de son
utilisation pour éviter les brûlures.
(Italiano)
Funzione di ricarica
La NU50 è dotata di un sistema di
ricarica intelligente. Si prega di caricare la
lampada prima del primo utilizzo.
Collegamento all'alimentazione: Come
illustrato, ruotare il coperchio di protezione
USB in senso orario e utilizzare il cavo USB
per collegare un alimentatore esterno (ad
esempio un adattatore USB o altri dispositivi
di ricarica USB) alla porta di ricarica per
avviare il processo. Il tempo di ricarica è di
circa 2,5 ore (con un adattatore da 5V/2A).
Quando è completamente carica, il tempo
di standby è di circa 12 mesi.
Indicazione di carica: Durante il
processo di carica, i 4 indicatori di
alimentazione sul fondo lampeggiano per
informare l'utente. Quando la batteria è
completamente carica, i 4 indicatori di
alimentazione restano accesi in modo sso.
Pulsante di accensione /
Pulsante MODE
•
Il pulsante di accensione serve ad
accendere/spegnere la torcia ed a
regolare i livelli di luminosità.
•
Il pulsante MODE è progettato per la
commutazione delle sorgenti luminose.
Accensione e Spegnimento
•
Quando la torcia è spenta, premere a
lungo il pulsante di accensione per 1
secondo per accedere alla potenza LOW.
•
Quando la torcia è accesa, premere
a lungo il pulsante di accensione o
il pulsante MODE per 1 secondo per
spegnerla.
Luce bianca
•
Quando la torcia è spenta, premere a
lungo il pulsante di accensione per 1
secondo per accedere alla potenza LOW.
•
Quando la torcia è spenta, premere
due volte il pulsante di accensione per
accedere alla potenza ULTRALOW.
•
Quando la torcia è accesa, premere
brevemente il pulsante di accensione
per scorrere tra i seguenti livelli di
luminosità: LOW - MID – HIGH.
•
Quando la torcia è accesa, premere
due volte il pulsante di accensione
per accedere alla modalità TURBO.
Premere di nuovo brevemente il
pulsante di accensione per tornare
allo stato precedente, oppure la torcia
tornerà automaticamente allo stato
precedente se non viene eettuata
alcuna pressione entro 30 secondi.
Luce rossa
•
Quando la torcia è spenta, premere a
lungo il pulsante MODE per 1 secondo
per accendere la luce rossa.
•
Quando la luce rossa è accesa,
premere brevemente il pulsante di
accensione per passare dall'accensione
costante al lampeggiamento lento.
Commutazione delle
sorgenti luminose
Quando la torcia è accesa, premere
brevemente il pulsante MODE per passare
dalla luce bianca alla luce rossa e viceversa.
Modalità speciali (SOS /
BEACON)
•
Quando la lampada frontale è in qualsiasi
stato, premere due volte il pulsante
MODE per accedere alla modalità SOS.
•
Quando una delle due modalità speciali
è attiva, premere brevemente il
pulsante di accensione per passare da
SOS a BEACON. Premere nuovamente
due volte il pulsante MODE per tornare
allo stato precedente.
Blocco/Sblocco
•
Quando la lampada frontale è spenta,
premere a lungo entrambi i pulsanti per
2 secondi nché la luce non lampeggia 3
volte per indicare l'accesso alla modalità
Blocco. In modalità Blocco tutti i livelli
di luminosità o le modalità speciali non
sono disponibili e la luce lampeggia una
volta per indicare questo stato quando si
preme uno dei due pulsanti.
•
Quando si è in modalità Blocco,
premere di nuovo a lungo entrambi
i pulsanti per 2 secondi nché
l'indicatore ULTRALOW non si accende
per indicare lo stato di Sblocco.
Nota: la lampada frontale si sblocca
automaticamente quando si carica in
modalità Blocco.
Indicazione di potenza
Quando la torcia è spenta, premere
brevemente il pulsante MODE: gli
indicatori di alimentazione corrispondenti
sul fondo si accendono a turno e si
spengono dopo 2 secondi.
Nota: la batteria deve essere ricaricata
quando la luce sembra essere oca o la
lampada frontale non risponde a causa
della bassa potenza.
Funzione del Sensore di
Prossimità
Quando il sensore ottico incorporato rileva
un ostacolo davanti a sé, la luminosità
si abbassa automaticamente al livello
BASSO (100 Lumen). Una volta rimosso
l'ostacolo, il proiettore tornerà al livello di
luminosità precedente. La sensibilità del
sensore può variare a causa dei diversi
colori e materiali degli ostacoli.
Nota: questa funzione non è disponibile
quando la luce rossa, l'SOS o il BEACON
sono accesi.
Avvertenze
1. ATTENZIONE! Possibili radiazioni
pericolose! Non guardare la luce! Può
essere pericoloso per gli occhi.
2. In caso di inutilizzo prolungato,
ricaricare il prodotto ogni 6 mesi.
3. Quando il prodotto viene tenuto nello
zaino, attivare la modalità di blocco per
evitare un'attivazione accidentale.
4. NON smontare o modicare il
proiettore per non danneggiarlo e
invalidare la garanzia del prodotto. Per
informazioni complete sulla garanzia,
consultare la sezione del manuale
dedicata alla garanzia.
5. Smaltire il dispositivo/batterie in
conformità alle leggi e alle normative
locali vigenti.
6. NON COPRIRE la torcia frontale o non
tenerla troppo vicina ad altri oggetti,
mentre è accesa, per evitare incidenti.
7. Il prodotto produce elevato calore
quando resta acceso per un periodo di
tempo prolungato. In fase di utilizzo vi
raccomandiamo di prestare adeguata
attenzione per prevenire scottature.
Ladefunktion
Die NU50 ist mit einem intelligenten
Ladesystem ausgestattet. Bitte laden Sie die
Stirnlampe vor dem ersten Gebrauch auf.
Stromanschluss:Drehen Sie die USB-
Schutzabdeckung - wie abgebildet - im
Uhrzeigersinn und verwenden Sie das USB-
Kabel, um eine externe Stromversorgung
(z. B. einen USB-Adapter, einen Computer
oder andere USB-Ladegeräte) an den
Ladeanschluss anzuschließen und den
Ladevorgang zu starten. Die Ladezeit
beträgt ca. 2,5h (aufgeladen über den
5V/2A-Adapter). Bei voller Ladung beträgt
die Standby-Zeit ca. 12 Monate.
Anzeige des Ladevorgangs: Während
des Ladevorgangs blinken 4 LEDs auf der
Unterseite. Wenn der Akku vollständig
aufgeladen ist, leuchten die 4 LEDs
dauerhaft.
Power Button / MODE
Button
● Die Power-Taste dient zum Ein- und
Ausschalten des Lichts und zum
Einstellen der Helligkeit.
● Die MODE-Taste steuert das Umschalten
der Lichtquelle.
Ein/Aus
● Wenn das Licht ausgeschaltet ist,
halten Sie die Power-Taste 1 Sek lang
gedrückt, um auf „LOW“ zuzugreifen.
● Wenn das Licht eingeschaltet ist,
drücken Sie die Power-Taste oder
die MODE-Taste 1 Sek lang, um es
auszuschalten.
Weißes Licht
● Wenn das Licht aus ist, drücken Sie die
Power-Taste 1 Sek lang, um auf „LOW“
zuzugreifen.
● Wenn das Licht aus ist, drücken Sie
zweimal auf die Power-Taste, um auf
„ULTRALOW“ umzuschalten.
● Wenn das Licht eingeschaltet ist,
drücken Sie kurz auf die Power-Taste, um
zwischen den folgenden Helligkeitsstufen
zu wechseln: „LOW“ – „MID“ – „HIGH“.
● Wenn das Licht eingeschaltet ist,
drücken Sie zweimal auf den Power-
Taste, um zu „TURBO“ zu gelangen.
Drücken Sie erneut kurz auf die
Power-Taste, um zum vorherigen
Status zurückzukehren, oder Sie
kehren automatisch in den vorherigen
Status zurück, wenn innerhalb von 30
Sekunden keine Bedienung erfolgt.
Rotes Licht
● Wenn das Licht aus ist, halten Sie die
MODE-Taste 1 Sekunde lang gedrückt,
um das rote Licht einzuschalten.
● Wenn das rote Licht an ist, drücken
Sie kurz die Power-Taste, um zwischen
„Dauerlicht“ und „langsames Blinken“
zu wechseln.
Umschalten der Lichtquellen
Wenn das Licht eingeschaltet ist, drücken
Sie kurz die MODE-Taste, um zwischen
weißem und rotem Licht zu wechseln.
Sondermodi (SOS /
BEACON)
● Wenn sich die lampe in einem
beliebigen Status bendet, drücken Sie
zweimal die MODE-Taste, um den SOS-
Mode aufzurufen.
● Wenn einer der beiden Sondermodi
eingeschaltet ist, drücken Sie kurz auf
die Power-Taste, um zwischen „SOS“ und
„BEACON“ umzuschalten. Drücken Sie
erneut doppelt auf die MODE-Taste, um
zum vorherigen Status zurückzukehren.
Sperren/Entsperren
● Halten Sie bei ausgeschaltetem
Scheinwerfer beide Tasten 2 Sekunden
lang gedrückt, bis die Lampe dreimal
blinkt, um den Zugri auf den Sperr-
Mode anzuzeigen. Im Sperr-Mode
sind keine Helligkeitsstufen oder
Sondermodi verfügbar, und die Leuchte
blinkt einmal, um diesen Status
anzuzeigen, wenn eine der beiden
Tasten gedrückt wird.
● Wenn Sie sich im Sperr-Mode benden,
halten Sie beide Tasten erneut 2
Sekunden lang gedrückt, bis der
ULTRALOW-Mode leuchtet, um den
Entsperrungsstatus anzuzeigen.
Hinweis: Der Scheinwerfer wird beim
Auaden im Sperr-Mode automatisch
entriegelt.
Stromanzeige
Wenn das Licht ausgeschaltet ist,
drücken Sie kurz die MODE-Taste. Die
entsprechenden LEDs an der Unterseite
leuchten auf und erlöschen nach 2
Sekunden.
Hinweis: Der Akku sollte aufgeladen
werden, wenn die Lichtleistung nachlässt
oder die Stirnlampe nicht mehr reagiert.
Sensorschutz-Funktion
Wenn der eingebaute optische Sensor
ein Hindernis vor sich erkennt, wird
die Helligkeit automatisch auf die Stufe
„LOW“ (100 Lumen) reduziert. Der
Scheinwerfer kehrt zu seiner vorherigen
Helligkeitsstufe zurück, sobald das
Hindernis beseitigt ist. Die Empndlichkeit
des Sensors kann aufgrund von
unterschiedlichen Farben und Materialien
der Hindernisse variieren.
HINWEIS: Diese Funktion ist nicht
verfügbar, wenn das rote Licht, SOS oder
BEACON eingeschaltet ist.
WARNUNG
1. VORSICHT! Gefährliche Strahlung
möglich! Nicht direkt in das Licht
schauen! Dies kann gefährlich für Ihre
Augen sein.
2. Bitte laden Sie das Produkt alle 6
Monate auf, wenn es längere Zeit nicht
benutzt wird.
3. Wenn das Produkt im Rucksack
aufbewahrt wird, aktivieren Sie
bitte den Sperr-Mode, um eine
versehentliche Aktivierung zu
verhindern.
4. Zerlegen oder modizieren Sie den
Scheinwerfer NICHT, da dies zu
Schäden führt und die Produktgarantie
erlischt. Vollständige Informationen
zur Garantie nden Sie im Abschnitt
"Garantiebedingungen".
5. Entsorgen Sie das Gerät/die Batterien
in Übereinstimmung mit den geltenden
örtlichen Gesetzen und Vorschriften.
6. Um Unfälle zu vermeiden, darf der
Scheinwerfer beim Einschalten NICHT
abgedeckt oder in die Nähe anderer
Gegenstände gebracht werden.
7. Das Produkt erzeugt bei längerem
Betrieb große Hitze. Bitte achten Sie
bei der Verwendung auf die Sicherheit,
um Verbrühungen/Verbrennungen zu
vermeiden.
Entsorgung von Elektro-
und Elektronikgeräten
Die durchgestrichene Mülltonne
bedeutet, dass Sie gesetzlich
verpichtet sind, diese Geräte
einer vom unsortierten
Siedlungsabfall getrennten Erfassung
zuzuführen. Die Entsorgung über die
Restmülltonne oder die gelbe Tonne
ist untersagt. Enthalten die Produkte
Batterien oder Akkus, die nicht fest
verbaut sind, müssen diese vor der
Entsorgung entnommen und getrennt als
Batterie entsorgt werden.
NU50

Dołącz do dyskusji na temat tego produktu
Tutaj możesz podzielić się swoją opinią na temat Nitecore NU50 Latarka. Jeśli masz pytanie, najpierw dokładnie przeczytaj instrukcję. Zapytanie o instrukcję można złożyć za pomocą naszego formularza kontaktowego.