
Charging Function
The NE20 is equipped with an intelligent charging system.
Please place the earbuds into the charging case correctly for
charging. Use the USB cable to connect an external power
supply (e.g. a USB adapter or other USB charging devices)
to the USB port of the charging case to begin the charging
process.
Charging the Earbuds:
• When the earbuds are in charging, the blue Power Indicators
will steadily turn on while both Earbud Indicators will show
red steadily.
• When the earbuds are fully charged, they will cease the
charging process automatically, and both Earbud Indicators
and Power Indicators will turn o to inform the user.
• The charging time of the earbuds is approx. 1 hour.
Charging the Charging Case:
• When the charging case is in charging, the blue Power
Indicators will ash slowly to inform the user.
• When the charging case is fully charged, it will cease the
charging process automatically and 4 blue Power Indicators
will become steadily turned on to inform the user.
• The charging time of the charging case is approx. 2 hours 30
minutes. (Charged via the 5V/1A adapter)
Accessory Installation
Please install the ear n, lanyard and ear tip in the sequence
shown.
Note: The ear n and ear tip are specially designed for the
NE20. Please select the proper size to t your ear canal.
DO NOT use the NE20 directly without ear ns and ear tips
installed.
Wearing Instructions
1. Please remove the insulation lm on the earbud before the
rst use.
2. Keep your hands clean and dry. Hold the earbud with an ear
tip installed, and then roll and compress the ear tip.
3. Gently pull your ear upwards and insert the earbud into the
ear canal.
4. Hold in place for about 20 seconds after inserting until the
ear tip fully expands in the ear canal.
5. Check the size of the ear tip:
Before using the earbud, try pulling it gently to ensure the
ear tip is xed and will not fall o easily. If not, please repeat
the above steps.
Operating Instructions
Auto On / O:
• Take the earbuds out of the charging case to turn them on
automatically.
• Put the earbuds into the charging case to turn them o
automatically.
• When the earbuds are on, there is no operation and they are
not in the charging case, they will be in the pending pairing
status; the earbuds will automatically turn o after 2 hours,
and the Earbud Indicator will go out followed by the voice
prompt "Power O".
Manual On / O:
• Long press both Mode Buttons of the earbuds for 3 seconds
until the voice prompt "Power On" is heard to turn them on
respectively.
• Long press either Mode Button of the earbuds for 3 seconds
to turn o the earbuds simultaneously. Both Earbud
Indicators will turn red and ash 3 times followed by the
voice prompt "Power O".
User Mode Selection
When the earbuds are on, short press either Mode Button to
cycle through the following modes: Silent Mode – Standard
Transparency Mode – Enhanced Transparency Mode.
The NE20 has a memory function. When reactivated, it will
automatically access the memorized mode.
Bluetooth Connection
Pairing: Take the earbuds out of the charging case to turn
them on automatically, and then they will enter the pending
pairing status (1 Earbud Indicator ashes red and blue). The
pairing name is "NE20". Once the pairing is successful, the
Earbud Indicator will stop ashing followed by the voice prompt
"Connected".
Unpairing: When the earbuds are o, long press both Mode
Buttons even after hearing the voice prompt "Power On", until
both Earbud Indicators turn blue and ash 3 times followed
by the voice prompt "Pairing" to indicate that the Bluetooth
connection is removed and the earbuds will access the pending
pairing status.
• Bluetooth 5.3 Technology
• 26dB Noise Reduction Rating
• Active Noise Cancellation
Features
Accessory Installation
Power Level Display
Warranty Service
Wearing Instructions
Accessories
Approval
Technical Data
Product View
SYSMAX Innovations Co., Ltd.
TEL: +86-20-83862000
FAX: +86-20-83882723
Web: www.nitecore.com
Address: Unit 6355, 5/F, No. 1021 Gaopu Road, Tianhe District,
Guangzhou, 510653, Guangdong, China
Please nd us on facebook : NITECORE Flashlight
Made in China
NE17022023
• Extended memory foam ear tips with in-ear hearing
protection, eective against high-frequency noise
• Integrated ANC (Active Noise Cancellation) chip for
automatically reducing noise higher than 82dB
• Fast Reaction Technology specially designed for shooting to
provide a continuous noise reduction
• Clear Voice Tracking Technology for self and surrounding
voice tracking and optimization
• 3 user modes available. Standard Transparency Mode:
outside sounds will be amplied slightly; Enhanced
Transparency Mode: outside sounds will be amplied more;
Silent Mode will cancel the outside noises
• Available with Bluetooth connection, enabling to listen to
music / answer or decline a call in any mode
• Voice prompt function to indicate the earbuds status
• The charging case comes with a clip for easy carrying
• Max runtime of the earbuds: 32 hours
All NITECORE
®
products are warranted for quality. Any DOA /
defective product can be exchanged for a replacement through
a local distributor/dealer within 15 days of purchase. After
that, all defective / malfunctioning NITECORE
®
products can
be repaired free of charge within 12 months from the date
of purchase. Beyond 12 months, a limited warranty applies,
covering the cost of labor and maintenance, but not the cost of
accessories or replacement parts.
The warranty will be nullied if
1. the product(s) is/are broken down, reconstructed and/or
modied by unauthorized parties;
2. the product(s) is/are damaged due to improper use.
For the latest information on NITECORE
®
products and services,
please contact a local NITECORE
®
distributor or send an email
※ All images, texts and statements specied herein this
user manual are for reference purposes only. Should any
discrepancy occur between this manual and information
specied on www.nitecore.com, Sysmax Innovations Co.,
Ltd. reserves the rights to interpret and amend the content
of this document at any time without prior notice.
The NE20 is tested and certified according to the following
standards:
FCC ID: 2A8YA-NE20
CMIIT ID: 2022DP19417
ANSI S3.19-1974
EN 352-2: 2002
EN 352-5: 2002
EN 352-7: 2002
EN 352-9: 2002
Battery Li-ion
Battery
Capacity
65mAh x 2 (Earbuds)
500mAh (Charging Case)
Rated Input
5V⎓60mA (Earbuds)
5V⎓250mA (Charging Case)
ANC
(Active Noise
Cancellation)
82dB
NRR
(Noise
Reduction
Rating)
26dB*
Microphone
Sensitivity
-38dB
Dimensions
29mm x 23mm x 34mm
/ 1.14" x 0.91" x 1.34"
(Earbud, M Size Ear Fin and Ear Tip Included)
78.5mm x 40.8mm x 67.6mm
/ 3.09" x 1.61" x 2.66" (Charging Case)
Weight
7.7g / 0.27 oz (Earbud)
89g±2g / 3.14 oz±0.07 oz
(Charging Case, Earbuds Not Included)
(English) NE20
(Deutsch) NE20
Bluetooth Electronic Hearing Protection Earbuds
(Francais) NE20
Ladefunktion
Die NE20 sind mit einem intelligenten Ladesystem ausgestattet.
Bitte legen Sie die Ohrhörer zum Auaden richtig in die
Ladebox. Verwenden Sie das USB-Kabel, um eine externe
Stromversorgung (z. B. einen USB-Adapter oder andere USB-
Ladegeräte) an den USB-Anschluss der Ladebox anzuschließen
und den Ladevorgang zu starten.
Auaden der Ohrhörer
• Wenn die Ohrhörer aufgeladen werden, leuchten die
Betriebsanzeigen ständig blau, während die beiden
Ohrhöreranzeigen ständig rot leuchten.
• Wenn die Ohrhörer vollständig aufgeladen sind, wird der
Ladevorgang automatisch beendet und sowohl die Ohrhörer-
als auch die Betriebsanzeigen schalten sich aus.
• Die Ladezeit der Ohrhörer beträgt ca. 1 Stunde.
Auaden der Ladebox
• Wenn die Ladebox geladen wird, blinken die blauen
Betriebsanzeigen langsam.
• Wenn die Ladebox vollständig aufgeladen ist, wird der
Ladevorgang automatisch beendet und die vier blauen
Betriebsanzeigen leuchten stetig.
• Die Ladezeit der Ladebox beträgt ca. 2 Stunden und 30
Minuten (Auadung über den 5V/1A-Adapter).
Installation des Zubehörs
Bringen Sie die Ohr-Flosse, das Trageband und den Ohrstöpsel
in der angegebenen Reihenfolge an.
Hinweis: Die Ohr-Flosse und der Ohrstöpsel sind speziell für
die NE20 konzipiert. Bitte wählen Sie die richtige Größe für
Ihren Gehörgang. Verwenden Sie die NE20 NICHT direkt, ohne
dass Ohr-Flossen und Ohrstöpsel installiert sind!
Tragehinweise
1. Bitte entfernen Sie die Isolierfolie auf dem Ohrhörer vor dem
ersten Gebrauch.
2. Halten Sie Ihre Hände sauber und trocken. Halten Sie den
Ohrhörer mit installiertem Ohrstöpsel. Rollen und drücken
Sie den Ohrstöpsel zusammen.
NE20
* The attenuation data is measured in accordance with the
specications of the American National Standards Institute
ANSI S3.19-1974.
Frequency (Hz) 125 250 500 1000 2000 3150 4000 6300 8000 NRR
Mean Attenuation (dB) 34.4 30.2 34.3 35.7 38.4 41.5 43.7 45.5 45.1
26
Standard Deviation (dB) 5.9 5.1 5.5 4.7 4.1 2.7 5.3 4.8 5.7
Note: Ear ns and ear tips of M size have been installed on the
earbuds.
Worldwide Warranty Service
Model number
————————————————————————
Date of purchase
————————————————————————
Serial number
————————————————————————
Store Stamp
————————————————————————
This is the certicate of authenticity if this item and we
conrm that it has been subjected to the most exacting
quality controls by SYSMAX Innovations Co., Ltd.
NOTE:
Please ensure this warranty card is fully completed by the
distributor or retailer after purchasing the product. Should
the product fail to operate correctly during the warranty
period, it may be returned with the completed warranty
card and original sales receipt to the retailer or local
distributor for replacement or repair.
Customer Service Email:
Status of Indicators Power Level
4 Constant-on Approx. 100%
3 Constant-on Approx. 75%
2 Constant-on Approx. 50%
1 Constant-on Approx. 25%
1 Flashing
Nearly Depleted (Please get
recharged as soon as possible)
Note: During Bluetooth pairing, only after 1 Earbud Indicator
ashes red and blue can 2 earbuds be paired simultaneously.
Phone Call
• After the Bluetooth connection is successful, short press
either Mode Button to answer an incoming call.
• After the Bluetooth connection is successful, long press
either Mode Button for 1 second to decline an incoming call.
• After the Bluetooth connection is successful, double press
either Mode Button to end a call.
Power Level Display
• Check the remaining power of the earbuds on the device.
When the remaining power is low, please stop using and
charge them as soon as possible to avoid damage.
• Short press the Power Button, and the Power Indicators
will turn on to display the power level of the charging case.
The charging case will automatically enter hibernation when
there is no input / output for a while.
Warnings
1. Please read and follow the instructions carefully. Failure to
follow the instructions may cause personal injury or serious
impact on use.
2. If there is any discomfort or infection in your ears, please
consult a doctor before using the product to avoid hearing
damage or loss.
3. DO NOT disassemble or crush the product.
4. DO NOT submerge the product in water.
5. DO NOT use the product after soaking in water.
6. Please recharge the product every 3 months when left
unused for a prolonged time.
7. Dispose of the device/batteries in accordance with applicable
local laws and regulations.
8. Operating Temperature: -20~50°C (-4~122°F)
9. Temperature of Storage: -20~50°C (-4~122°F)
Fonction de charge
Le NE20 est équipé d’un système de charge intelligent.
Veuillez placer correctement les écouteurs dans le boîtier
de chargement pour le chargement. Utilisez le câble USB
pour connecter une alimentation externe (par exemple, un
adaptateur USB ou d’autres périphériques de chargement USB)
au port USB du boîtier de charge pour commencer le processus
de charge.
Chargement des écouteurs :
• Lorsque les écouteurs sont en cours de chargement, les
indicateurs d'alimentation bleus s'allument en continu, tandis
que les deux indicateurs d'écouteurs s'allument en continu
en rouge.
• Lorsque les écouteurs sont complètement chargés, ils
cessent automatiquement le processus de charge et les deux
indicateurs d'écouteurs et d'alimentation s'éteignent pour
informer l'utilisateur.
• Le temps de charge des écouteurs est d'environ 1 heure.
Chargement du boîtier de recharge :
• Lorsque le boîtier de recharge est en cours de chargement,
les indicateurs d'alimentation bleus clignotent lentement
pour informer l'utilisateur.
• Lorsque le boîtier de recharge est complètement chargé, le
processus de recharge s'arrête automatiquement et les 4
indicateurs d'alimentation bleus s'allument en continu pour
informer l'utilisateur.
• Le temps de charge de l'étui de charge est d'environ 2
heures et 30 minutes (charge via l'adaptateur 5V/1A).
Installation d’accessoires
Veuillez installer l’ergot, le cordon d’attache et l’embout
auriculaire dans l’ordre indiqué.
Remarque: L’ergot et l’embout auriculaire sont spécialement
conçus pour le NE20. Veuillez sélectionner la taille appropriée
pour s’adapter à votre conduit auditif. NE PAS utiliser le NE20
directement sans les ergots et les embouts d’oreille installés.
Instructions de port
1. Veuillez retirer le lm isolant de l’écouteur avant la première
utilisation.
2. Gardez vos mains propres et sèches. Tenez l’écouteur avec
un embout installé, puis roulez et comprimez l’embout de
l’oreille.
3. Tirez doucement votre oreille vers le haut et insérez
l’écouteur dans le conduit auditif.
4. Maintenez en place pendant environ 20 secondes après
l’insertion jusqu’à ce que l’embout de l’oreille se dilate
complètement dans le conduit auditif.
5. Vériez la taille de l’embout auriculaire :
Avant d’utiliser l’écouteur, essayez de le tirer doucement pour
vous assurer que l’embout de l’oreille est xé et ne tombera
pas facilement. Si ce n’est pas le cas, veuillez répéter les
étapes ci-dessus.
Mode d’emploi
Auto On / O:
• Retirez les écouteurs de l’étui de chargement pour les
allumer automatiquement.
• Placez les écouteurs dans l’étui de chargement pour les
éteindre automatiquement.
• Lorsque les écouteurs sont allumés, qu’il n’y a pas
d’opération et qu’ils ne sont pas dans le boîtier de charge,
ils sont dans le statut d’appairage en attente; les écouteurs
s’éteindront automatiquement après 2 heures et l’indicateur
d’écouteurs s’éteindra suivi de l’invite vocale « Power O ».
Manuel On / O:
• Appuyez longuement sur les deux boutons de mode des
écouteurs pendant 3 secondes jusqu’à ce que l’invite
vocale « Power On » se fasse entendre pour les allumer
respectivement.
• Appuyez longuement sur l’un des boutons de mode des
écouteurs pendant 3 secondes pour éteindre les écouteurs
simultanément. Les deux indicateurs d’écouteurs deviendront
rouges et clignoteront 3 fois, suivis de l’invite vocale « Power
O ».
Sélection du mode utilisateur
Lorsque les écouteurs sont allumés, appuyez brièvement sur
l’un des boutons Mode pour passer par les modes suivants :
Mode silencieux – Mode de transparence standard – Mode de
transparence amélioré.
Le NE20 dispose d’une fonction mémoire. Lorsqu’il est réactivé,
il accède automatiquement au mode mémorisé.
Connexion Bluetooth
Jumelage : Retirez les écouteurs de l’étui de charge pour les
allumer automatiquement, ils entreront dans l’état d’appairage
en attente (1 indicateur d’écouteurs clignote en rouge et bleu).
Le nom d’appairage est « NE20 ». Une fois le couplage réussi,
l’indicateur d’écouteurs cessera de clignoter, suivi de l’invite
vocale « Connected ».
Dissociation: Lorsque les écouteurs sont éteints, appuyez
longuement sur les deux boutons de mode même après avoir
entendu l’invite vocale « Power On », jusqu’à ce que les
deux indicateurs d’écouteurs deviennent bleus et clignotent
3 fois, suivis de l’invite vocale « Pairing » pour indiquer que
la connexion Bluetooth est supprimée et que les écouteurs
accédent à l’état d’appairage en attente.
Remarque: Pendant le jumelage Bluetooth, deux écouteurs
ne peuvent être jumelés simultanément qu'après que le voyant
d'un écouteur ait clignoté en rouge et en bleu.
Appel
• Une fois la connexion Bluetooth établie, appuyez brièvement
sur l’un des boutons Mode pour répondre à un appel entrant.
• Une fois la connexion Bluetooth établie, appuyez longuement
sur l’un des boutons Mode pendant 1 seconde pour refuser
un appel entrant.
• Une fois la connexion Bluetooth établie, appuyez deux fois
sur l’un des boutons de mode pour mettre n à un appel.
Affichage du niveau de puissance
• Vériez la puissance restante des écouteurs sur l’appareil.
Lorsque la puissance restante est faible, veuillez cesser de
les utiliser et les charger dès que possible pour éviter tout
dommage.
• Appuyez brièvement sur le bouton d’alimentation et les
voyants d’alimentation s’allumeront pour acher le niveau de
puissance du boîtier de charge. Le boîtier de charge entrera
automatiquement en hibernation lorsqu’il n’y aura pas
d’entrée / sortie pendant un certain temps.
Avertissements
1. Veuillez lire et suivre attentivement les instructions. Le
non-respect des instructions peut causer des blessures
corporelles ou un impact grave sur l’utilisation.
2. SEn cas de gêne ou d'infection dans vos oreilles, veuillez
consulter un médecin avant d'utiliser le produit an d'éviter
tout dommage ou perte auditive.
3. NE PAS démonter ou écraser le produit.
4. NE PAS immerger le produit dans l’eau.
5. NE PAS utiliser le produit après l’avoir trempé dans l’eau.
6. Veuillez recharger le produit tous les 3 mois lorsqu’il n’est
pas utilisé pendant une période prolongée.
7. Jetez l’appareil/les piles conformément aux lois et
réglementations locales applicables.
8. Température de fonctionnement: -20 ~ 50 °C (-4 ~ 122 °F)
9. Température de stockage: -20 ~ 50 °C (-4 ~ 122 °F)
3. Ziehen Sie Ihr Ohr sanft nach oben und führen Sie den
Ohrhörer in den Gehörgang ein.
4. Halten Sie den Ohrhörer nach dem Einsetzen etwa 20
Sekunden lang fest, bis sich der Ohrstöpsel im Gehörgang
vollständig entfaltet hat.
5. Überprüfen Sie die Größe des Ohrstöpsels:
Ziehen Sie vor der Verwendung des Ohrhörers vorsichtig
daran, um sicherzustellen, dass der Ohrhörer festen Sitz hat
und nicht leicht herausfallen kann. Falls nicht, wiederholen
Sie bitte die oben genannten Schritte.
Bedienungsanleitung
Automatisch AN /AUS
• Nehmen Sie die Ohrhörer aus der Ladebox, um sie
automatisch einzuschalten.
• Legen Sie die Ohrhörer in die Ladebox, um sie automatisch
auszuschalten.
• Wenn die Ohrhörer eingeschaltet sind, kein Betrieb
stattndet und sie sich nicht in der Ladeschale benden, sind
sie im Status "Pairing". Die Ohrhörer schalten sich nach 2
Stunden automatisch aus und die Ohrhöreranzeige erlischt,
gefolgt von der Sprachansage "Ausschalten".
Manuell AN /AUS
• Halten Sie beide Mode-Tasten der Ohrhörer 3 Sekunden lang
gedrückt, bis die Sprachansage "Einschalten" ertönt, um sie
einzuschalten.
• Drücken Sie eine der Mode-Tasten der Ohrhörer 3 Sekunden
lang, um die Ohrhörer gleichzeitig auszuschalten. Beide
Ohrstöpsel-Anzeigen leuchten rot und blinken drei Mal,
gefolgt von der Sprachansage "Ausschalten".
Wahl des Benutzer-Mode
Wenn die Ohrhörer eingeschaltet sind, drücken Sie kurz
eine der Mode-Tasten, um zwischen den folgenden Modi zu
wechseln: „Stiller Mode“ – „Standard-Transparenz-Mode“ –
„Erweiterter Transparenz-Mode“.
Die NE20 verfügen über eine Speicherfunktion. Wenn sie wieder
aktiviert werden, greifen sie automatisch auf den gespeicherten
Mode zu.
Bluetooth-Verbindung
Koppeln: Nehmen Sie die Ohrstöpsel aus der Ladebox, um
sie automatisch einzuschalten. Sie gehen dann in den Pairing-
Status über (1 Ohrstöpsel-Anzeige blinkt rot und blau). Der
Pairing-Name lautet "NE20". Sobald das Pairing erfolgreich
war, hört die Ohrhöreranzeige auf zu blinken, gefolgt von der
Sprachansage "Verbunden".
Trennen: Wenn die Ohrhörer ausgeschaltet sind, drücken
Sie nach der Sprachansage "Einschalten" lange auf beide
Mode-Tasten, bis beide Ohrhöreranzeigen blau leuchten und
dreimal blinken, gefolgt von der Sprachansage "Pairing", um
anzuzeigen, dass die Bluetooth-Verbindung getrennt ist und die
Ohrhörer den ausstehenden Pairing-Status aufrufen.
Hinweis: Während der Bluetooth-Kopplung können nur dann
2 Ohrhörer gleichzeitig gekoppelt werden, wenn eine Ohrhörer-
Anzeige rot und blau blinkt.
Sprachanruf
• Nachdem die Bluetooth-Verbindung erfolgreich hergestellt
wurde, drücken Sie kurz eine der beiden Mode-Tasten, um
einen eingehenden Anruf anzunehmen.
• Nachdem die Bluetooth-Verbindung erfolgreich hergestellt
wurde, drücken Sie eine der Mode-Tasten 1 Sekunde lang,
um einen eingehenden Anruf abzulehnen.
• Nachdem die Bluetooth-Verbindung erfolgreich hergestellt
wurde, drücken Sie zweimal auf eine der Mode-Tasten, um
einen Anruf zu beenden.
Restenergieanzeige
• Überprüfen Sie die verbleibende Leistung der Ohrhörer am
Gerät. Wenn die verbleibende Leistung niedrig ist, beenden
Sie die Nutzung und laden Sie sie so schnell wie möglich auf,
um Schäden zu vermeiden.
• Drücken Sie kurz die Einschalt-Taste und die
Betriebsanzeigen leuchten auf, um den Energiestand des
Ladegeräts anzuzeigen. Die Ladebox geht automatisch in
den Ruhezustand über, wenn eine Zeit lang keine Eingabe/
Ausgabe erfolgt.
WARNUNGEN
1. Bitte lesen und befolgen Sie die Anweisungen sorgfältig. Die
Nichtbeachtung der Anweisungen kann zu Verletzungen oder
schwerwiegenden Auswirkungen auf die Nutzung führen.
2. Wenn Sie Beschwerden oder Infektionen in den Ohren
haben, konsultieren Sie bitte einen Arzt, bevor Sie das
Produkt verwenden, um Hörschäden oder gar Hörverluste zu
vermeiden.
3. Zerlegen Sie das Produkt NICHT und zerdrücken Sie es nicht.
4. Tauchen Sie das Produkt NICHT in Wasser ein.
5. Verwenden Sie das Produkt NICHT, nachdem es durchnässt
worden ist.
6. Bitte laden Sie das Produkt alle 3 Monate auf, wenn es über
einen längeren Zeitraum nicht benutzt wurde.
7. Entsorgen Sie das Gerät/die Batterien in Übereinstimmung
mit den geltenden örtlichen Gesetzen und Vorschriften.
(Italiano) NE20
Funzione di ricarica
L'auricolare NE20 è dotato di un sistema di ricarica intelligente.
Per la ricarica, inserire correttamente gli auricolari nella custodia
di ricarica. Utilizzare il cavo USB per collegare un alimentatore
esterno (ad esempio, un adattatore USB o altri dispositivi di
ricarica USB) alla porta USB della custodia di ricarica per avviare
il processo di ricarica.
Ricarica degli auricolari:
• Quando gli auricolari sono in carica, gli indicatori di
alimentazione blu si accendono costantemente, mentre
entrambi gli indicatori degli auricolari mostrano una luce
rossa ssa.
• Quando gli auricolari sono completamente carichi, il processo
di ricarica si interrompe automaticamente e gli indicatori
degli auricolari e di alimentazione si spengono per informare
l'utente.
• Il tempo di ricarica degli auricolari è di circa 1 ora.
Ricarica della custodia di ricarica:
• Quando la custodia è in carica, gli indicatori di alimentazione
blu lampeggiano lentamente per informare l'utente.
• Quando la custodia di ricarica è completamente carica, il
processo di ricarica si interrompe automaticamente e i 4
indicatori di alimentazione blu si accendono costantemente
per informare l'utente.
• Il tempo di ricarica della custodia è di circa 2 ore e 30 minuti
(ricarica tramite adattatore 5V/1A).
Installazione degli accessori
Installare l'aletta auricolare, il cordino (opzionale) e l’inserto
auricolare nella sequenza indicata.
Nota: l'aletta e l’inserto auricolare sono stati progettati
appositamente per il modello NE20. Scegliere la misura adatta
al proprio canale uditivo. NON utilizzare direttamente il NE20
senza le alette e gli inserti auricolari installati.
Istruzioni per l'uso
1. Rimuovere la pellicola isolante sugli auricolari prima del
primo utilizzo.
2. Mantenere le mani pulite e asciutte. Tenere l'auricolare con
un inserto auricolare installato, quindi arrotola e comprimi
l’inserto auricolare
3. Tirare delicatamente l'orecchio verso l'alto e inserire
l'auricolare nel canale uditivo.
4. Tenere in posizione per circa 20 secondi dopo l'inserimento,
no a quando l’inserto auricolare si espande completamente
nel condotto uditivo.
5. Controllare le dimensioni dell’inserto auricolare:
Prima di utilizzare l'auricolare, prova a tirarlo delicatamente
per assicurarsi che l’inserto auricolare sia ssato e non cada
facilmente. In caso contrario, ripetere le operazioni sopra
descritte.
Istruzioni per l'uso
Accensione e Spegnimento automatici
• Estrarre gli auricolari dalla custodia di ricarica per accenderli
automaticamente.
• Inserite gli auricolari nella custodia di ricarica per spegnerli
automaticamente.
• Quando gli auricolari sono accesi, non sono in funzione
e non sono nella custodia di ricarica, saranno in stato di
attesa di accoppiamento; gli auricolari si spegneranno
automaticamente dopo 2 ore e l'indicatore degli auricolari si
spegnerà seguito dal messaggio vocale "Power O" .
Accensione e Spegnimento manuali:
• Premere a lungo entrambi i pulsanti di modalità degli auricolari
per 3 secondi nché non viene emesso il messaggio vocale
"Power On" per accenderli rispettivamente.
• Premere a lungo uno dei due pulsanti Modalità
degli auricolari per 3 secondi per spegnere gli
auricolari contemporaneamente . Entrambi gli indicatori
degli auricolari diventano rossi e lampeggiano 3 volte,
seguiti dal messaggio vocale "Power O".
Selezione della modalità utente
Quando gli auricolari sono accesi, premere brevemente uno
dei due pulsanti Modalità per scorrere le seguenti modalità:
Modalità silenziosa - Modalità trasparenza standard - Modalità
trasparenza potenziata.
L'NE20 è dotato di una funzione di memoria. Quando
viene riattivato, accede automaticamente alla modalità
precedentemente utilizzata e memorizzata.
Connessione Bluetooth
Accoppiamento: Estrarre gli auricolari dalla custodia di ricarica
per accenderli automaticamente, quindi entreranno nello stato di
accoppiamento in attesa (l'indicatore di 1 auricolare lampeggia in
rosso e blu). Il nome dell'accoppiamento è "NE20". Una volta che
l'accoppiamento è riuscito, l'indicatore degli auricolari smetterà di
lampeggiare seguito dal messaggio vocale "Connected".
Disaccoppiamento: Quando gli auricolari sono spenti,
premere a lungo entrambi i pulsanti di modalità anche dopo
aver ascoltato la richiesta vocale "Power On", nché entrambi
gli indicatori degli auricolari non diventano blu e lampeggiano
3 volte, seguiti dalla richiesta vocale "Pairing" per indicare
che la connessione Bluetooth è stata rimossa e gli auricolari
accederanno allo stato di accoppiamento in sospeso.
Nota: Durante l'accoppiamento Bluetooth, solo dopo che
l'indicatore di 1 auricolare lampeggia in rosso e blu è possibile
accoppiare 2 auricolari contemporaneamente.
Telefonata
• Dopo che la connessione Bluetooth è riuscita, premere
brevemente uno dei pulsanti di modalità per rispondere a
una chiamata in arrivo.
• Dopo che la connessione Bluetooth è riuscita, premere a
lungo uno dei due pulsanti di modalità per 1 secondo per
riutare una chiamata in arrivo.
• Dopo che la connessione Bluetooth è riuscita, premere
due volte uno dei pulsanti di modalità per terminare una
chiamata.
Display del livello di carica
• Controllare la carica residua degli auricolari sul dispositivo.
Se l'energia residua è bassa, smettere di usarli e ricaricarli il
prima possibile per evitare danni.
• Premendo brevemente il pulsante di accensione,
gli indicatori di carica si accendono per visualizzare il livello
di carica della custodia di ricarica. La custodia di ricarica
entra automaticamente in ibernazione quando non vi sono
ingressi/uscite per un certo periodo di tempo.
Avvertenze
1. Leggere e seguire attentamente le istruzioni. La mancata
osservanza delle istruzioni può causare lesioni personali o
gravi conseguenze sull'uso.
2. In caso di disturbi o infezioni alle orecchie, consultare un
medico prima di utilizzare il prodotto per evitare danni o
perdita dell'udito.
3. NON smontare o schiacciare il prodotto.
4. NON immergere il prodotto in acqua.
5. NON utilizzare il prodotto dopo l'immersione in acqua.
6. In caso di inutilizzo prolungato, ricaricare il prodotto ogni 3
mesi.
7. Smaltire il dispositivo/batterie in conformità alle leggi e alle
normative locali vigenti.
8. Temperatura di esercizio: -20~50°C (-4~122°F)
9. Temperatura di conservazione: -20~50°C (-4~122°F)
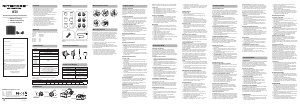
Ear Fin (Pair) x 3
Ear Tip (Pair) x 3
Lanyard
USB-C Charging Cable
2
54
3
Charging Contacts
Ear Tip
Earbud Indicator
Ear Fin
Mode Button
Microphone
Clip
USB-C Charging Port
Power Indicators
Power Button
Earbud
①
Ear Fin
②
Lanyard
(Optional)
③
Ear Tip


Dołącz do dyskusji na temat tego produktu
Tutaj możesz podzielić się swoją opinią na temat Nitecore NE20 Słuchawki. Jeśli masz pytanie, najpierw dokładnie przeczytaj instrukcję. Zapytanie o instrukcję można złożyć za pomocą naszego formularza kontaktowego.