
Order of Settings:
YEAR > MONTH > DATE > 12/24 HOUR FORMAT > HOUR
> MINUTE > ALARM 1 ON/OFF > ALARM HOUR > ALARM
MINUTE > ALARM 2 ON/OFF > ALARM 2 HOUR > ALARM
2 MINUTE > ALARM 3 ON/OFF > ALARM 3 HOUR >
ALARM 3 MINUTE > SOUND CONTROL (--:SD)
Setting Instructions:
Activate Setting Mode
Pr
ess and hold the SET button for 2 seconds.
Time and Date Settings
When the year ashes, use the UP/DOWN buttons to select
the correct year. Press the SET button; when the month
ashes, use the UP/DOWN buttons to select the correct
month. Press the SET button; when the date ashes, use
the UP/DOWN buttons to select the correct date. Press
the SET button; when “12H” ashes, use the UP/DOWN
buttons to select between 12-hour and 24-hour formats.
Press the SET button; when the hour ashes, use the
UP/DOWN buttons to select the correct hour. Press the
SET button; when the minute ashes, use the UP/DOWN
buttons to select the correct minute.
Alarm Settings
Press the SET button; when the screen displays “--: AL”
and ashes, use the UP/DOWN buttons to toggle the alarm
ON/OFF (“ON:AL” indicates active; “--: AL” indicates off).
Press the SET button; when the alarm hour ashes, use the
UP/DOWN buttons to set the correct alarm hour. Press the
SET button; when the alarm minute ashes, use the UP/
DOWN buttons to set the correct alarm minute. Repeat the
above steps for ALARM 2 and ALARM 3.
Sound Control
Press the SET button; the sound control indicator appears
as “--> Sd”, meaning the function is off. Use the UP/DOWN
buttons to turn on sound control. It will display “ON :Sd”
and the clock display light will turn off for about 15 seconds.
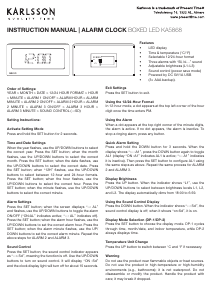
INSTRUCTION MANUAL | ALARM CLOCK BOXED LED KA5868
Exit Settings
Press the SET button to exit.
Using the 12/24‑Hour Format
In 12-hour mode, a dot appears at the top left corner of the hour
digit once the time enters PM.
Using the Alarm
When a dot appears at the top right corner of the minute digits,
the alarm is active. If no dot appears, the alarm is inactive. To
stop a ringing alarm, press any button.
Quick Alarm Setting
Press and hold the DOWN button for 3 seconds. When the
display shows “:-- :A1”, press the DOWN button again to toggle
AL1 (display “ON :A1” indicates AL1 is active; “:-- A1” indicates
it is inactive). Then press the SET button to congure AL1 using
the same steps as above. Repeat the same process for ALARM
2 and ALARM 3.
Display Brightness
Press the UP button. When the indicator shows “L1”, use the
UP/DOWN buttons to select between brightness levels L1, L2,
and L3. The display automatically dims from 18:00 to 6:59.
Using the Sound Control Display
Press the DOWN button. When the indicator shows “--: Sd”, the
sound control display is off; when it shows “on:Sd”, it is on.
Display Mode Selection (DP‑1/DP‑2)
Press the SET button to choose the display mode. DP-1 cycles
through time, month/date, and indoor temperature, while DP-2
always displays time.
Temperature Unit Change
Press the UP button to switch between °C and °F if necessary.
Warning
Do not use the product near ammable objects or heat sources.
Do not use the product in high-temperature or high-humidity
environments (e.g., bathrooms); it is not waterproof. Do not
disassemble or modify the product. Handle the product with
care; it may break if dropped.
SET
RESET
UP
DOWN
Features
•
LED display
•
Time & temperatur
e (°C/°F)
•
Selectable 12/24
-hour format
•
Thr
ee alarms with “Bi, bi…” sound
•
Adjustable brightness (L1–L3)
•
Sound contr
ol (power save mode)
•
Power
ed by DC 5V/1A USB
•
(3× AAA backup).


Dołącz do dyskusji na temat tego produktu
Tutaj możesz podzielić się swoją opinią na temat Karlsson KA5868GR Budzik. Jeśli masz pytanie, najpierw dokładnie przeczytaj instrukcję. Zapytanie o instrukcję można złożyć za pomocą naszego formularza kontaktowego.