thermio 713 thermio 713
Gerätebeschreibung
Der Raumthermostat thermio 713 ermöglicht eine praktische
Wärmeregelung, spart Energie und lässt sich auf einfache
Weise auf die gewünschte Raumtemperatur einstellen.
• Steuerung von Heizungen und Klimaanlagen innerhalb
einer Temperaturspanne von + 5°C bis + 35°C
• Regulierung von Fan Coils
• Automatischer Frostschutz
Bestimmungsgemäße Verwendung
• Aufputzgerät zur Installation an Wänden.
• Nur für den Einsatz in trockenen Räumen geeignet!
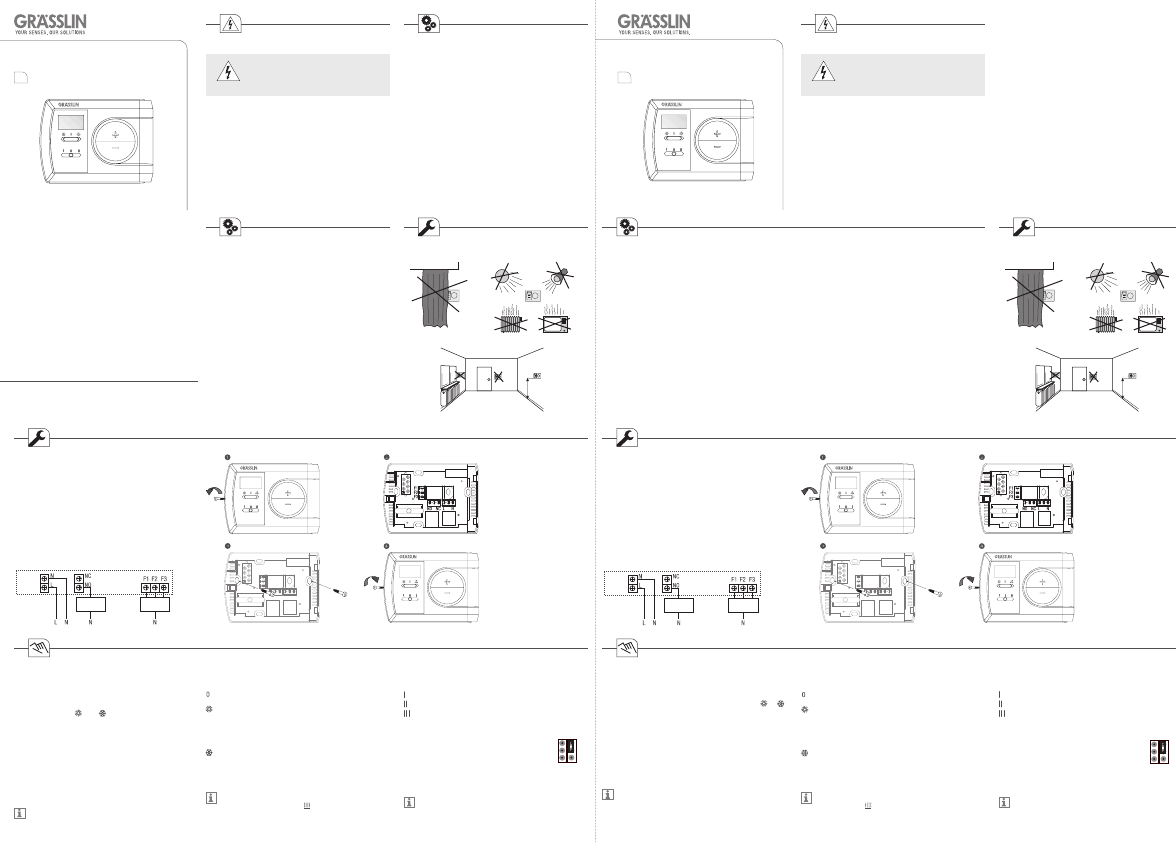
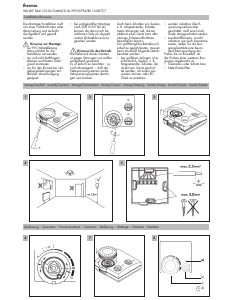
Installation und Montage
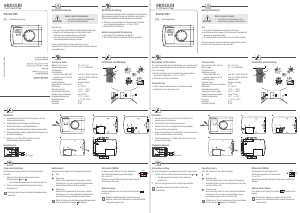
Anschlussplan
thermio_touch/de/en/fr/nl/10/10/01
20.9
°C
20.9
°C
1.5 m
Installation
1. Gehäusedeckel mit einem Schraubenzieher von der
Gehäuserückseite abschrauben.
2. Drähte anschließen, siehe Anschlussplan.
3. Gehäuserückseite mit den mitgelieferten Schrauben an
der Wand befestigen.
4. Gehäusedeckel auf die Gehäuserückseite setzen und
die beiden Gehäusehälften wieder verschrauben.
Betriebsmodi
Schieben Sie den Regler auf die gewünschte Position:
AUS
Heizmodus
Stellen Sie die gewünschte Temperatur mit den Tasten
+ und – ein. Je nach aktueller Raumtemperatur wird der
Boiler EIN oder AUS geschalten.
Kühlmodus
Stellen Sie die gewünschte Temperatur mit den Tasten
+ und – ein. Je nach aktueller Raumtemperatur wird die
Klimaanlage EIN oder AUS geschalten.
Wenn der Boiler oder die Klimaanlage EIN geschalten
sind, erscheint das Symbol
im Display.
Geschwindigkeits-Regler für den Fan Coil:
Stufe 1 (F1) = langsame Geschwindigkeit
Stufe 2 (F2) = mittlerer Geschwindigkeit
Stufe 3 (F3) = maximale Geschwindigkeit
Temperatureinstellung
Die Raumtemperatur können Sie mit den Tasten + und –
einstellen.
1. Stellen Sie den Regler auf den gewünschten
Betriebsmodus:
oder
2. Drücken Sie die Taste + oder – zweimal.
Die Hintergrundbeleuchtung des Displays geht an
und die Temperaturanzeige blinkt.
3. Stellen Sie die gewünschte Temperatur mit den Tasten
+ und – ein.
Erfolgt 10 Sekunden lang keine Eingabe, wird die
eingestellte Temperatur gespeichert und im Display
erscheint wieder die aktuelle Raumtemperatur.
Drücken Sie die Taste + oder – einmal um die
Hintergrundbeleuchtung des Displays für 15
Sekunden einzuschalten.
Technische Daten
Maße H x B x T (mm)
Anschlussspannung
Schutzklasse
Schaltleistung
– ohmsche Last (VDE, IEC)
– induktive Last cos φ 0,6
Schaltausgang
Funktions-Modus
Geschw. Fan Coil
Automatischer Frostschutz
Differential
Steuertemperatur
Temperaturmessbereich
Display Temperaturupdate
Umgebungstemperatur
Ganggenauigkeit
Auösung
Schutzart
82 x 111 x 26
220-240 V/50-60 Hz
||
max. 6 A / 250 V AC/50 Hz
max. 2 A / 250 V AC/50 Hz
potentialfrei
Heizen / Kühlen
3 Geschwindigkeiten
+5°C
0.4 / 0.6°C
+5°C ... + 35°C
+0°C ... + 40°C
alle 10 Sek.
-5°C ... + 45°C
± 1°C bei +20°C
0,5°C
IP30
Differential (SWING)
Es können zwei Positionen für den Steckreiter
der Differential-Regelung gewählt werden:
0.4 oder 0.6°C
Drücken Sie anschließend die Reset-Taste um
Ihre Änderung zu aktivieren.
Der Differential-Steckreiter sowie die Reset-Taste
bendet sich auf der Innenseite des Gehäusedeckels.
PID
SWING
0.4/0.6
ON/OFF
Grässlin GmbH
Bundesstraße 36
D-78112 St. Georgen
Germany
Phone: +49 (0) 7724 / 933-0
Fax: +49 (0) 7724 / 933-240
www.graesslin.de
Beachten Sie
• Die nationalen Vorschriften und Sicherheitsbedingungen.
• Eingriffe und Veränderungen am Gerät führen zum
Erlöschen der Gewährleistung und Garantie.
• Das Gerät darf nur für den beschriebenen
Verwendungszweck betrieben werden.
Lesen und beachten Sie diese Anleitung, um eine
einwandfreie Funktion des Gerätes und ein sicheres Arbeiten
zu gewährleisten.
Gefahr durch Stromschlag!
Anschluss und Montage ausschließ-
lich durch Elektrofachkraft!
WARNUNG
Sicherheitshinweise
HEATING/
COOLING
Max.
6(2)A 250 VAC
FAN
230 V AC 50Hz
Bedienungsanleitung Operating Manual
DE
EN
1.5 m
Note
• The national regulations and safety instructions.
• Interferences and changes to the device will invalidate the
warranty and guaranty rights.
• The device must only be used for the described purpose.
Read and observe these instructions to guarantee a perfect
function of the device and a safe operation.
Risk of electric shock!
Connection and mounting must be
realized by a professional electrician!
WARNING
Safety Instructions
Description of the device
The room thermostat thermio 713 allows you a practical heat
regulation, saves energy and the desired room temperature
can be set easily.
• Control of heating and air-conditioning systems within a
temperature range from + 5°C to + 35°C
• Automatic anti-freeze protection
• Regulation of fan coils
Designated use
• Surface mounted device which is mounted on walls.
• Suitable for use in dry rooms only!
Technical data
Dimensions H x W x D (mm)
Main voltage
Protection class
Switching capacity
– Ohmic load (VDE, IEC)
– Inductive load cos φ 0.6
Switching output
Function mode
Velocity fan coil
Automatic anti-freeze protection
Differential
Controlled temperature
Temperature meas. range
Display temperature update
Ambient temperature
Accuracy
Resolution
Protection degree
82 x 111 x 26
220-240 V/50-60 Hz
||
max. 6 A / 250 V AC/50 Hz
max. 2 A / 250 V AC/50 Hz
potential-free
Heating / Cooling
3 different speeds
+5°C
0.4 / 0.6°C
+5°C ... + 35°C
+0°C ... + 40°C
every 10 sec.
-5°C ... + 45°C
± 1°C for +20°C
0.5°C
IP 30
Installation and mounting
Installation
1. Unscrew the housing cover from the backside of the
housing using a screwdriver.
2. Connect the wires according to the wiring diagram.
3. Fasten the backside of the housing on the wall by means
of the screws included in the delivery.
4. Place the housing cover on the backside of the housing
and screw the two halves together.
Connection diagram
Temperature setting
The room temperature can be set by pressing the keys +
and -.
1. Set the controller to the desired operating mode:
or
2. Press the keys + or - twice.
The background illumination of the display goes on
and the temperature indication ashes.
3. Use the keys + and - to set the desired temperature.
If you do not enter anything within 10 seconds, the set
temperature is stored and the current room temperature
is shown again on the display.
Press the key + or - once in order to switch on the
background illumination of the display for 15 seconds.
Operating modes
Slide the controller to the desired position:
OFF
Heating mode
Use the keys + and - to set the desired temperature.
According to the current room temperature, the boiler
will be set ON or OFF.
Cooling mode
Use the keys + and - to set the desired temperature.
According to the current room temperature, the air-
conditioning system will be set ON or OFF.
If the boiler or the air-conditioning system is switched
ON, the symbol
appears in the display.
Differential (SWING)
Two positions for the jumper of the differential
regulation can be selected:
0.4 or 0.6°C
Afterwards press the Reset key to make your
modication effective.
The differential jumper and the Reset key are located
on the inside of the housing cover.
Speed controller for the fan coil:
Step 1 (F1) = slow speed
Step 2 (F2) = medium speed
Step 3 (F3) = maximum speed
PID
SWING
0.4/0.6
ON/OFF
HEATING/
COOLING
Max.
6(2)A 250 VAC
FAN
230 V AC 50Hz


Dołącz do dyskusji na temat tego produktu
Tutaj możesz podzielić się swoją opinią na temat Grässlin Thermio 713 Termostat. Jeśli masz pytanie, najpierw dokładnie przeczytaj instrukcję. Zapytanie o instrukcję można złożyć za pomocą naszego formularza kontaktowego.