
2 3
INSTRUCTION MANUAL
Read this booklet thoroughly before using and
save it for future reference
IMPORTANT SAFEGUARDS:
Before using the electrical appliance, the
following basic precautions should always be
followed:
1. Read all instructions.
2. Before using check that the voltage of wall
outlet corresponds to the one shown on the
rating plate.
3. Do not operate any appliance with a
damaged cord or plug or after the appliance
malfunctions, or is dropped or damaged
in any manner. Return appliance to
manufacturer or the nearest authorized
service agent for examination, repair or
electrical or mechanical adjustment.
4. Do not touch hot surfaces. Use handles or
knobs.
5. To protect against electric shock do not
immerse cord, plugs, or housing in water or
other liquid.
6. Unplug from outlet when not in use, before
putting on or taking off parts, and before
cleaning.
7. Do not let cord hang over edge of table or hot
surface.
8. The use of accessory attachments not
recommended by the appliance manufacturer
may cause injuries.
9. This appliance is not intended for use by
persons (including children) with reduced
physical, sensory or mental capabilities,
or lack of experience and knowledge,
unless they have been given supervision or
instruction concerning use of the appliances
by a person responsible for their safety.
10. Children should be supervised to ensure that
they do not play with the appliance.
11. Do not place on or near a hot gas or electric
burner, or in a heated oven.
12. Do not touch any moving or spinning parts of
the machine when baking.
13. Never switch on the appliance without
properly placed bread pan fi lled ingredients.
14. Never beat the bread pan on the top or edge
to remove the pan, this may damage the
bread pan.
15. Metal foils or other materials must not be
inserted into the bread maker as this can
give rise to the risk of a fi re or short circuit.
16. Never cover the bread maker with a towel or
any other material, heat and steam must be
able to escape freely. A fi re can be caused
if it is covered by, or comes into contact with
combustible material.
17. Do not operate the appliance for other than
its intended use.
18. Do not use outdoors.
19. Save these instructions.
HOUSEHOLD USE ONLY
DEVICE OVERVIEW
(see fi g. 1)
Appliance lid
Viewing window
2 kneading paddles
Baking mould
Control panel
Housing
Kneading paddle remover
Measuring cup
Measuring spoon
PROPER USE INTRODUCTION
PROPERTIES
You can use the automatic bread maker to bake
according to your taste.
• You can choose from among 12 different
baking programs.
• You can use ready-to-use baking mixtures.
• You can knead noodle dough or roll dough
and make jam.
• With the „gluten-free“ baking program, you
can successfully make gluten-free baking
mixtures and recipes with gluten-free fl ours,
such as corn fl our, buckwheat fl our and
potato fl our.
CONTROL PANEL (see fi g. 2)
A. Display
1. Display for selection of the weight
(750g, 1000g, 1250g)
2. The remaining baking time in minutes and
the programmed time
3. The selected degree of browning
(Medium Dark Rapid Lower)
4. The selected program number
5. The program processing sequence
B. MENU
Load the desired baking program. The program
number and the corresponding baking time
appear on the display.
Important:
When pressing all touch buttons an acoustic
signal must be audible, unless the appliance is
in operation (namely all the program have been
set, and the Start/Stop button has been pressed
down, the others button without acoustic signal).
C. LOAF SIZE
Select the gross weight (750g, 1000g, 1250g).
Press the button enough times until the marking
appears beneath the desired weight.
1.
2.
3.
4.
5.
6.
7.
8.
9.
Note:
The default setting upon activation of the
appliance is 1250g. The program 6, 7, 11 and 12
can not adjust the loaf size.
D. DELAY TIMER
Time-delayed baking.
E. COLOR
Select the degree of browning (Medium Dark
Rapid Lower). Press the button of Color
enough times until a marking appears above
the desired degree of browning. The baking
time changes depending on the selected level
of browning. For baking programs 1-4 you can
activate rapid mode by pressing the button until
the triangle indicates the rapid program. The
program 6, 7, and 11 can not select the color
setting.
F. START/STOP
To start and stop the operation or to delete a
set timer. To interrupt operation, briefl y press
the Start/Stop button, until an acoustic signal is
heard and the time fl ashes on the display. By
pressing the Start/Stop button again operation
can be resumed. If you do not pressing the
Start/Stop manually, the machine will resume to
process program automatically after 10 minutes.
To fi nish operation and delete the settings, press
the Start/Stop button for 3 seconds until one long
acoustic signals are audible.
Note:
Do not press the Start/Stop button, if you only
want to check the state of your bread.
MEMORY FUNCTION
When being switched on again after a power
failure of up to approx. 10 minutes, the program
will continue from the same point. This does not
apply, however, when you cancel/terminate the
baking process by pressing the Start/Stop button
for 3 seconds.
WINDOW
You can check the baking process through the
window.
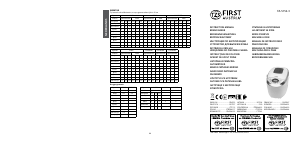
BAKING PROGRAMS
You select the desired program by pressing
the button menu. The corresponding program
number is showed on the display. The baking
time depends on the selected Program
combinations. See chapter „Program sequence”.
BAKING PROGRAM 1: BASIC
For white and mixed breads mainly consisting of
wheat fl our or rye fl our. The bread has a compact
consistency. You can adjust the degree of
browning of the bread via the button Color.
BAKING PROGRAM 2: FRENCH
For light breads made from fi ne fl our. Normally
the bread is fl uffy and has a crispy crust. This is
not suitable for baking recipes requiring butter,
margarine or milk.
BAKING PROGRAM 3: WHOLE WHEAT
For breads with heavy varieties of fl our that
require a longer phase of kneading and rising (for
example, whole wheat fl our and rye fl our). The
bread will be more compact and heavy.
BAKING PROGRAM 4: SWEET
For breads with additives such as fruit juices,
grated coconut, raisins, dry fruits, chocolate or
added sugar. Due to a longer phase of rising the
bread will be light and airy.
BAKING PROGRAM 5: SUPER RAPID
Kneading, rise and baking in a very fast way. But
the baked bread is the most rough among all
bread menus.
BAKING PROGRAM 6: DOUGH
For preparing the yeast dough for buns, pizza or
plaits. In this program no baking is done.
BAKING PROGRAM 7: PASTE DOUGH
For preparing noodle dough. In this program no
baking is done.
BAKING PROGRAM 8: BUTTER MILK
For breads made with buttermilk or yoghurt.
PROGRAM 9: GLUTEN FREE
For breads of gluten-free fl ours and baking
mixtures. Gluten-free fl ours require longer for
the uptake of liquids and have different rising
properties.
BAKING PROGRAM 10: CAKE
Kneading, rise and baking, but rise with soda or
baking powder
PROGRAM 11: JAM
For making jams.
PROGRAM 12: BAKE
For additional baking of breads that are too light
or not baked through. In this program there is
no kneading or resting. The bread will be kept
warm for nearly an hour after the end of the
baking operation. This prevents the bread from
becoming too moist.
• To prematurely terminate this function press
the Start/Stop button for three seconds,
until one long acoustic signals are heard.
To switch off the appliance, disconnect the
appliance from the power supply.
In programs 1, 2,3, 4, 5, 6, 8 and 9 hurried
acoustic signal sounds during the program
sequence. Soon thereafter, add the ingredients
such as fruits or nuts. And the “ADD” letter will
appear. The ingredients are not chopped by the
kneading paddle.
If you have set the delayed timer, you can put all
the ingredients into the baking mould
ENGLISH
ENGLISH
m-5152_v03.indd Abs1:2-Abs1:3m-5152_v03.indd Abs1:2-Abs1:3 2010.6.10 6:45:30 PM2010.6.10 6:45:30 PM

Dołącz do dyskusji na temat tego produktu
Tutaj możesz podzielić się swoją opinią na temat First Austria FA-5152 Automat do chleba. Jeśli masz pytanie, najpierw dokładnie przeczytaj instrukcję. Zapytanie o instrukcję można złożyć za pomocą naszego formularza kontaktowego.
odpowiedz | To było pomocne (20) (Przetłumaczone przez Google)
odpowiedz | To było pomocne (3) Czytaj więcej (Przetłumaczone przez Google)
To było pomocne (0) (Przetłumaczone przez Google)
odpowiedz | To było pomocne (0) (Przetłumaczone przez Google)
odpowiedz | To było pomocne (0) (Przetłumaczone przez Google)
odpowiedz | To było pomocne (0) (Przetłumaczone przez Google)
odpowiedz | To było pomocne (0) (Przetłumaczone przez Google)
odpowiedz | To było pomocne (0) (Przetłumaczone przez Google)