BATTERIES SAFETY WARNINGS:
1. Please read all instructions carefully before use.
2. Install batteries correctly by matching the
polarities (+/-).
3. Always replace a complete set of batteries.
4. Never mix used and new batteries.
5. Remove exhausted batteries immediately.
6. Remove batteries when not in use.
7. Do not recharge and do not dispose of batteries
in fi re as the batteries may explode.
8. Ensure batteries are stored away from metal
objects as contact may cause a short circuit.
9. Avoid exposing batteries to temperature or
humidity extremes or direct sunlight.
10. Keep all batteries out of reach from children.
They are a choking hazard.
11. Please retain batteries packaging for future
reference.
USING AC/DC ADAPTER.
1. Remove all ‘AA’ size batteries when using
AC/DC adapter.
DISPLAYING TIME AND ALARM TIME.
Press ‘MODE’ button (5) to toggle between
displaying time and alarm time.
TO SET TIME AND CALENDAR:
1. When the clock is showing the time, press the
‘SET’ button (6) and the hour digits will fl ash.
2. Press ‘ADJ’ button (7) or ‘C/F’ button (8) to
change the hour setting.
3. Press ‘SET’ button (6) again.
4. Press ‘ADJ’ button (7) or ‘C/F’ button (8) to
change the minute setting.
5. Press ‘SET’ button (6) again.
6. Press ‘ADJ’ button (7) or ‘C/F’ button (8) to
change the year setting.
7. Press ‘SET’ button (6) again.
8. Press ‘ADJ’ button (7) or ‘C/F’ button (8) to
change the month setting.
9. Press ‘SET’ button (6) again.
10. Press ‘ADJ’ button (7) or ‘C/F’ button (8) to
change the date setting.
11. Press ‘SET’ button (6) to confi rm.
AM/PM AND 24-HOUR CLOCK
1. When the time is showing, press ‘ADJ’ button
(7) to toggle between displaying AM/PM and
24-hour clock.
TO SET ALARM TIME:
1. When the alarm time is showing, press the ‘SET’
button (6) and the hour digits will fl ash.
2. Press ‘ADJ’ button (7) or ‘C/F’ button (8) to
change the alarm hour setting.
3. Press ‘SET’ button (6) again.
4. Press ‘ADJ’ button (7) or ‘C/F’ button (8) to
change the alarm minute setting.
5. Press ‘PRESET’ button (6) again.
6. Press ‘ADJ’ button (7) or ‘C/F’ button (8) to
change the snooze duration (Range 1 to 60
minutes).
7. Press ‘SET’ button (6) again.
8. Press ‘ADJ’ button (7) or ‘C/F’ button (8) to
change the alarm sound (8 different sounds).
9. Press ‘SET’ button (6) to confi rm.
TO ACTIVATE THE ALARM:
When the alarm time is showing, press the ‘ADJ’
button once to activate the alarm. Press the ‘ADJ’
button again to activate the alarm and snooze.
Press the ‘ADJ’ button again to deactivate the alarm
and snooze.
TO TURN OFF THE ALARM:
1. When the beeping alarm goes on, press any
button except the ‘MODE’ button (5) to turn off
the beeping alarm.
2. Press ‘MODE’ button (5) to activate the snooze
function. The alarm will sound again as the
preset duration
.
TO ACTIVATE THE RADIO WITH ALARM
1. Follow the instructions below to operate the
radio.
2. Slide radio ‘AUTO/OFF/ON’ switch (4) to
‘AUTO’ to turn on the radio and follow the above
instructions set the alarm time.
3. Ensure the volume dial is at an appropriate
hearing volume and the radio is at the desired
frequency, the radio will sound when the preset
alarm is reached.
CELSIUS/FAHRENHEIT
1. Press ‘C/F’ button (8) to toggle between
displaying the temperature in Celsius and
Fahrenheit.
RADIO OPERATION
1. Slide radio ‘AUTO/OFF/ON’ switch (4) to ‘ON’ to
turn on the radio. Slide the switch ‘OFF’ to turn
off the radio.
2. Select ‘FM’ or ‘AM’ band by turning the dial
turning the ‘AM/FM’ dial (3).
3. Select the desired radio station by turning the
‘AM/FM Frequency’ dial
4. Adjust the volume by turning the ‘VOLUME’ dial
(1) to the desired level. The volume of the radio
should be set to the lowest possible to avoid any
damage to your hearing.
ANTENNAS
1. Extend and change the direction of the FM
antenna (12) to achieve best reception.
2. This unit is equipped with built-in AM antenna.
To improve AM reception, turn the unit in a
direction which gives the best results.
USING THE RADIO AS A SPEAKER
1. Slide radio ‘AUTO/OFF/ON’ switch (4) to ‘ON’ to
turn on the radio.
2. Insert any external audio output device (e.g.
MP3 players) in 3.5mm ‘AUX’ auxiliary audio
line-in jack (10). Audio line is not included.
3
ENGLISH
2
ENGLISH
FM-AM ALARM CLOCK RADIO
OPERATING INSTRUCTIONS
Before connecting, operating, or adjusting this
product, please read these instructions completely.
PRECAUTIONS
SAFETY
1. The unit should be connected to power supply
only of the type described in the operating
instructions or as marked on the unit.
2. The AC power plug will fi t into the AC wall outlet
in one way only. Do not try to force the plug in
the outlet if it doesn’t fi t.
3. Adaptor output cords should be routed so that
they are not likely to be walked on or pinched
by items placed upon or against them. Never
take hold of the plug or cord if your hand is wet.
Grasp only the plug body when connecting or
disconnecting the ac power.
4. Turn off the power when the unit is not in used.
When the unit is not in used for an extended
period of time, disconnected the AC power from
the wall AC power outlet.
5. Do not use this unit near water including but not
limited to a bathtub, washbowl, swimming pool,
spa, sinks, and other similar water sources.
Damp and extreme humid rooms should also be
avoided, such as bathrooms, basements, crawl
spaces, and the like.
6. The unit should be situated away from heat
sources such as radiators, heaters, vents,
and other similar heating elements. The unit
should be only used indoors and in a room with
temperature between 5°C and 35°C.
7. The unit should be situated so that its location or
position allows for good ventilation. A minimum
of 4” (10cm) clearance on all sides from any
foreign object is recommended.
8. The volume of the radio should be set to the
lowest possible to avoid any damage to your
hearing. The radio should not be on loud for
any extended period of time. Turn off the radio
if you are experiencing any hearing pain and
should seek medical attention immediately.
Seek professional advice if you are unsure what
a safe hearing level is.
9. Care should be taken so that objects do not
fall into and liquids are not spilled onto unit. Do
not subject this unit to excessive smoke, dust,
vibrations, extreme temperature and humidity, or
shock.
10. The unit should be situated away from
equipment or devices that generate strong
magnetism.
11. The unit shall be placed on a fl at level
surface only. The unit is not designed to be
wall mounted, ceiling mounted, or any other
mounting methods not described herein.
12. Clean the unit with a soft dry cloth. Do not use
any type of abrasive pad, scouring powder, or
any other liquids or cleaning solvents.
13. The unit shall be serviced by qualifi ed service
personnel when:
a. The adaptor output cord, the plug, the AC
adapter, or any other part of the AC power
supply has been damaged; or
b. Objects have fallen or liquid has been spilled
onto the unit; or
c. The unit has been exposed to rain or
moisture; or
d. The unit does not appear to operate normally
or exhibits a marked change in performance;
or
e. The unit has been dropped, or the enclosure
damaged.
14. Users should not attempt to service the
unit beyond that described in this operating
instructions. All other servicing should be
referred to qualifi ed service personnel. Do not
remove any screws unless instructed. Do not
attempt to fi x this unit.
15. Do not dispose this unit in a fi re. IT MAY
EXPLODE.
16. Keep unit away from small children. The unit or
parts of the unit might be a choking hazard.
17. Dispose the unit legally.
18. Recycle when possible.
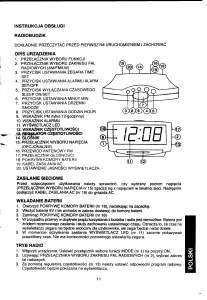
FUNCTIONAL OVERVIEW
• AM/FM radio
• Digital display with backlight
• Alarm clock with weekday calendar and snooze.
• Temperature display
Fig. 1 Top view/Fig. 2 Back view
1. ‘VOLUME’ dial
2. ‘AM/FM Frequency’ dial
3. ‘AM/FM’ switch
4. Radio ‘AUTO/OFF/ON’ switch
5. ‘MODE’ button
6. ‘SET’ button
7. ‘ADJ’ button
8. ‘C/F’ button
9. ‘TIMER’ button
10. ‘AUX’ auxiliary audio line-in jack
11. DC 7.5V jack
12. Antenna
13. Battery compartment
GETTING STARTED:
The clock in this unit powered separately by 2x ‘AG-
13’ size batteries.
1. Remove battery compartment (13) on the back
of the unit. (See fi gure 2).
2. Install 2x ‘AG-13’ size button cell batteries under
the ‘AA’ size batteries (if present).
3. Replace battery compartment (13).
The radio can be powered either by dry cell
batteries or with DC 7.5V AC/DC adapter.
1. Remove battery compartment (13) on the back
of the unit. (See fi gure 2).
2. Install 5x ‘AA’ size batteries.
3. Replace battery compartment (13).
N
i
FA-1908
2
1
2
1
FA-1908-1


Dołącz do dyskusji na temat tego produktu
Tutaj możesz podzielić się swoją opinią na temat First Austria FA-1908 Radiobudzik. Jeśli masz pytanie, najpierw dokładnie przeczytaj instrukcję. Zapytanie o instrukcję można złożyć za pomocą naszego formularza kontaktowego.