
IMPORTANT: THESE INSTRUCTIONS SHOULD BE READ CAREFULLY AND RETAINED FOR FUTURE REFERENCE
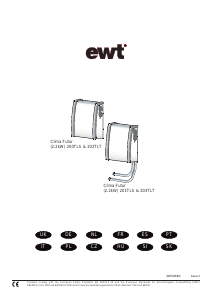
Clima Futur 200TLS, 201TLS, 202TLT & 203TLT
UK
Model(s) Specification
Clima Futur 200TLS 2.2KW Rotary switch & Thermostat
Clima Futur 201TLS 2.2KW Rotary switch, Thermostat & Towel Rail
Clima Futur 202TLT 2.2KW Thermostat & 120 minute Runback Timer
Clima Futur 203TLT 2.2KW Thermostat, 120 minute Runback Timer & Towel Rail
Important Safety Advice
READ THESE INSTRUCTIONS BEFORE USE.
WARNING – DO NOT USE THIS HEATER IN THE IMMEDIATE SURROUNDINGS
OF A BATH, A SHOWER OR A SWIMMING POOL.
DO NOT COVER THE APPLIANCE or place material or garments on it, or obstruct
the air circulation around this appliance, for example with curtains or furniture,
as this could cause overheating and a fire risk.
DO NOT PLACE AEROSOLS OR OTHER CONTAINERS SUSCEPTIBLE TO HEAT
IN THE DIRECT AIRFLOW FROM THE UNIT.
THIS HEATER MUST NOT BE LOCATED IMMEDIATELY BELOW A FIXED SOCKET
OUTLET.
The socket-outlet must be accessible at all times to enable the mains plug to be
disconnected as quickly as possible.
WARNING – DISCONNECT THE HEATER FROM THE ELECTRICITY SUPPLY
BEFORE UNDERTAKING SERVICE OR REPAIR.
DO NOT operate the heater with the mains lead overhanging the front grill.
The appliance is not intended for use by children or other persons without
assistance or supervision if their physical, sensory or mental capabilities prevent
them from using it safely. Children should be supervised to ensure that they do
not play with the appliance.
The heater carries the Warning symbol indicating that it must not be covered.
The instruction leaflet belongs to the appliance and must be kept in a safe place.
If changing owners, the leaflet must be surrendered to the new owner.
IMPORTANT – If the mains lead of this appliance is damaged, it must be replaced
by the manufacturer or its service agent or similarly qualified person in order to
avoid a hazard.
WARNING: In order to avoid a hazard due to inadvertent resetting of the thermal
cut-out, this appliance must not be supplied through an external switching
device, such as a timer, or connected to a circuit that is regularly switched on
and off by the utility.
General
The heater has been designed with a durable metal body with plastic trims and is to be
mounted in the vertical position with the grill pointing towards the ground.
The heater has a loading of 2.2kW. It is designed for permanent wall mounting and is
suitable for operation on A.C. electrical supply having the same voltage as shown on the
rating label.
Electrical Installation
Before undertaking installation work, ensure the electricity supply is disconnected from
any relevant fixed wiring.
The heater must be used on an A.C. supply only and the voltage marked on the heater
must correspond to the supply voltage. This heater is fitted with a plug.
The appliance complies with EEC regulations EN55014 concerning radio and T.V
interference.
Installation Procedure
For wall mounting, care must be taken not to damage concealed cables. For this reason,
no holes must be made above or below wall power sockets.
It is essential to observe minimum wall mounting clearances, see Fig. 1. The appliance
is splash proof and may be used in bathrooms, however not in the immediate vicinity of
baths, showers, water connections, wash basins or swimming pools – see Fig. 6.
The appliance should be fitted vertically with the outlet grill facing towards the
floor. It should be mounted not less than 1.8 metres above the floor with a
clearance of 600mm to any shelf or projecting surface below the heater and not
less than 280mm below the ceiling or other projecting surface. It must also be not
less than 250mm from an adjacent projected surface. All screws and wall plugs
needed to fix the appliance to the wall are supplied.
Wall bracket assembly (models 200TLS & 202TLT)
1. Position the wall bracket level and at the correct height on the wall – see Fig.’s 1 &
2.
2. Mark the position of the holes on the wall and drill and plug for the 3 screws supplied.
3. Screw the wall bracket to the wall making sure that it is level.
4
. Hang the appliance on to the wall bracket – see Fig. 3.
Wall bracket & Towel Rail assembly (models 201TLS & 203TLT)
On the 201 TLS and 203 TLT models, there is an additional 2 bar towel rail supplied
with these models.
The procedure for assembling the towel rails is as follows:
1. Follow steps 1 – 3 above to assemble the wall bracket, except fix the top 2 screws
only, the third screw is to be fixed through the ‘towel rail’ bracket – see below.
2. Slide the ‘towel rail’ bracket into place (see step 1 in Fig. 3) and secure its
position with the third screw – see step 2 in Fig. 3.
3. Position the towel rails on to the wall rail bracket ensuring the larger rail is on
the outside.
4. Screw the towel rails to the wall rail bracket ensure that they are level – see
step 3 in Fig. 3.
5. Hang the appliance on to the wall bracket – see Fig. 3.
Controls
Switch (200TLS & 201TLS only)
The rotary switch on models 200TLS and 201TLS (see ‘A’ in Fig. 4) allows the
appliance to operate the following functions:
Off
Cool Blow
Half heat
Full heat
Thermostat (all models)
The heat output is controlled by the thermostat (see ‘B’ in Fig. 4), according to the room
temperature. Firstly turn the knob fully clockwise to the maximum setting. When the room
is warm enough, reduce the setting slowly until the heater ‘clicks’ off. The heater will now
cycle on and off to maintain your selected room temperature. A neon (see ‘C’ in Fig. 4)
will illuminate when either heat setting is on and will switch off when the thermostat
activates.
Run back Timer (202TLT & 203TLT only)
On these models the heater can also be switched On using the run back timer (see ‘A’ in
Fig. 5).
Setting the heater operating time:
The heater is switched on and off by means of a mechanical timer. The operating time is
infinitely adjustable up to a maximum setting of 120 minutes.
Rotate dial to the right (in clockwise direction). The heater is switched on.
After the preset time has elapsed, the heater switches off automatically (rotary dial is in
the left most position).
The heater can be switched off at any time, i.e. also before the originally set time has
elapsed, by turning the rotary dial all the way to the left.
When the runback timer is in operation full heat output can be achieved however the
thermostat is inactive and will not regulate the room temperature. When the run back
timer is not in operation the heater will operate at half heat output only.
Safety
For your safety, this appliance is fitted with a thermal cut-out. In the event that the product
overheats, the cut-out switches the heater off automatically. To bring the heater back into
operation, remove the cause of overheating, then turn off the electrical supply to the
heater for a few minutes.
When the heater has cooled sufficiently reconnect and switch on the heater.
Cleaning and User Maintenance
BEFORE UNDERTAKING CLEANING OR MAINTENANCE WORK ON THE APPLIANCE
IMMEDIATELY DISCONNECT THE ELECTRICITY SUPPLY.
The outside can be cleaned by wiping it over with a soft damp cloth and then dried. Do
not use abrasive cleaning powders or furniture polish as this can damage the surface
finish. Ensure that dust of fluff does not accumulate inside as this could lead to overheating
of the element. Use a vacuum cleaner to remove any fluff which does accumulate.
Recycling
For electrical products sold within the European Community. At the end
of the electrical products useful life it should not be disposed of with
household waste. Please recycle where facilities exist. Check with your
Local Authority or retailer for recycling advice in your country.
After Sales Service
Should you require after sales service or should you need to purchase any
spares, please contact the retailer from whom the appliance was purchased or
contact the service number relevant to your country on the warranty card.
Please do not return a faulty product to us in the first instance as this may result
in loss or damage and delay in providing you with a satisfactory service.
Please retain your receipt as proof of purchase.


Dołącz do dyskusji na temat tego produktu
Tutaj możesz podzielić się swoją opinią na temat EWT Clima Futur 201TLS Ogrzewacz. Jeśli masz pytanie, najpierw dokładnie przeczytaj instrukcję. Zapytanie o instrukcję można złożyć za pomocą naszego formularza kontaktowego.