~
+1
MODE
2
+1
MODE
Fig. H
MAIN UNIT SETUP
~
0~9
0~9
4
OK!
OK!
2s
~
OK!
2s
2s
~
OK!
0~9
4
2s
4
4
2s
1st
2nd
Tire Size
Circumference
Nunber
POPULAR TIRES CIRCUMFERENCE
REFERENCE TABLE
b.
a.
INDEX
:
N
N
N
=KEY NUMBER:[
o
:Mode Button,
f
:Set Button]
Means press button
N
more than 2 seconds
Means press button
N
quickly.
2s
BATTERY CHANGE
WHEEL CIRCUMFERENCE
4
+
2
3s
2
OK
OK!
Unit Selection
Bike 1 Circumference Setting
Bike 2 Circumference Setting
Bike 1 ODO setting
OK!
4
2s
Clock setting
Bike 2 ODO setting
Riding time count-down
Distance count-down
2s
2s
2s
OK!
4
2s
END setting
2
4
RIDING STATUS
4
DST, TM, MAX, AVG,
MAX_RPM, AVG_RPM
=
0
3s
RESET DATA
BIKE 1 or BIKE 2 SELECTION
FUNCTIONS OPERATION
5s
<GENERAL OPERATION>
Change screen
Press MODE key to
change screen
Reset data
Press and hold MODE key 3 secs
(DST, TM, MAX, AVG,
M-RPM, A-RPM DATA)
Press and hold MODE
key 5 secs
(only ODO mode)
Change wheel size
Press and hold MODE
key 5 secs
Resetting data
Press SET key enter
setting mode
Press and hold MODE o + SET f key
3 secs to restart main unit
All clear
<SETTING OPERATION>
Adjust digit
Press MODE key to
select
Change to next
setting digit
Press and hold MODE
key 2 secs
2s
Press SET key turn to
next function
Turn to next
function
Quit of setting
mode
Press and hold SET
key 2 secs
Enter DST or
TM mode
Press and hold MODE
key 3 secs
Quit DST or
TM mode
PROBLEM CHECK ITEM REMEDY
No display
No current
Speed or
incorrect
data
Irregular
display
LCD is black
Display is
slow
1. Is the battery dead?
2. Is there incorrect battery installation?
1. Is it at the MAIN UNIT SETUP or another
setting screen?
2. Are the relative positions and gap
between sensor and magnet correct?
3. Is the circumference correct?
4. Is the sensing distance too long or the
installation angle of the sensor incorrect?
5. Is the sensor battery nearly exhausted?
6. Is any strong interference source nearby?
Did you leave main unit under
directsunlight when not riding the bike
for a long period of time?
Is the temperature below 0° C (32° F)?
1. Replace the battery.
2. Be sure that the positive pole of the battery is
facing the battery cap.
1. Refer to the setting procedure and complete
the adjustment.
2. Refer to
Installation
(Fig. C-1) and(Fig.
D-4) and re-adjust position and gap correctly.
3. Refer to "Circumference Setting" and enter
correct value.
4.
Refer to Installation (Fig. D-3) to adjust distance
or angle between he main unit and the sensor.
5. Replace with a new battery.
6. Move away from the source of interference.
Refer to the "Main Unit Setup" and initiate
the computer again.
Place main unit in the shade to return to
normal state. No adverse effect on data.
Unit will return to normal state when the
temperature rises.
TROUBLE SHOOTING
Check the following before taking unit in for repairs.
PRECAUTIONS
1. This computer can be used in the rain but should not be used under water.
2. Don’t leave the main unit exposed to direct sunlight when not riding the bike.
3. Don’t disassemble the main unit or it’s accessories.
4. Check relative position and gap of sensor and magnet periodically.
5. Clean the contacts of the bracket and the bottom of the main unit periodically.
6. Don’t use thinner, alcohol or benzine to clean the main unit or its accessories when they become
dirty.
7. Remember to pay attention to the road while riding.
Sensor: No Contact Magnetic Sensor.
Battery Type: 3V battery x 1 (CR2032), battery operating life is about 2 years.
(Based on an average of 1.5 hours use per day)
Battery Operating Life:
About 3 years. (The original factory-attached battery may be shorter
than this period due to shipping and storage time.)
Dimensions/Weight: 45.8 x 54 x 17.2mm / 31.5g
Wheel Circumference Setting: 0mm - 3999mm (1mm increment)
Operation Temperature: 0
°
C ~ 50
°
C (32
°
F ~ 122
°
F)
Storage Temperature: - 10
°
C ~ 60
°
C (14
°
F ~ 140
°
F)
INITIATE THE COMPUTER
1.A battery is already loaded in the main unit when purchased. Hold down the MODE button o and
SET button f simultaneously for more than 3 seconds to initiate the computer and clear all data.
IMPORTANT: Be sure to initiate the computer before it is being used, otherwise the
computer may run errors.
2.The LCD segments will be tested automatically after the unit is initiated.
3.Press MODE button o to stop LCD test, then the flickering "Km/h".
MAIN UNIT SLIDE ON/OFF DETECTION
The computer has a slide on detecting switch (patents pending) to avoid noise interference when the main
unit is removed from the bracket. The main unit can receive the wheel signal only when it is slid onto the
bracket only.
AUTOMATIC START/STOP & POWER AUTO ON/OFF
1.The computer will automatically begin counting data upon riding and stop counting data when riding
is stopped. The flickering symbol " " indicates that the computer is at start status.
2.To preserve battery, this computer will automatically switch off and just displays the " " data when it
has not been used for about 20 minutes. The power will be turned on by pressing the MODE button
o
.
RESET DATA
Hold down the MODE button o‚ till the LCD digit is blanked, then release it. The computer will reset
DST, TM, MAX, AVG, M-RPM,A-RPM, data from stored values to zero for a new cycle reference.
WHEEL CIRCUMFERENCE
z Precise Measurement (Fig. a)
Roll the wheel until the valve stem is at its lowest point close to the ground, then mark this first
point on the ground. Get on the bicycle and have a helper push you until the valve stem returns to
its lowest point. Mark the second point on the ground. Measure the distance between the marks.
Enter this value to set the wheel circumference.
zQuick Table (Fig.b): Get a suitable circumference value from the table.
MAIN UNIT BATTERY CHANGE
1. The symbol " " will appear to indicate the battery is nearly exhausted.
2. Replace the battery with a new battery within a few days after the symbol was appeared.
3.All data will be cleared when battery is replaced, but this computer allows you to re-key in ODO which
you had rode after replacing battery, keeping record these data before you remove the old battery.
4.Replace with a new CR2032 battery and initiate the main unit.
FUNCTIONS
Current Speed 0.0 – 199.9 Km/h or 120.0 Mile/h+/- 1%
1. The current speed is always displayed on the left side of upper display when riding. It displays
current speed up to 199.9 KM/h or 120.0 M/h (for wheel diameters of over 24 inches).
2. When riding is stopped, the speed will continue to count 4 seconds for Bike 1 and count 2 seconds
for Bike2 to confirm that no more wheel signals have been sent.
DST Trip Distance 0.00 – 999.99 Km or Miles +/- 0.1%
The DST function accumulates the distance data from the last RESET operation as long as the bike
is being ridden.
TM Riding Time 0 00H:00M:00S-99H:59M:59S
1. The TM totals the riding time from the last RESET operation.
2.It will automatically begin counting upon riding, and continue to count 4 seconds for Bike 1 and count
2 seconds for Bike 2 to confirm that no more wheel sensing signal is sent when riding is stopped.
But this computer revises back the overcounted 4 seconds for Bike 1 and 2 seconds for Bike2
automatically to get the real riding time.
MAX Maximum Speed 0.0 – 199.9 Km/h or 120.0 Mile/h +/- 1%
It shows the highest speed from the last RESET operation.
AVG Average Speed 0.0 – 199.9 Km/h / 0.0 – 120.0Mile/h +/- 0.1%
1. It is calculated from the DST divided by the TM. The average data counted is from the last RESET
to current point.
2. It will display “0.0” when TM is less than 4 seconds.
3. It is updated once about one second when TM is over 4 seconds.
4. It displays an “Error” symbol when either the TM is over 100 hours or the DST is over 1,000 km (or
miles). Reset the unit in order to restart.
ODO ODO-1/ ODO-2 0.0 – 999999 Km or Miles +/- 0.1%
1.The odometer cumulates the total distance as long as the bike is running, either Bike 1 or 2 has its
odometer ODO 1 or ODO 2 individually.
2.The ODO1, ODO 2 data can not be cleared to zero by RESET operation.
CLOCK 12HR AM/PM or 24HR Clock
1:00:00 ~12:59:59 AM/PM or 0:00:00 ~ 23:59:59 +/- 0.003%
It can display the current time in 12HR AM/PM or 24HR clock.
RPM Current RPM (Revolutions Per Minute) 0-199rpm +/- 0.1%
1. The current RPM is the pedal revolutions per minute (rpm). It displays on the right-upper icon and
updates every one second.
2. The general display range is from 0 to 199 rpm in 1 rpm increments. It resets the current RPM data
to zero after 4 seconds when the crank stop turning.
AVG RPM Average RPM 0-199rpm +/- 1.5%
1. The average RPM is calculated from the total pedal revolutions divided by the pedal revolution time
(It is independent from the wheel riding time). The A-RPM is counted from the last RESET
operation to current point and it is updated once about one second.
2. It displays “0” when either the pedal revolution time is less than 6 seconds or the total pedal
revolution is less than 10 . (Both of these 2 values are not displayed on the screen.)
3. It displays on “Error” symbol when either the total pedal revolution is over 1 million turns or the
pedal revolution time is over 100 hours. Reset it in order to restart.
MAX RPM Maximum RPM 0-199rpm +/- 1.5%
1. It records the highest RPM from the last RESET operation.
2. The maximum RPM display range is the same as the current cadence.
/ Speed Pacer
It flashes the " " speed pacer arrow while the current speed is higher than the average speed and
the down arrow " " flickers conversely.
*
Remarks: All functions’ data are updated about every one second.
SPECIAL FUNCTIONS FOR USER
DST Distance countdown 0.0~999.9 Km or miles
When countdown to Zero, freezeh the TM, AVG, MAX, AVG_RPM, MAX_RPM data
1.REMIND ALARM
For example, if the rider wants to go 30Km, presetting the desired distance, this computer will
flash when it reaches 30Km.
2. FOR TEST
For example, the rider presets 1Km testing distance. One does not need to operate any button
while riding. When the rider reaches 1Km, the computer freeze the TM, AVG, MAX, AVG_RPM,
data automatically for your reference.
TM Riding Time countdown 0H:00M:00S~99H:59M:59S
1. The TIME countdown function changes the TM function from count-up to count-down. It also
flashes to remind the user and freeze the DST, AVG, MAX, MAX_RPM and AVG_RPM
data when the count-down reaches zero.
2. The operations of the TIME countdown function are refer to the descriptions in the DISTANCE
countdown section of these instructions.
2s
English
English
+
3s
Riding time
count down
1. When enter TM mode:
Auto-reset DST, TM, AVG/ MAX / AVG_RPM/ MAX_RPM
data.
2. Auto-start to count down while riding
3. When count down to zero,ash symbol and freeze all
data then TM return to default data
4. Press and hold key 3 secs to reset all data and quit
TM count down mode.
1. When enter DST mode:
Auto-reset DST, TM, AVG/ MAX / AVG_RPM/
MAX_RPM data.
2. Auto-start to count down while riding
3. When count down to zero,ash symbol and freeze all
data then DST return to default data
4. Press and hold key 3 secs to reset all data and quit
DST-count down mode.
Only DST mode
Only TM mode
-04C
SET
MODE
3V CR2032
S
2s
3s
5s
5s
3s
SET
MODE
SET
4
MODE
2
2s
0~3
0~3
1~12
0~23
0~5
0~9
5s
3s
0~9
5s
3s
Distance count
down setting
2s
+
3s
2s
3s
5s
5s
3s
SET
MODE
Cancella tutto
Daten-Reset
Tenere premuto per 2
secondi il tasto MODE o.
<NORMALBETRIEB>
Menü ändern
Daten-Reset
Radgröße ändern
Wechsel in den
DST- bzw.
TM-Modus.
DST- bzw.
TM-Modus
beenden
<EINSTELLUNG>
(nur ODO-Modus)
Betätigen Sie die MODE o-Taste,
um das Menü zu wechseln.
Halten Sie die MODE o-Taste 3
Sekunden lang gedrückt.
(DST, TM, MAX, AVG, M-RPM,
A-RPM-Daten.)
Halten Sie die MODE o-Taste 5
Sekunden lang gedrückt.
Halten Sie die MODE o-Taste 5
Sekunden lang gedrückt
Halten Sie die MODE o-Taste 3
Sekunden lang gedrückt.
Betätigen Sie die SET f -Taste,
nachdem Sie in den Einstellungsmodus
(Setting) gegangen sind.
Ziffer einstellen
Betätigen Sie zur Auswahl
die MODE o-Taste.
Wechsel zur
nächsten
Einstellungsziffer
Weiter zur
nächsten Funktion
Betätigen Sie die SET
f
-Taste
und setzen Sie den Vorgang mit
der nächsten Funktion fort.
Einstellungsmodus
beenden
Halten Sie die SETf -Taste
2 Sekunden lang gedrückt.
Halten Sie die MODE-o und die SETf-Taste
3 Sekunden lang gedrückt, um den Computer
neu zu starten.
Aktuelle Geschwindigkeit 0.0 – 199.9 km/h bzw. 120.0 Meilen/h+/- 1%
1. Die aktuelle Geschwindigkeit wird beim Fahren immer links im oberen Teil des Displays angezeigt.
Das Display zeigt die aktuelle Geschwindigkeit bis zu 199,9 KM/h bzw. 120,0 m/h (für
Raddurchmesser über 24').
2.
Bei Beendigung des Fahrens bleibt die Geschwindigkeitsanzeige noch 4 Sekunden für Fahrrad 1
und 2 Sekunden für Fahrrad 2 aktiviert, um sicher zu gehen, dass keine Radsignale mehr
gesendet wurden.
DST Zurückgelegte Strecke 0.00 – 999.99 km bzw. Meilen +/- 0.1%
Die DST-Funktion zeigt die mit dem Fahrrad zurückgelegte Entfernung seit dem letzten RESET an.
TM Fahrzeit 0 00H:00M:00S-99H:59M:59S
1. Gesamte Fahrzeit seit dem letzten RESET.
2. Die Zählung beginnt sofort nach Fahrtbeginn und endet 4 Sekunden (Fahrrad 1) bzw. 2 Sekunden
(Fahrrad 2) nach Fahrtende, um sicher zu gehen, dass nach Beendigung der Fahrt kein
Radmess-Signal mehr übertragen wird.
Die zuviel gezählten Sekunden werden jedoch zur Erm ttlung der tatsächlichen Fahrzeit automatisch wieder
abgezogen.
MAX Höchstgeschwindigkeit 0.0 – 199.9 km/h oder 120.0 Meilen/h +/- 1%
Zeigt die höchste erreichte Geschwindigkeit seit dem letzten RESET.
AVG Durchschnittsgeschwindigkeit 0.0 – 199.9 Km/h / 0.0 – 120.0 Meilen/h +/- 0.1%
1. Entspricht der zurückgelegten Strecke (DST) geteilt durch die Fahrzeit (TM). Die Durchschnittsdaten
werden vom letzten RESET bis zum jeweiligen Punkt gezählt.
2. Wenn der TM-Wert weniger als 4 Sekunden beträgt, wird “0.0” angezeigt.
3. Bei längeren Fahrzeiten erfolgt die Aktualisierung in Sekundenintervallen.
4. Ein "Error"-Symbol wird angezeigt, wenn die Fahrzeit über 100 Stunden oder die zurückgelegte
Entfernung über 1,000 km (bzw. Meilen) beträgt). Zum Neustart muss die RESET-Taste am Gerät
betätigt werden.
ODO ODO-1/ ODO-2
0.0 – 999999 km oder Meilen +/- 0.1%
1. Die Gesamtkilometerstandsanzeige zählt sämtliche Streckenkilometerstände während der Laufzeit
des Fahrrades zusammen. Sowohl Fahrrad 1 als auch Fahrrad 2 verfügt jeweils über eine eigene
Gesamtkilometerstandsanzeige (ODO 1 bzw. ODO 2).
2. Die Gesamtkilometerstanddaten von ODO 1 und ODO 2 werden bei einem Reset nicht
zurückgesetzt.
CLOCK 12- oder 24-Stunden-Anzeige
1:00:00 ~12:59:59 AM/PM oder 0:00:00 ~ 23:59:59 +/- 0.003%
Die Uhrzeit kann im 12-Stunden- (AM/PM) oder im 24-Stunden-Format angezeigt werden.
RPM Derzeitige Drehzahl (Umdrehungen pro Minute) 0-199Drehzahl (RPM+/- 0.1%
1. Die aktuelle Drehzahl ist die Anzahl der Pedalumdrehungen pro Minute (RPM). Sie wird mit dem
Symbol oben rechts angezeigt und wird jede Sekunde aktualisiert.
2. Der normale Anzeigebereich reicht von 0 bis 199 U/Min. (RPM) in 1 U/Min.-Schritten. Die aktuellen
Drehzahldaten werden 4 Sekunden nach Ausbleiben einer Pedalbewegung auf Null zurückgesetzt.
AVG RPM Durchschnittliche Drehzahl 0-199 U/Min. +/- 1.5%
1. Die durchschnittliche Drehzahl entspricht der Gesamtzahl der Pedalumdrehungen geteilt durch die
Pedalumdrehungszeit. (Er ist damit unabhängig von der Fahrzeit). Der durchschnittliche RPM-Wert
(A-RPM) wird ab dem letzten RESET bis zum aktuellen Zeitpunkt gezählt und wird in
Sekundenabständen aktualisiert.
2. Beträgt die Pedalumdrehungszeit weniger als 6 Sekunden bzw. ist die Gesamtzahl der
Pedalumdrehungen geringer als 1ß, so wird "0" angezeigt. (Beide Werte werden nicht auf dem
Display angezeigt.)
3. Ein "Error"-Symbol wird angezeigt, wenn entweder die Gesamtzahl der Pedalumdrehungen mehr
als 1 Mio. beträgt oder eine Gesamtzeit von 100 Stunden überschritten wurde. Betätigen Sie
RESET zum Neustart.
MAX RPM Maximale Drehzahl 0-199 U/Min+/- 1.5%
1. Zeigt die höchste erzielte Drehzahl seit dem letzten RESET.
2. Der Anzeigebereich für die maximale Drehzahl (M-RPM) ist mit dem für den aktuellen Tretrhythmus
identisch.
/ Speed Pacer (Geschwindigkeitsschrittmacher)
Der " " Pfeil nach oben blinkt auf, wenn die aktuelle Geschwindigkeit über der
Durchschnittsgeschwindigkeit liegt. Liegt die aktuelle Geschwindigkeit darunter, blinkt der Pfeil nach
unten " " auf.
*
Anmerkungen: Alle Funktionsdaten werden in Sekundenabständen aktualisiert.
SPEZIELLE FUNKTIONEN FÜR BENUTZER
DST Entfernungs-Countdown 0.0~999.9 Km oder Meilen
Beim Countdown bis auf Null werden die Daten TM, AVG, MAX, AVG_RPM, MAX_RPM (RPM)
automatisch gespeichert.
1.ERINNERUNGSALARM
Wenn ein Fahrer z. B. 30 km fahren möchte und die gewünschte Entfernung zuvor einstellt, wird
der Computer aufblinken, wenn die 30 km erreicht sind:
2. TEST
Beispiel: Der Fahrer stellt eine Testentfernung von 1 km ein. Beim Fahren muss keine
Tastenbedienung vorgenommen werden. Wenn 1 km zurückgelegt wurde, werden die Daten für
TM, AVG, MAX, AVG_RPM automatisch zu Referenzzwecken gespeichert.
TM Countdown-Timer 0H:00M:00S~99H:59M:59S
1. Die TIME Countdown-Funktion bewirkt eine Umstellung der TM-Funktion von Aufwärts- auf
Abwärtszählung. Diese Funktion lässt ebenfalls das Display aufblinken und hält die Werte
für DST, AVG, MAX, MAX_RPM und AVG_RPM fest, wenn der Countdown bei Null angelangt ist.
2. Die Abläufe der TIME Countdown-Funktion entsprechen denen der DISTANCE
Countdown-Funktion. Entsprechende Anweisungen finden Sie dort.
COMPUTER INITIIEREN
1. Der Computer wird beim Kauf bereits mit eingelegter Batterie geliefert. Halten Sie die MODE o
-Taste und die SET-Taste f gleichzeitig mehr als 3 Sekunden gedrückt, um den Computer zu
initiieren und um alle vorhandenen Daten zu löschen.
WICHTIG: Achten Sie darauf, den Computer vor der Benutzung zu initiieren, da die Funktion
ansonsten beeinträchtigt werden könnte.
2. Die LCD-Displaysegmente werden sofort nach Initiierung des Gerätes automatisch getestet.
3.
Betätigen Sie die MODE-Taste ‚ um den LCD-Test zu stoppen. Die Anzeige "km/h" wird aufblinken.
EINRASTERKENNUNG DES COMPUTERS
Der Computer verfügt über eine zum Patent angemeldete Einrasterkennung, um Störungen zu
vermeiden, wenn sich der Computer nicht auf dem Halter befindet. Der Computer kann nur noch
das Radsignal empfangen, wenn er sich auf dem Halter befindet.
AUTO START/STOP & POWER AUTO ON/OFF (Autom. Start/Stopp bzw. Ein-
und Ausschaltung
1. Der Computer wird bei Fahrtbeginn automatisch mit der Zählung der Daten beginnen und nach
Fahrtende damit aufhören. Das Blinksymbol
" "
blinkt auf, wenn sich der Computer im
Startstatus befindet.
2. Um die Batterie zu schonen schaltet sich der Computer automatisch aus und zeigt lediglich die
-Daten an, wenn er ca. 20 Minuten lang nicht benutzt wurde. Der Strom wird durch Betätigung der
MODE-oTaste eingeschaltet .
DATEN-RESET
Halten Sie die MODE-Taste gedrückt , bis sich die LCD-Ziffern auf 0 stellen. Lassen Sie die
MODE-o Taste los. Der Computer wird die gespeicherten Daten für DST, TM, MAX, AVG, M-RPM,
A-RPM löschen und auf Null stellen.
RADUMFANG
z Genaue Messung (Abb. a)
Rollen Sie das Rad, bis das Ventil genau unten steht. Markieren Sie diesen ersten Punkt auf dem Boden.
Setzen Sie sich auf das Fahrrad und lassen Sie sich von einem Helfer anschieben, bis das Vent l wieder
den niedrigsten Punkt erreicht. Markieren Sie diesen zweiten Punkt auf dem Boden. Messen Sie den
Abstand zwischen den Markierungen. Geben Sie diesen Wert als Radumfang ein.
zTabelle (Abb. b):
Lesen Sie den entsprechenden Radumfangwert aus der Tabelle ab.
BATTERIEWECHSEL AM COMPUTER
1. Das Symbol "
" erscheint, wenn die Batterie fast verbraucht ist.
2. Die Batterie muss innerhalb einiger Tage nach Aufleuchten des entsprechenden Symbols gewechselt werden.
3. Bei einem Batteriewechselwerden alle Daten gelöscht. Bei diesem Computer ist es jedoch möglich, den
Gesamtkilometerstand (ODO), der nach dem Batteriewechsel erscheint, zu überschreiben. B tte merken Sie
sich diese Daten, bevor Sie die alte Batterie entfernen.
4. Legen Sie eine neue CR2032-Batterie ein und initiieren Sie den Computer.
VORSICHTSMAßNAHMEN
1. Wenn der Computer nicht auf dem Fahrrad in Betrieb ist, darf er keiner direkten
Sonneneinstrahlung ausgesetzt werden.
2. Lassen Sie, wenn Sie nicht am fahren sind, das Hauptteil nicht in der prallen Sonne liegen.
3. Bauen Sie nicht das Hauptteil oder anderes Zubehör auseinander.
4. ‹berprüfen Sie in regelmäfligen Zeitabständen die relevante Position und Gröfle der Lücke
zwischen Magnet, Haupteinheit und Sensor.
5. Reinigen Sie die Kontakte auf der Halterung und die unterhalb des Hauptteils von Zeit zu Zeit.
6. Benutzen Sie keine Lösungsmittel, Alkohol oder Benzin zum reinigen des Hauptteiles, falls es
verschmutzt ist.
7. Achten Sie beim Fahren immer auf den Verkehr!
1. Bei Start des DST Modus:
Automatischer Reset der DST, TM , AVG, MAX , AVG_RPM/
MAX_PRM Daten.
2. Automatischer Countdown-Start bei Fahrtbeginn
3. Wenn der Countdown beendet ist, blinkt das Symbol
auf und alle Daten außer DST werden auf die
Standardwerten zurückgestellt.
4. Halten Sie die Taste 3 Sekunden lang gedrückt, um alle
Daten zurück zu setzen und beenden Sie den DST
Countdown-Modus.
1. Bei Start des TM Modus:
Automatischer Reset der DST, TM , AVG, MAX , AVG_RPM, MAX_PRM
Daten.
2. Automatischer Countdown-Start bei Fahrtbeginn
3. Wenn der Countdown beendet ist, blinkt das Symbol auf und
alle Daten außer TM werden auf die Standardwerten
zurückgestellt.
4. Halten Sie die Taste 3 Sekunden lang gedrückt, um alle Daten
zurück zu setzen und beenden Sie den TM Countdown-Modus.
HILFE ZUR PROBLEMLÖSUNG
Keine Anzeige
am Computer
Keine aktuelle
Geschwindigkeit
oder Unkorrekte
Daten
Unregelmäßige
Anzeige
LCD-Anzeige
schwarz
Anzeige langsam
1. Ist die Batterie verbraucht?
2. Ist die Batterie korrekt eingelegt?
1. Passiert dies beim SETUP des
Computers oder in einem anderen
Einstellungsmenü?
2. Sind Sensor und Magnet korrekt
ausgerichtet?
3. Stimmt der Radumfang?
4. Ist der Sensorabstand zu lang oder
ist der Montagewinkel des Sensors
nicht korrekt?
5. Ist die Sensorbatterie fast
verbraucht?
6.
Gbt es starke Störungsquellen in der
nahen Umgebung?
War der Computer längere Zeit direkter
Sonnenausstrahlung ausgesetzt,während
er nicht zum Radfahren benutzt wurde?
Ist die Temperatur unter 0° C. (32° F)?
PROBLEM ÜBERPRÜFEN LÖSUNG
1. Batterie austauschen.
2. Achten Sie darauf, dass der Pluspol der
Batterie auf den Batteriedeckel zeigt.
1. Beachten Sie das Einstellungsverfahren
und schließen Sie die Einstellung ab.
2. Siehe
ANBAU
(Abb.C-3) und (Abb. D-4)
und gleichen Sie die Position und den
Spalt entsprechend an.
3. Halten Sie sich an das Verfahren in
"Radumfang" und geben Sie den
korrekten Wert ein.
4. Siehe
ANBAU
(Abb. D-3) zur Einstellung
des Abstandes bzw. des Winkels
zwischen Computer und Sensor.
5. Neue Batterie einlegen.
6. Von der Störungsquelle entfernen.
Schlagen Sie in COMPUTER-SETUP"
nach und initiieren Sie den Computer neu.
Legen Sie den Computer in den Schatten,
um den Normalzustand wiederherzustellen.
Dies hat keine Auswirkungen auf die Daten.
Der Computer wird normal unktionieren,
wenn die Temperatur wieder steigt.
Batterietyp: kontaktloser Magnetsensor
Batterielebensdauer: Eine 3 V Batterie X 1 (Typen-Nr.: CR2032)
Abmessung / Gewicht: Ungefähr 2 Jahre. (Die vom Hersteller mitgelieferte original Batterie kann
aufgrund des Transportes und der Lagerhaltung eine kürzere
Lebensdauer haben).
Radumfang Einstellung: 45.8 x 54 x 17.2mm / 31.5g
Betriebstemperatur: 0mm - 3999 mm (Zunahme um 1 mm)
Lagerungstemperatur: 0 C ~ 50 C (32 F ~ 122 F)
- 10 C ~ 60 C (14 F ~ 140 F)
Deutsch
Deutsch
FUNKTIONEN
Nur TM Modus
Only DST mode
Riding time
count down
5s
3s
0~9
5s
3s
Distance count
down setting
18 Inch 1436
20 Inch 1596
22 Inch 1759
24 Inch 1916
24 x 1.75 1888
24 x 1 3/8 1942
26 x 1.40 1995
26 x 1.50 2030
26 x 1.75 2045
26 x 1.95 2099
26 x 2.1 2133
700C tubular 2117
700 x 20C 2092
700 x 23C 2112
700 x 25C 2124
700 x 28C 2136
700 x 32C 2155
700 x 35C 2164
700 x 38C 2174
27.5 Inch 2193
28 Inch 2234
28.6 Inch 2281
Français
+
3s
2s
3s
5s
5s
3s
SET
MODE
TROUBLE SHOOTING
Check the following before taking unit in for repairs.
<PARAMÉTRAGE>
Tout effacer
Maintenez les touches MODEo + SET f
enfoncées pendant 3 secondes pour
redémarrer l’unité principale.
Appuyez sur la touche
MODE o pour sélectionner.
Réglage des
valeurs
Passage au chiffre de
paramètre suivant
Maintenez la touche MODE
o
enfoncée pendant 2 secondes.
Passer à la
fonction suivante
Appuyez sur la touche SET
f
pour passer à fonction suivante.
Maintenez la touche SET
f
enfoncée pendant 2 secondes.
Quitter le mode
de paramétrage
<FONCTIONNEMENT GÉNÉRAL>
Changement
d’écran
Réinitialisation
des données
Changement du
diamètre de roue
(en mode ODO uniquement)
Passage en mode
DST ou TM
Quitter le mode
DST ou TM
Réinitialisation
des données
Appuyez sur la touche MODE o
pour changer d’écran.
Maintenez la touche MODE o
enfoncée pendant 3 secondes.
(Données DST, TM, MAX, AVG,
M-RPM, A-RPM.)
Maintenez la touche MODE o
enfoncée pendant 5 secondes.
Appuyez sur la touche SET f pour
passer en mode de paramétrage.
Français
Maintenez la touche MODE
o
enfoncée pendant 5 secondes
.
Maintenez la touche MODE o
enfoncée pendant 3 secondes.
PRÉCAUTIONS
1. Ce compteur est utilisable sous la pluie mais pas dans l'eau.
2. N'exposez pas l'appareil au soleil lorsque vous n'utilisez pas la bicyclette.
3. Ne démontez pas l'appareil ou ses accessoires.
4. Vérifiez réguliËrement la position relative de l'aimant et du capteur ainsi que le jeu.
5. Nettoyez réguliËrement les contacts du support ainsi que le bas de l'appareil.
6. N'utilisez pas de diluant, d'alcool ou d'essence pour nettoyer l'appareil ou ses accessoires
lorsqu ils sont sales.
7. Pensez à regarder la route en roulant !
INITIALISEZ L'ORDINATEUR
1. Une pile est déjà installée dans l'unité principale lors de l'achat. Maintenez enfoncées
simultanément les touches MODEo et SET f pendant plus de 3 secondes pour initialiser
l'ordinateur et effacer toutes les données.
IMPORTANT : Veillez à initialiser l'ordinateur avant de l'utiliser pour éviter des erreurs.
2. Les segments LCD sont automatiquement testés après l'initialisation de l'unité.
3. Appuyez sur la touche MODEo pour arrêter le test des segments LCD, puis le « Km/h » clignotant.
DÉTECTION DE POSITIONNEMENT DE L'UNITÉ PRINCIPALE SUR LE
SUPPORT
L'ordinateur comporte un commutateur de détection (brevets en cours) pour éviter les interférences
lorsque l'unité principale est retirée du support. L'unité principale ne peut recevoir le signal de la
roue que lorsque elle est positionnée sur le support.
MARCHE/ARRET AUTOMATIQUE et MISE SOUS TENSION/HORS
TENSION AUTOMATIQUE
1. L'ordinateur commence automatiquement à compter les données lors de l'utilisation et arrête de
compter lorsque le trajet est terminé. Le symbole clignotant « » indique que l'ordinateur est prêt
à démarrer.
2. Pour économiser la pile, cet ordinateur s'éteint automatiquement et n'affiche que les données « »
quand il n'a pas été utilisé pendant environ 20 minutes. Il est mis sous tension en appuyant sur la
touche MODEo.
RÉINITIALISATION DES DONNÉES
Maintenez enfoncée la touche MODEo jusqu'à ce que l'écran soit vide, puis relâchez-la.
L'ordinateur réinitialise les données DST, TM, MAX, AVG, M-RPM, A-RPM pour une nouvelle
référence de cycle.
DIAMÈTRE DE LA ROUE
z Mesure précise (Fig. a )
Faites tourner la roue jusqu'à ce que la tige de la valve soit au point le plus bas, près du sol, puis
repérez ce premier point au sol. Montez sur la bicyclette et faites vous pousser jusqu'à ce que la tige
de la valve se retrouve de nouveau au point le plus bas. Marquez le second point au sol. Mesurez la
distance entre ces deux marques. Entrez cette valeur pour régler la circonférence de la roue.
zTableau rapide (Fig. b ) : Obtention d'une valeur de circonférence correcte dans le tableau.
CHANGEMENT DE PILE DE L'UNITÉ PRINCIPALE
1. Le symbole « » s'affiche pour indiquer que la pile est presque déchargée.
2. Remplacez la pile usagée par une pile neuve dans les quelques jours suivant l'apparition du
symbole.
3. Toutes les données sont effacées lors du changement de pile, mais cet ordinateur vous permet
d'entrer de nouveau après le changement de pile la distance parcourue dont vous aviez pris note
avant d'ôter la pile usagée.
4. Remplacez par une nouvelle pile CR2032 et initialisez l'appareil.
FONCTIONS
Vitesse actuelle 0.0 – 199.9 Km/h ou 120.0 Mile/h+/- 1 %
1. La vitesse actuelle est toujours affichée dans la partie supérieure de l'écran lorsque vous roulez. La
vitesse est affichée jusqu'à 199,9 Km/h (120,0 miles/h) pour des roues d'un diamètre supérieur à
24 pouces.
2. Lorsque le trajet est terminé, la vitesse continue à compter pendant 4 secondes pour Vélo 1 et
pendant 2 secondes pour Vélo 2 pour vérifier que plus aucun signal de roue n'a été envoyé.
DST Distance du trajet 0.00 – 999.99 Km ou Miles +/- 0.1 %
La fonction DST enregistre les données de distance à partir de la dernière opération de
réinitialisation RESET tant que la bicyclette est utilisée.
TM Durée du trajet 0 00h00m00s – 99h59m59s
1. La durée du trajet est cumulée depuis la dernière réinitialisation (RESET).
2. Le compteur commence à compter automatiquement lorsque le trajet commence et continue à
compter pendant 4 secondes pour Vélo 1 et pendant 2 secondes pour Vélo 2 pour pour vérifier que
plus aucun signal de roue n'a été envoyé lorsque le trajet est arrêté.
Mais cet ordinateur corrige automatiquement ce délai compté en plus pour obtenir la durée de
trajet réelle.
MAX Vitesse maximale 0.0 – 199.9 Km/h ou 120.0 Mile/h +/- 1 %
Affiche la vitesse la plus élevée depuis la dernière opération de réinitialisation (RESET).
AVG Vitesse moyenne 0.0 – 199.9 Km/h / 0.0 – 120.0Mile/h +/- 0.1 %
1. Elle est calculée par division de la longueur du trajet par sa durée. Les données moyennes
calculées concernent la période s'étalant depuis la dernière réinitialisation (RESET) jusqu'au
moment présent.
2. L'écran affiche « 0,0 » lorsque la durée est inférieure à 4 secondes.
3. La valeur est mise à jour toutes les secondes lorsque la durée dépasse 4 secondes.
4. L'écran affiche le symbole « Erreur » lorsque la durée dépasse 100 heures ou lorsque la durée
dépasse 1 000 Km (ou miles). Réinitialisez l'appareil pour recommencer.
ODO ODO-1/ ODO-2 0.0 – 999999 Km or Miles +/- 0.1 %
1. L'odomètre cumule la distance totale tant que la bicyclette roule, et Vélo 1 et Vélo2 ont chacun leur
odomètre ODO 1 ou ODO 2.
2. Les données d'ODO1 et d'ODO2 ne peuvent être effacées par une opération de
RÉINITIALISATION.
HORLOGE Horloge avec affichage sur 12 ou 24 heures
1:00:00 à12:59:59 AM/PM ou 0:00:00 à 23:59:59 +/- 0,003 %
L'heure est affichée soit au format 12 heures (matin/soir, ou AM/PM), soit au format 24 heures.
RPM Cadence actuelle (révolutions par minute) 0-199 rpm +/- 0.1 %
1. La cadence actuelle est le nombre de révolutions de la pédale par minute (tours/minute). Il s'affiche
sur l icône droite supérieure et se met à jour toutes les secondes.
2.
La plage normale d'affichage s'étend de 0 à 199 t/m par incréments de 1 t/m. Les données de
cadence actuelle sont réinitialisées à zéro après 4 secondes lorsque la manivelle s'arrête de tourner.
AVG RPM Cadence moyenne 0-199rpm+/- 1.5 %
1. La cadence moyenne est calculée à partir du nombre total de révolutions de la pédale divisé par le
temps de révolution (indépendant de la durée mesurée à la roue). La valeur tours/minute est
comptée depuis la dernière opération de réinitialisation (RESET) jusqu'au moment présent ; elle
est mise à jour toutes les secondes.
2. Affiche « 0 » lorsque la durée de révolution de la pédale est inférieure à six secondes ou lorsque le
nombre total des révolutions est inférieur à 10 . (Ces deux valeurs ne s'affichent pas à l'écran.)
3. Affiche le symbole « Error » soit lorsque le nombre total de révolutions est supérieur à 1 million, soit
lorsque la durée de révolution de la pédale est supérieure à 100 heures. Réinitialisez pour
redémarrer.
MAX RPM Cadence maximale 0-199rpm+/- 1.5 %
1. Enregistre la cadence la plus élevée dpuis la dernière opération de réinitialisation (RESET).
2. La plage d'affichage de la cadence maximale est identique à celle de la cadence actuelle.
/ Régulateur de vitesse
La flèche du régulateur de vitess eclignote tant que la vitesse actuelle est plus élevée que la
vitesse moyenne et la flèche vers le bas clignote inversement.
*
5HPDUTXH¬7RXWHVOHVGRQQpHVGHIRQFWLRQVVRQWPLVHVjMRXUHQYLURQXQHIRLVSDUVHFRQGH
FONCTIONS SPÉCIALES POUR L'UTILISATEUR
DST Longueur du trajet 0,0 à 999,9 Km ou miles
Lorsque le décompte est à zéro, les données de TM, AVG, MAX, AVG_RPM, MAX_RPM sont figées.
1. ALARME DE RAPPEL
Si, par exemple, le cycliste veut parcourir 30 Km, et prédéfinit la distance voulue, cet ordinateur
clignote lorsqu'il atteint 30 Km.
2. TEST
Le cycliste prérègle, par exemple, une distance de test de 1 Km. Il n'est pas nécessaire d'actionner
des touches pendant ce parcours. Lorsque le cycliste atteint le Km, l'ordinateur fige
automatiquement les données concernées à titre de référence.
TM Test de durée 0h00m00s à 99h59m59s
1. La fonction TM TEST inverse la fonction TM qui décompte alors une durée préréglée. L'ordinateur
clignote aussi comme rappel à l'utilisateur et fige les données DST, AVG, MAX, MAX_RPM et
AVG_RPM lorsque le décompte atteint zéro.
2. Le fonctionnement de la fonction TIME TEST est identique à celui de la fonction DISTANCE TEST
décrit ci-dessus.
1. Lors du passage en mode DST:
Réinitialisation automatique des données DST, TM, AVG, MAX, AVG-RPM,
MAX_RPM.
2. Démarrage automatique du décompte lors du pédalage.
3. Lorsque le décompte arrive à zéro, le symbole clignote
et les
données sont gées puis DST ache de nouveau les
données par défaut.
4. Maintenez enfoncée la touche pendant 3 secondes pour
réinitialiser toutes les données et quittez le mode de
décompte DST .
PROBLÈME
VÉRIFIEZ REMÈDE
Pas d'affichage
sur l'unité
principale
Pas de
vitesse
actuelle ou
Données
erronées
Affichage
irrégulier
L'écran reste
noir
L'affichage
est lent
1. La pile est-elle déchargée ?
2. La pile est-elle bien installée ?
1. Est-ce que c'est sur l'écran de réglage
de l'unité principale ou ou sur un autre
écran de réglage ?
2. L'emplacement et la distance du capteur
par rapport à l'aimant sont-ils corrects ?
3. La circonférence est-elle exacte ?
4. La distance de capture est-elle trop
importante oul'angle d'installation du
capteur est-il erroné ?
5. La pile du capteur est-elle presque
déchargée ?
6.
Existe-t-il une forte interférence à proximité ?
Avez-vous laissé l'unité principale inutilisée
au soleil pendant longtemps ?
La température est-elle inférieure à 0 C
(32 F) ?
1. Remplacez la pile.
2. Vérifiez que le pôle positif de la pile fait
face au couvercle de pile.
1. Consultez la procédure de réglage et
procédez à un nouveau réglage. 2.
Consultez les Montages
(Fig. C-3) et (Fig.
D-4) et réglez de nouveau la position et
l'espacement.
3. Consultez la section « Réglage du
diamètre » et saisissez la valeur exacte.
4. Consultez la Montages (Fig. D-3) pour
régler la distance ou l'angle entre l'unité
principale et le capteur.
5. Remplacer par une pile neuve.
6. Éloigner de la source de l'interférence.
Consultez la section « RÉGLAGE DE
L'UNITÉ PRINCIPALE » et initialisez de
nouveau l'ordinateur.
Placez l'unité principale à l'ombre. Cet
inconvénient n'a aucune incidence sur les
données.
L'appareil fonctionnera de nouveau normalement
lorsque la température remontera.
Détecteur: Détecteur magnétique sans contact.
Type de pile: 3V x 1.(habituellement CR2032.)
Durée de vie de la pile: Environ 2 ans (la pile installée à l’usine peut avoir une urée de vie plus
courte en raison du temps de transport et d’entreposage).
Dimensions/poids:
45.8 x 54 x 17.2mm/ 31.5g
Programmation de la
circonférence de la roue: 0mm - 3999mm (incrément 1mm)
Température d’exploitation: 0° C ~ 50° C (32° F ~ 122° F)
Température d’entreposage: -10° C ~ 60° C (14° F ~ 140° F)
En mode DST
uniquement
1. Lors du passage en mode TM :
Réinitialisation automatique des données DST, TM, AVG, MAX,
AVG_RPM, MAX_RPM.
2. Démarrage automatique du décompte lors du pédalage.
3. Lorsque le décompte arrive à zéro, le symbole clignote et les
données sont gées puis TM ache de nouveau les données par
défaut.
4. Maintenez enfoncée la touche pendant 3 secondes pour réinitialiser
toutes les données et quittez le mode de décompte TM.
2s
Riding time
count down
5s
3s
~9
5s
3s
Distance count
down setting
En mode TM
uniquement
Nederlands
Houd de MODE o-toets
5 seconden ingedrukt.
DST- of TM-
modus afsluiten
1. Als u naar de modus DST gaat:
beginwaarden gegevens DST, TM, AVG, MAX, AVG_RPM,
MAX_RPM automatisch herstellen.
2. Automatisch aftellen tijdens rijden.
3. Bij het aftellen naar nul knippert het symbool en
worden alle gegevens bevroren. Vervolgens worden de
standaardgegevens van DST hersteld.
4. Houd de toets 3 seconden ingedrukt om de beginwaarden
van alle gegevens te herstellen en de aftelmodus van
DST af te sluiten.
1. Als u naar de modus TM gaat:
beginwaarden gegevens DST, TM, AVG, MAX, AVG_RPM, MAX_RPM
automatisch herstellen.
2. Automatisch aftellen tijdens rijden.
3. Bij het aftellen naar nul knippert het symbool en worden alle
gegevens bevroren. Vervolgens worden de standaardgegevens van
TM hersteld.
4. Houd de toets 3 seconden ingedrukt om de beginwaarden van alle
gegevens te herstellen en de aftelmodus van TM af te sluiten.
Alleen DST modus
Alleen TM modus
DE COMPUTER INITIALISEREN
1. Bij aankoop bevindt zich reeds een batterij in de hoofdeenheid. Om de computer te initialiseren en
alle gegevens te wissen, dient u de MODE-knopo en de SET-knop f langer dan 3 seconden
ingedrukt te houden.
BELANGRIJK: Indien u de computer vóór gebruik niet initialiseert, kan deze foutmeldingen
gaan genereren.
2. Nadat de eenheid is geïnitialiseerd, worden automatisch de LCD-segmenten getest.
3.
Druk op de MODE-knop
o
om de LCD-test te stoppen. Vervolgens zal de melding ‘Km/h’ gaan knipperen.
SCHUIFDETECTIE HOOFDEENHEID
De computer heeft een schuifdetectieschakelaar (patent aangevraagd). Hiermee kan, als de
hoofdeenheid van de beugel is verwijderd, interferentie worden voorkomen. Het signaal van het wiel
kan alleen worden ontvangen als de hoofdeenheid op de beugel is geschoven.
AUTOMATISCH STARTEN/STOPPEN * IN-/UITSCHAKELEN
1. De computer zal tijdens het rijden automatisch de gegevens bijhouden. Het knipperende symbool
’ geeft aan dat de computer klaar is om te starten.
2. Zodra de computer langer dan 2 minuten niet wordt gebruikt, schakelt de eenheid zichzelf
automatisch uit en wordt alleen de melding ‘ ’ weergegeven. De eenheid kan weer worden
ingeschakeld door op de MODE-knop te drukken.
GEGEVENS RESETTEN
Druk op de MODE-knop totdat het getal op het LCD wordt gewist. Laat vervolgens de MODE-knop
los. De computer zet de opgeslagen waarden van DST, TM, MAX, AVG, M-RPM en A-RPM op nul,
zodat er nieuwe referentiewaarden kunnen worden gegenereerd.
WIELOMTREK
z Nauwkeurige meting (fig. a )
Draai het wiel totdat het ventiel op zijn laagste punt staat en markeer dit punt op de grond. Stap
op de fiets en laat u duwen totdat het ventiel weer op zijn laagste punt staat. Markeer het tweede
punt op de grond. Meet de afstand tussen de markeringen. Voer deze waarde in.
zTabel (fig.b ): Neem de wielomtrek uit de tabel over.
BATTERIJ HOOFDEENHEID VERVANGEN
1. Het symbool ‘ ’ verschijnt om aan te geven dat de batterij bijna op is.
2. Nadat het symbool verdwenen is, dient u de batterij binnen enkele dagen door een nieuwe batterij
te vervangen.
3. Als de batterij wordt vervangen, zullen alle gegevens worden gewist. U kunt na het vervangen van
de batterij de gereden ODO echter opnieuw op de computer invoeren. Het is daarom van belang
deze gegevens te noteren alvorens de oude batterij te verwijderen.
4. Vervang de batterij door een nieuwe CR2032-batterij en initialiseer de hoofdeenheid.
Nederlands
Geen beeld op
hoofd-eenheid
Geen huidige
snelheid of
onjuiste
gegevens
Onregelmatig-
heden op
scherm
Zwart LCD
Scherm
reageert traag
1. Is de batterij leeg?
2. Is de batterij niet goed geïnstalleerd?
1. Zit u in het installatiescherm van de
hoofdeenheid of een ander installatiescherm?
2.
Zijn de relatieve posities van en de afstand
tussen de sensor en de magneet juist?
3. I
s de wielomtrek juist?
4. Is de afstand tussen de zender ende
hoofdeenheid te groot of is de sensor onder
een verkeerde hoek geïnstalleerd?
5. Is de batterij van de sensor bijna op?
6. Bent u in de buurt van een sterk
interfererend apparaat?
Heeft u de hoofdeenheid lange tijd in direct
zonlicht laten staan?
Is de temperatuur lager dan 0°C (32°F)?
1. Vervang de batterij.
2. Zorg dat de positieve kant van de batterij
naar de batterijdeksel is gericht.
1. Lees de installatieprocedure en voer de
benodigde aanpassingen uit.
2.
Zie Installatie (fig. C-3) en (fig. D-4) en pas
de posities en de afstanden opnieuw aan.
3. Lees ‘Instelling wielomtrek’ en voer de
juiste waarde in.
4. Zie Installatie(fig. D-3) en pas de afstand
en de hoek tussen de hoofdeenheid en
de sensor aan.
5. Vervang de batterij.
6. Verwijder u van de bron van interferentie.
Lees ‘Installatie hoofdeenheid’ en initialiseer
de computer opnieuw.
Plaats de hoofdeenheid in de schaduw om
het probleem te verhelpen. De gegevens
zullen niet worden aangetast.
Het apparaat zal weer normaal functioneren
als de temperatuur stijgt.
PROBLEMEN OPLOSSEN
PROBLEEM TE CONTROLEREN ONDERDELEN OPLOSSING
Sensor: Geen Contact Magnetische Sensor.
Type Batterij: 3V Batterij symbol X 1.(Typenummers No. CR2032 )
Levensduur Batterij: Ongeveer 2 jaar (de levensduur van de originele batterij uit de fabriek
kan korter zijn, vanwege de tijd die de aanvoer en opslag van het
produkt voor de verkoop in beslag nemen).
Afmetingen/Gewicht: 45.8 x 54 x 17.2mm/ 31.5g
Instelling Wielomtrek: 0mm - 3999mm (stappen van 1mm)
Operationele temperatuur: 0 C tot 50 C (32 F tot 122 F)
Bewaartemperatuur: - 10 C tot 60 C (14 F tot 140 F)
+
3s
2s
3s
5s
5s
3s
SET
MODE
2s
Turn to next
function
Druk op de MODE o-toets om het
scherm te wijzigen.
Scherm wijzigen
Houd de MODE
o
-toets 3 seconden
ingedrukt.
(Gegevens DST, TM, MAX, AVG,
M-RPM, A-RPM.)
Beginwaarden
gegevens herstellen
Houd de MODE -toets
5 seconden ingedrukt.
Wielgrootte
wijzigen
(alleen ODO-modus)
Naar DST- of
TM-modus gaan
Houd de MODE o-toets
3 seconden ingedrukt.
Druk op de SET f-toets om
naar de instelmodus te gaan.
Beginwaarden
gegevens herstellen
Houd de MODE o-toets + SET f-toets 3
seconden ingedrukt om de hoofdeenheid
opnieuw te starten.
Alles wissen
Druk op de MODE o-toets
om te selecteren.
Cijfer wijzigen
Houd de MODE o-toets
2 seconden ingedrukt.
Naar volgende
instelcijfer gaan
Druk op de SET f-toets
om naar de volgende
functie te gaan.
Houd de SET f-toets 2
seconden ingedrukt.
Instelmodus
afsluiten
<INSTELLINGEN>
<ALGEMENE BEDIENING>
Riding time
count down
5s
3s
0~9
5s
3s
Distance count
down setting
FUNCTIES
Huidige snelheid 0.0 - 199.9 km/u of 120.0 mijl/u +/- 1%
1. De huidige snelheid wordt tijdens het rijden altijd links op het bovenste scherm aangegeven. Bij een
wielomtrek die groter is dan 24 inch kan de huidige snelheid worden aangegeven tot 199,9 km/u of
120,0 mijl/u.
2. Als u bent gestopt, zal er voor de snelheid nog 4 seconden (Fiets 1) of 2 seconden (Fiets 2) worden
doorgeteld om na te gaan of het wiel geen signalen meer afgeeft.
DST Ritafstand 0.00 - 999.99 km of mijl +/- 0.1%
Zolang de fiets wordt bereden, zal de functie DST de afstandsgegevens bij elkaar optellen (vanaf de
laatste RESET).
TM Rijtijd 0 00U:00M:00S - 99U:59M:59S
1. De TM is de totale rijtijd berekend vanaf de laatste RESET.
2. Zodra de rit begint, zal met tellen worden begonnen. Als u stopt zal er nog 4 seconden (Fiets 1) of 2
seconden (Fiets 2) worden doorgeteld om na te gaan of het wiel geen signalen meer afgeeft.
De computer trekt de te veel getelde 4 seconden (Fiets 1) en 2 seconden (Fiets 2) echter
automatisch weer af om de daadwerkelijke rijtijd te verkrijgen.
MAX Maximale snelheid 0.0 - 199.9 km/u of 120.0 mijl/u +/- 1%
Laat de hoogste snelheid sinds de laatste RESET zien.
AVG
Gemiddelde snelheid
0.0 - 199.9 km/u / 0.0 - 120.0 mijl/u +/- 0.1%
1. Deze wordt berekend door DST door TM te delen. Hiervoor worden de gegevens vanaf de laatste
RESET gebruikt.
2. Het scherm zal ‘0.0’ weergeven indien TM korter is dan 4 seconden.
3. Zodra TM langer is dan 4 seconden, worden de gegevens elke seconde bijgewerkt.
4. Indien TM langer is dan 100 uur, of indien DST langer is dan 1000 km (of mijl), geeft het scherm het
symbool ‘Error’ weer. Reset het apparaat om opnieuw te beginnen.
ODO
ODO-1/ ODO-2 0.0 - 999999 km of mijl +/- 0.1%
1. De odometer houdt de totale afstand bij die de fiets heeft afgelegd. Fiets 1 en 1 hebben hun eigen
odometer (ODO 1 of ODO 2).
2. De gegevens van ODO1 en ODO 2 kunnen niet door een RESET worden gewist.
KLOK 12-uurs AM/PM of 24-uurs klok
1:00:00 ~ 12:59:59 AM/PM of 0:00:00 ~ 23:59:59 +/- 0.003%
De huidige tijd kan volgens het 12- of 24-uren systeem worden weergegeven.
RPM Huidige RPM (toeren per minuut) 0 - 199 rpm +/- 0.1%
1. Het huidige toerental staat voor het aantal omwentelingen per minuut (toeren/minuut) van het
pedaal. Dit wordt bij het pictogram rechtsboven weergegeven en elke seconde bijgewerkt.
2. Het algemene weergegeven bereik is 0 t/m 199 toeren/minuut met een stapgrootte van 1
toeren/minuut. Als de askruk 4 seconden niet draait, worden de huidige toerentalgegevens weer op
nul gezet.
AVG RPM Gemiddeld toerental 0 - 199 rpm +/- 1.5%
1. Het gemiddelde toerental wordt berekend door het totale aantal pedaalomwentelingen te delen
door de omwentelingstijd van de pedalen (dit is niet afhankelijk van de wielrijtijd). Het gemiddelde
toerental wordt berekend voor de periode vanaf de laatste RESET en wordt ongeveer elke seconde
bijgewerkt.
2. Het scherm geeft ‘0’ weer indien de pedaalomwentelingstijd korter is dan 6 seconden of indien het
totale aantal pedaalomwentelingen lager is dan 10. (Beide waarden worden niet op het scherm
weergegeven.)
3. Het scherm geeft het symbool ‘Error’ weer indien het totale aantal pedaalomwentelingen hoger is
dan 1 miljoen of indien de pedaalomwentelingstijd langer is dan 100 uur. Reset de apparatuur om
opnieuw te beginnen.
MAX RPM Maximaal toerental 0 - 199 rpm +/- 1.5%
1. Registreert het hoogste toerental sinds de laatste RESET.
2. Het bereik van het maximale toerental is gelijk aan dat van het huidige toerental.
/ Snelheidspacer
Als de huidige snelheid boven de gemiddelde snelheid ligt, gaat de snelheidspacer-pijl ‘ ’ knipperen;
als de huidige snelheid onder de gemiddelde snelheid igt, gaat de neerwaartse pijl ‘ ’ knipperen.
* Opmerkingen: De gegevens van alle functies worden elke seconde bijgewerkt.
SPECIALE GEBRUIKERSFUNCTIES
DST Aftelling afstand 0.0 ~ 999.9 km of mijl
Bij het aftellen naar nul worden de gegevens van TM, AVG, MAX, AVG_RPM en MAX_RPM bevroren.
1. HERINNERING
Indien de fietser bijvoorbeeld een afstand van 30 km wil afleggen, gaat de computer knipperen
wanneer de gebruiker 30 km heeft gereden.
2. TEST
De fietser stelt bijvoorbeeld een testafstand van 1 km in. Tijdens het rijden hoeven de knoppen niet
te worden bediend. Wanneer de fietser 1 km gereden heeft, ‘bevriest’ de computer automatisch de
gegevens van TM, AVG, MA en A-RPM.
TM Aftelling tijd 0U:00M:00S ~ 99U:59M:59S
1. De functie voor tijdaftelling laat TM af- in plaats van optellen. Ook hier knippert de melding om
de gebruiker te herinneren en worden de gegevens voor DST, AVG, MAX, MAX_RPM en
AVG_RPM ‘bevroren’ als bij het aftellen de waarde nul wordt bereikt.
2. Zie de sectie over het aftellen van de afstand voor meer informatie over de functie voor het aftellen
van tijd.
VOORZORGSMAATREGELEN
1. Deze computer kan in de regen gebruikt worden, maar niet onder water.
2. Stel de computer niet bloot aan direct zonlicht als u de fiets niet gebruikt.
3. Haal de computer of de accessoires niet uit elkaar.
4. Controleer regelmatig de relatieve positie en de opening tussen de sensor en de magneet.
5. Maak regelmatig de contacten van de bracket en de onderkant van de computer schoon.
6. Gebruik bij het schoonmaken van de computer of accessoires geen verdunner,
alcohol of benzine.
7. Blijf tijdens het rijden op de weg letten.
1. Cuando se entra en el modo de DST (cuenta atrás de
distancia):
Se ponen a cero automáticamente los datos de DST, TM,
AVG, MAX , AVG_RPM, MAX-RPM.
2. Comienza automáticamente la cuenta atrás mientras se
monta en bicicleta.
3. Cuando la cuenta atrás llega a cero, aparece un símbolo
intermitente y se congelan todos los datos. A continuación,
DST vuelven a los valores predeterminados.
4. Mantener pulsada la tecla durante 3 seg. para poner a cero
todos los datos y salir del modo de cuenta atrás de
distancia y tiempo DST .
1. Cuando se entra en el modo de TM (cuenta atrás de tiempo):
Se ponen a cero automáticamente los datos de DST, TM, AVG, MAX ,
AVG_RPM, MAX_RPM.
2. Comienza automáticamente la cuenta atrás mientras se monta en
bicicleta.
3. Cuando la cuenta atrás llega a cero, aparece un símbolo
intermitente y se congelan todos los datos. A continuación, TM
vuelven a los valores predeterminados.
4. Mantener pulsada la tecla durante 3 seg. para poner a cero todos los
datos y salir del modo de cuenta atrás de distancia y tiempo TM.
Sólo modo TM
PUESTA EN FUNCIONAMIENTO DEL CICLOCOMPUTADOR
1. A La unidad principal ya lleva una batería en el momento de compra. Mantener pulsados
simultáneamente y durante más de 3 segundos el botón "MODE"o (modo) y el botón "SET" (de
programación) f para poner en funcionamiento el ciclocomputador y poner a cero todos los datos.
IMPORTANTE: Asegurarse de poner en funcionamiento el ciclocomputador de este modo
antes de usarlo, ya que, de lo contrario, podrían producirse errores.
2. Cuando se pone en funcionamiento la unidad, se realiza una prueba automática de los segmentos
de la pantalla de cristal líquido.
3. Pulsar el botón MODEo para detener la prueba de la pantalla de cristal líquido y a continuación se
verá parpadear en la pantalla "Km/h".
DETECCIÓN DE LA CONEXIÓN/DESCONEXIÓN DE LA UNIDAD PRINCIPAL
El ciclocomputador tiene un interruptor detector de la conexión (patente en trámite) para evitar las
interferencias cuando se saca la unidad principal del soporte. La unidad principal sólo puede recibir
señal de la rueda una vez introducida en el soporte.
SISTEMA AUTOMÁTICO DE INICIO/PARADA Y ENCENDIDO/APAGADO
AUTOMÁTICO
1. El ciclocomputador empieza a contar automáticamente los datos nada más empezar a montar en
bicicleta y deja de contar los datos cuando se para de montar. Puede verse parpadear el símbolo
" " cuando el ciclocomputador se encuentra en estado de inicio.
2.Para ahorrar batería, este ciclocomputador se apaga automáticamente y solamente muestra los
datos " " cuando ha dejado de usarse durante unos 20 minutos. La computadora volverá a
encenderse al apretar el botón "MODEo.
PUESTA A CERO DE DATOS
Mantener pulsado el botón "MODE"o (modo) hasta que el dígito de la pantalla de cristal líquido
desparezca y, entonces, dejar de pulsarlo. El ciclocomputador pondrá a cero los valores guardados
de TM, MAX, AVG, M-RPM y A-RPM para iniciar un nueva referencia.
CIRCUNFERENCIA DE LA RUEDA
z Medición exacta (Ilus. a )
Gire la rueda hasta que la válvula se encuentre en el punto más cercano al suelo y marque ese
primer punto en el suelo. Monte en la bicicleta y haga que alguien le empuje hasta que la válvula
vuelva a situarse en el punto más bajo. Haga la segunda marca en el suelo. Mida la distancia que
hay entre las marcas. Introduzca este valor para establecer la circunferencia de la rueda.
zTabla de referencia (Ilus.b ): Consulte en la tabla el valor correspondiente de la circunferencia.
CAMBIO DE LA BATERÍA DE LA UNIDAD PRINCIPAL
1. El símbolo " " aparecerá para indicar que la batería está a punto de agotarse.
2. Hay que cambiar la batería pocos días después de que aparezca el símbolo.
3. Todos los datos se borrarán al cambiar la batería, pero este ciclocomputador permite volver a
introducir en ODO la distancia total acumulada, manteniendo el registro de este dato antes de
sacar la batería vieja.
4.Colocar una batería nueva CR2032 y poner en funcionamiento la unidad principal.
FUNCIONES
Velocidad actual 0.0 – 199.9 Km/h ó 120.0 millas/h +/- 1%
1. La velocidad actual siempre aparece en la parte izquierda de la pantalla superior cuando se monta
en bicicleta. Muestra la velocidad actual hasta un máximo de 199,9 km/h o de 120,0 m/h (para
ruedas de diámetro superior a las 24 pulgadas - 60,96 cm).
2. Cuando se para de montar, la velocidad sigue contando durante 4 segundos para la Bicicleta 1 y 2
segundos para la Bicicleta2 para confirmar que ya no se recibe ninguna señal de movimiento de la
rueda.
DST Distancia recorrida 0.00 – 999.99 Km o millas +/- 0.1%
La función DST acumula los datos de la distancia recorrida desde la última operación de puesta a
cero (RESET) siempre y cuando se haya montado en la bicicleta.
TM Tiempo de funcionamiento 00H:00M:00S-99H:59M:59S
1. TM indica el tiempo total que se ha montado en bicicleta desde la última operación de puesta a
cero (RESET).
2. Empieza a contar automáticamente al pedalear y sigue contando durante 4 segundos para la
Bicicleta 1 y 2 segundos para la Bicicleta2 para confirmar que ya no se recibe ninguna señal de
movimiento de la rueda después de parar.
Pero este ciclocomputador revisa automáticamente los 4 segundos extra contados para la
Bicicleta 1 y los 2 segundos para la Bicicleta 2 para obtener el tiempo real de funcionamiento.
MAX Velocidad máxima 0.0 – 199,9 Km/h ó 120.0 millas/h +/- 1%
Muestra la mayor velocidad alcanzada desde la última operación de puesta a cero (RESET).
AVG Velocidad media 0.0 – 199.9 Km/h / 0.0 – 120.0 millas/h +/- 0.1%
1. Se calcula dividiendo la distancia (DST) por el tiempo transcurrido (TM). Los datos medios se
calculan desde la última operación de puesta a cero (RESET) hasta el punto actual.
2. Cuando el tiempo transcurrido (TM) es inferior a 4 segundos, la pantalla mostrará “0.0”.
3. Se actualiza cada segundo, una vez que el tiempo transcurrido (TM) haya superado los 4 segundos.
4. Aparece un símbolo de “Error” cuando el tiempo transcurrido (TM) es superior a las 100 horas o la
distancia (DST) supera los 1.000 km (o millas). Poner a cero la unidad para reiniciar.
ODO ODO-1/ ODO-2
0.0 – 999999 Km o millas +/- 0.1%
1. El odómetro acumula la distancia total siempre que la bicicleta se utiliza. Tanto la Bicicleta 1 como
2 tienen su propio odómetro ODO 1 y ODO 2 independiente.
2. Los datos de ODO1 y ODO 2 no pueden ponerse a cero con RESET.
CLOCK Reloj de 12 horas a.m./p.m. o de 24 horas
1:00:00 ~12:59:59 AM/PM ó 0:00:00 ~ 23:59:59 +/- 0.003%
Puede mostrar la hora actual como reloj de 12 horas a.m./p.m. o de 24 horas.
RPM RPM actuales (revoluciones por minuto) 0-199 rpm+/- 0.1%
1. Las RPM actuales son el número de revoluciones por minuto del pedal (rpm). Se muestran en el
icono superior derecho y se actualizan cada segundo.
2. El rango general que aparece en la pantalla va desde 0 hasta 1 rpm con incrementos de 1 rpm.
Cuando el pedal deja de girar durante 4 segundos, los datos de las RPM actuales se ponen a cero.
AVG RPM RPM medias 0-199 rpm+/- 1.5%
1. Las RPM medias se calculan dividiendo el número total de revoluciones del pedal por el tiempo de
revoluciones del pedal (es independiente del tiempo que la rueda esté en movimiento). Las A-RPM
se cuentan a partir de la última operación de puesta a cero (RESET) hasta el punto actual,
actualizándose cada segundo.
2. En la pantalla aparece “0” cuando el tiempo de revoluciones del pedal es inferior a 6 segundos o
cuando las revoluciones totales del pedal son inferiores a 10. (Estos 2 valores no aparecen en la
pantalla)
3. El símbolo “Error” aparece en la pantalla cuando el total de revoluciones del pedal supera 1 millón
de giros o bien cuando el tiempo de revoluciones del pedal supera las 100 horas. Ponerla a cero
para reiniciar.
MAX RPM RPM máximas 0-199 rpm+/- 1.5%
1. Registra las RPM más altas desde la última operación de puesta a cero (RESET).
2. El rango de la revoluciones máximas que aparece en la pantalla es el mismo que el de la cadencia
actual.
/ Ritmo con respecto a la velocidad media
Se verá parpadear la flecha " " si la velocidad actual es superior a la velocidad media, mientras que
la flecha hacia abajo " " parpadeará en caso contrario.
*
Observaciones: Todos los datos de las funciones se actualizan cada segundo.
FUNCIONES ESPECIALES PARA EL USUARIO
DST Cuenta atrás de distancia 0.0~999.9 Km o millas
Cuando se hace la cuenta atrás hasta cero, los datos de TM, AVG, MAX, AVG_RPM y MAX_RPM se
congelan
1.ALARMA DE AVISO
Por ejemplo, si el ciclista quiere recorrer 30 km, al programar la distancia deseada, este
ciclocomputador mostrará un parpadeo cuando se alcancen los 30 km.
2. REALIZACIÓN DE PRUEBAS
Por ejemplo, el ciclista establece una distancia de prueba de 1 km. No es necesario accionar
ningún botón mientras se monta en bicicleta. Cuando el ciclista ha recorrido 1 km, el
ciclocomputador congela automáticamente los datos de TM, AVG, MAX y AVG_RPM para su
referencia.
TM Cuenta atrás de tiempo 0H:00M:00S~99H:59M:59S
1. La función de cuenta atrás de TIEMPO hace que la función de tiempo (TM) pase de la forma
ascendente a la descendente. También parpadea para avisar al usuario y congela los datos de
DST, AVG, MAX, MAX_RPM y AVG_RPM cuando la cuenta atrás llega a cero.
2. Las operaciones de la función de cuenta atrás de TIEMPO pueden consultarse en las
descripciones de la sección de cuenta atrás de DISTANCIA de estas instrucciones.
La pantalla de
la unidad
principal no se
enciende
No aparece la
velocidad
actual o los
datos son
incorrectos
Irregularidade s
en la pantalla
La pantalla de
cristal líquido
está negra
La pantalla
funciona con
lentitud
1. ¿Se ha agotado la batería?
2. ¿Está bien colocada la batería?
1. ¿Está en la pantalla de PREPARACIÓN DE
LA UNIDAD PRINCIPAL o en cualquier otra
pantalla de ajuste?
2. ¿Es correcta la posición y la distancia entre
el sensor y el imán?
3. ¿Son correctos los datos de circunferencia
de la rueda?
4. ¿Es excesiva la distancia del sensor o es
incorrecto el ángulo de instalación del
sensor?
5. ¿Está casi agotada la bateríadel sensor?
6. ¿Hay cerca alguna fuente fuerte de
interferencias?
¿Ha dejado expuesta al sol la unidad
principal sin haber utilizado la bicicleta
durante un periodo largo?
¿Hay una temperatura inferior a 0°C (32°F)?
1. Cambiar la batería.
2.
Asegurarse de que el polo positivo de la
batería esté mirando hacia la tapa de la
batería.
1. Consultar el procedimiento de puesta a
punto y seguir los pasos oportunos.
2. Consultar Instalación (Ilus. C-3) e (Ilus.
D-4) y volver a ajustar la posición y la
distancia de forma correcta.
3. Consultar la sección de "Fijación de la
circunferencia" e introducir el valor
correcto.
4. Consultar Instalación (Ilus. D-3) para
ajustar la distancia o el ángulo entre la
unidad principal y el sensor.
5. Sustituir por una batería nueva.
6. Alejarse de la fuente de interferencias.
Consultar la sección "Preparación de la
unidad principal" y volver a poner en
funcionamiento el ciclocomputador.
Coloque la unidad principal a la sombra
para que recupere su estado normal. No
tiene efectos adversos para los datos.
La unidad volverá a su estado normal
cuando la temperatura suba.
RESOLUCIÓN DE PROBLEMAS
Sensor: Sensor magnético sin contacto.
Tipo de batería: 3V Batería (Battery) X 1. ( Tipo No.CR2032)
Duración de la batería: Durante unos 2 años (La batería de origen puede durar
menos por el tiempo de transporte y almacenaje).
Dimensiones/Peso: 45.8 x 54 x17.2mm/ 31.5g
Instalación de la circunferencia de la rueda:
0mm.-3999mm. (incremento 1mm)
Temperatura de operación: 0 C ~ 50 C (32 F ~ 122 F)
Temperatura de almacenaje: - 10 C ~ 60 C (14 F ~ 140 F)
PROBLEMA ELEMENTOS DE COMPROBACIÓN SOLUCIÓN
PRECAUCIONES
1. Este ordenador puede utilizarse cuando llueva, pero no deberia utilizarse bajo el agua.
2. No deje la unidad principal expuesta directamente a la luz del sol cuando no se esté montando
en bicicleta.
3. No desmonte la unidad principal ni sus accesorios.
4. Compruebe la posición relativa y la distancia entre el sensor y el iman periódicamente.
5. Limpie los contactos del bandaje y la parte inferior de la unidad principal periódicamente.
6. No utilice disolvente, alcohol ni bencina para limpiar la unidad principal o sus accesorios cuando
se ensucien.
7. Preste siempre atención al camino cuando circule en bicicleta.
Español
Español
+
3s
2s
3s
5s
5s
3s
SET
MODE
2s
Maintenez la touche MODE
o
enfoncée pendant 2 secondes.
<OPERACIÓN DE AJUSTE>
<FUNCIONAMIENTO GENERAL>
Cambiar de
pantalla
Pulsar la tecla MODE o para
cambiar de pantalla.
Puesta a cero
de datos
Mantener pulsada la tecla
MODE o durante 3 seg.
(DATOS DE DST, TM, MAX, AVG,
M-RPM, A-RPM).
Cambiar el tamaño
de la rueda
(sólo en el modo ODO)
Mantener pulsada la tecla
MODE o durante 5 seg.
Entrar en el modo
DST
(Distancia) o
TM
(Tiempo)
Mantener pulsada la tecla
MODE o durante 5 seg.
Salir del modo
DST o TM
Mantener pulsada la tecla
MODE o durante 3 seg.
Poner a cero
los datos
Puesta a cero total
Mantener pulsadas las teclas MODEo+ SETf
durante 3 seg. para reiniciar la unidad principal.
Ajustar los
dígitos
Pulsar la tecla MODE o
para seleccionar.
Pasar al ajuste del
siguiente dígito
Mantener pulsada la tecla
SET f durante 2 seg.
Pasar a la
siguiente función
Pulsar la tecla SET f para
pasar a la siguiente función.
Salir del modo
de programación
Pulsar la tecla SET f para entrar
en el modo de programación
Riding time
count down
5s
3s
~9
5s
3s
Distance count
down setting
Sólo modo DST
DST Contagem da distância 0,0~999,9 Km ou milhas
Quando a contagem chega a zero, os valores de TM, AVG, MAX, AVG_RPM, MAX_RPM deixam
de ser actualizados
1. ALARME
Por exemplo, se o condutor pretender fazer um percurso de 30Km, basta definir a distância
pretendida e o computador emitirá um alarme assim que a distância predefinida for atingida.
2. PARA TESTE
Por exemplo, o condutor define uma distância de teste de 1 Km. Não é necessário utilizar
qualquer botão durante a condução. Quando o condutor atingir 1 Km, o computador deixa
automaticamente de actualizar os dados TM, AVG, MAX, AVG_RPM, para que estes possam ser
consultados posteriormente.
TM Contagem decrescente do tempo de percurso 0H: 00M: 00S~99H: 59M: 59S
1. A função de contagem decrescente do tempo altera a função TM (a contagem crescente passa a
ser feita no sentido inverso). Além disso, o ecrã pisca para alertar o condutor e os dados
DST, AVG, MAX, MAX_RPM e AVG_RPM deixam de ser actualizados assim que a contagem
atingir o zero.
2. As operações da função de contagem decrescente do tempo são mencionadas nas descrições
da função DISTÂNCIA
INICIAR O COMPUTADOR (TUDO LIMPO)
1. Mantenha os botões MODE o e SET f pressionados simultaneamente durante mais de 3
segundos para iniciar o computador e limpar todos os dados. IMPORTANTE: Certifique-se de que
inicia o computador antes de o utilizar, caso contrário podem surgir erros.
2. Os segmentos do LCD serão testados automaticamente após a unidade ter sido iniciada.
3. Pressione o botão MODE o para interromper o teste ao LCD e, em seguida, é apresentada a
indicação intermitente "KM/h".
LIGAR/DESLIGAR O SENSOR DE MOVIMENTO DA UNIDADE PRINCIPAL
O computador inclui um sensor (patenteado) para evitar qualquer interferência sempre que a
unidade principal for retirada do apoio. A unidade principal só recebe os sinais das rodas quando se
encontra encaixada no apoio.
ACTIVAÇÃO/DESACTIVAÇÃO E LIGAÇÃO/PARAGEM AUTOMÁTICAS
1. O computador inicia automaticamente a contagem assim que o percurso é iniciado e interrompe
quando o percurso termina. O símbolo intermitente " " indica que o computador está a ser
ligado.
2. Para economizar bateria, este computador desliga automaticamente após um período de
inactividade de 30 minutos, apresentando apenas a indicação " ". A alimentação é restaurada
assim que pressionar o botão MODE o.
OPERAÇÃO REINICIAR (Fig. 6 )
Mantenha o botão MODE o pressionado até que o LCD deixe de apresentar qualquer valor e, em
seguida, solte o botão. O computador reiniciará todos os valores de AS, DS, RT e MS a zero.
CIRCUNFERÊNCIA DA RODA
z Medição precisa (fig. a)
Faça girar a roda até que a válvula se encontre na posição mais próxima do solo e marque este
primeiro ponto no pavimento. Suba para a bicicleta e peça que o empurrem até que a válvula
regresse ao ponto mais próximo do solo. Marque o segundo ponto no pavimento. Meça a distância
existente entre as marcas. Introduza este valor para definir a circunferência da roda.
z Quadro de consulta rápida (fig.b): Verifique no quadro qual o valor de circunferência adequado.
SUBSTITUIÇÃO DA BATERIA DA UNIDADE PRINCIPAL
a). O símbolo " " surge para indicar que a bateria está quase sem carga.
b). Substitua a bateria por uma nova no prazo de alguns dias após o símbolo ter surgido.
c). Todos os dados serão eliminados aquando da substituição da bateria, mas o computador permite
que o condutor introduza os dados relativos a ODO1, ODO2 e T-RT após a operação de
substituição, pelo que deve registar estes valores antes de retirar a bateria antiga.
d). Utilize uma bateria CR2032 nova e ligue a unidade principal. (Fig. 1)
FUNÇÕES
VELOCIDADE ACTUAL 0.0 – 199,9 Km/h ou 120.0 Milhas/h +/- 1% (normal)
1. A velocidade actual é sempre indicada no ecrã superior durante a condução. É apresentada a
velocidade actual até 199,9 KM/h ou 120.0 M/h (para diâmetros de roda superiores a 24
polegadas).
2. Quando o percurso é interrompido, a velocidade continua a ser contabilizada durante mais 4
segundos no caso da bicicleta 1 e 2 segundos no caso da bicicleta 2, para confirmação de que
não foram enviados mais sinais.
DST DISTÂNCIA DO PERCURSO 0,00 – 999,99 Km ou Milhas +/- 0,1%
A função DS apresenta a distância percorrida desde a última operação REINICIAR, desde que a
bicicleta esteja a ser conduzida.
TM TEMPO DE PERCURSO 0M00.0S-59M59.9S, 1H00M00S-99H59M59S +/- 0.003%
1. O indicador RT apresenta o tempo de percurso desde a última operação REINICIAR.
2. A contagem começa automaticamente assim que o percurso é iniciado e, quando o percurso é
interrompido, a velocidade continua a ser contabilizada durante mais 4 segundos no caso da
bicicleta 1 e 2 segundos no caso da bicicleta 2, para confirmação de que não foram enviados mais
sinais pela roda. No entanto, o computador elimina automaticamente os valores recolhidos em
excesso durante esse período de 2 ou 4 segundos.
MAX VELOCIDADE MÁXIMA 0,0 – 199,9 Km/h ou 120,0 Milhas/h +/- 1%
Indica a velocidade mais elevada desde a última operação REINICIAR.
AVG VELOCIDADE MÉDIA 0.0 – 199,9 Km/h / 0,0 – 120,0Milhas/h +/- 0,1%
1. É calculado a partir de DS dividido por RT. O valor médio é calculado a partir da última operação
REINICIAR até ao ponto actual.
2. É apresentado "0.0" quando RT é inferior a 4 s, sendo actualizado de segundo a segundo quando
RT é superior a 4 segundos.
3. É apresentado um símbolo "Err" quando o valor de RT é superior a 100 horas ou o valor de DS é
superior a 1.000 km (ou milhas). Reinicie a unidade para recomeçar.
ODO ODO-1/ ODO-2
1. O conta-quilómetros indica a distância total, desde que a bicicleta continue a ser utilizada e tanto a
bicicleta 1 como a bicicleta 2 possuem o seu próprio indicador ODO 1 ou ODO 2. O indicador
T-ODO apresenta a soma de ODO 1 mais ODO 2.
2. Os dados de ODO1, ODO 2 ou T-ODO não podem ser colocados a zero através da operação
REINICIAR.
Clock 12HR AM/PM OU 24HR CLOCK
1:00:00 – 12:59:59 AM/PM ou 0:00:00 – 23:59:59 +/- 0.003%
A hora actual pode ser apresentada em unidades de 12HR AM/PM ou 24HR.
RPM Valor das RPM (rotações por minuto) actuais 0-199rpm +/- 0,1%
1. O valor das RPM actuais indica a rotação do pedal por minuto (rpm). Este valor é apresentado no
canto superior direito e é actualizado segundo a segundo.
2. A gama de apresentação geral varia entre 0 e 199 rpm, em intervalos de 1 rpm. Os dados das
RPM são reiniciados a zero 4 segundos depois do pedal ter deixado de rodar.
PRECAUÇÕES
1. Este computador pode ser utilizado à chuva, mas não pode ser utilizado debaixo de água.
2. Não deixe a unidade principal exposta à luz directa do sol quando não estiver a conduzir a
bicicleta.
3. Não desmonte a unidade principal ou os respectivos acessórios.
4. Verifique regularmente a posição relativa e o intervalo do sensor, do íman e da unidade principal.
5. Limpe regularmente os contactos do apoio e a zona inferior da unidade principal.
6. Não utilize diluente, álcool ou gasolina para limpar a unidade principal ou os respectivos
acessórios quando estes estiverem sujos.
7. Lembre-se de prestar atenção à estrada durante a condução.
FUNÇÕES ESPECIAIS PARA O UTILIZADOR
AVG RPM Valor médio das RPM 0-199rpm +/- 1,5%
1. O valor médio das RPM é calculado com base no número total de rotações do pedal dividido pela
duração da rotação (dependendo igualmente do tempo de percurso da roda). O valor A-RPM é
contado a partir da última operação REINICIAR até ao ponto actual e é actualizado de segundo a
segundo.
2. É apresentada a indicação “0” quando a duração da rotação do pedal é inferior a 6 segundos ou o
número total de rotações for inferior a 10. (Estes 2 valores não serão apresentados no ecrã.)
3. É apresentado o símbolo “Error” quando o número total de rotações do pedal for superior a 1
milhão ou a duração total das rotações ultrapassar as 100 horas. Reinicie a função para
recomeçar.
MAX RPM Valor máximo das RPM 0-199rpm +/- 1,5%
1. Regista a rotação mais elevada desde a última operação REINICIAR.
2. A gama de apresentação máxima das RPM é idêntica à cadência actual.
/ Indicador de velocidade
O cursor do indicador de velocidade pisca " " enquanto a velocidade actual for superior à
velocidade média, ao passo que a seta para baixo " " pisca inversamente.
* Observações: Todos os dados das funções são actualizados segundo a segundo.
1. Quando activa o modo DST: reinicio automático dos
dados DST, TM, AVG/ MAX / AVG_RPM/MAX_RPM.
2. Início automático da contagem decrescente durante a
condução
3. Quando a contagem atinge o zero, o símbolo pisca e os
dados deixam de ser actualizados; posteriormente, o modo
DST recupera os dados predenidos
4. Mantenha a tecla pressionada durante 3 segundos para
reiniciar todos os dados e abandonar o modo de contagem
decrescente DST.
1. Quando activa o modo TM: cio automático dos dados DST, TM, AVG/ MAX /
AVG_RPM/MAX_RPM.
2. Início automático da contagem decrescente durante a condução
3. Quando a contagem atinge o zero, o símbolo pisca e os dados deixam de ser actualizado ;
posteriormente, o modo TM recupera os dados predefinidos
4. Mantenha a tecla pressionada durante 3 segundos para reiniciar todos os dados e
abandonar o modo de contagem decrescente
TM.
RESOLUÇÃO DE PROBLEMAS
Realize as seguintes verificações antes de enviar a unidade para reparação.
Sensor com transmissor:
sensor de íman sem contacto com transmissor sem fios.
Alimentação da
unidade principal:
bateria de 3V x 1 (CR2032), a vida útil da bateria é de
aproximadamente 2 anos. (com base numa utilização diária
média de 1,5 horas)
(a vida út l da bateria original pode revelar-se mais curta devido aos períodos de envio e armazenamento.)
Dimensões e peso da unidade principal:
46 x 54 x 16,5mm/31,5g
Definição da circunferência da roda:
1mm - 3999mm (intervalos de 1 mm)
Temperatura de funcionamento:
0°C ~ 50°C (32°F ~ 122°F)
Temperatura de armazenamento:
- 10°C ~ 60°C (14°F ~ 140°F)
Só em modo
TM
Riding time
count down
5s
3s
Só em modo DST
0~9
5s
3s
Distance count
down setting
<OPERAÇÃO GERAL>
Alterar ecrã
Prima a tecla MODE para alterar
o ecrã
Restabelecer dados
Mantenha premida a tecla MODE
durante 3 seg
(DST, TM, MAX, AVG, M-RPM,
A-RPM DATA)
Mantenha premida a tecla
MODE durante 5 seg.
(apenas no modo ODO)
Alterar o tamanho da roda
Mantenha premida a tecla
MODE durante 5 seg
Restabelecer dados
Prima a tecla SET para entrar
no modo de configuração
Mantenha premida as teclas MODE o SET
f
Durante 3 seg para reiniciar a unidade
Limpar tudo
<OPERAÇÃO DE CONFIRMAÇÃO>
Ajustar digitos
Prima a tecla MODE
para selectionar
Mudar para o acerto
do digito seguinte
Mantenha premida a tecla
MODE durante 2 seg
2s
Prima a tecla SET para
mudar para a função seguinte
Mudar para a
função seguinte
Sair do modo
de configuração
Mantenha premida a tecla
SET durante 2 seg
Entrar no modo
DST ou TM
Mantenha premida a tecla
MODE durante 3 seg.
Sair do modo
DST ou TM
Português
Português
+
3s
2s
3s
5s
5s
3s
SET
MODE
Nenhuma
informação no
ecrã
Nenhum valor
relativo à
velocidade ou
dados incorrectos
Imagens
irregulares
O LCD não
apresenta
qualquer imagem
As imagens
demoram muito
tempo a serem
apresentadas
1. A bateria tem carga?
2. A bateria foi instalada correctamente?
1. Encontra-se no ecrã de recalibragem ou no
modo 12HR do relógio?
2. Os contactos existentes entre a unidade
principal e o apoio estão em bom estado?
3. As posições relativas e o intervalo do sensor
e do íman são os correctos?
4. O fio está partido?
5. O valor da circunferência é o correcto?
Deixou a unidade principal sob a luz directa
do sol durante um longo período de tempo?
A temperatura é inferior a 0ºC (32ºF)?
1. Subst tua a bateria.
2. Certifique-se de que o pólo pos tivo da
bateria se encontra orientado na direcção da
tampa da bateria.
1. Consulte o procedimento de ajuste e
conclua-o.
2. Limpe os contactos.
3. Consulte as imagens da instalação (fig. D1) e
reajuste os dados correctamente.
4. Efectue a reparação ou subst tua o fio.
5. Consulte a secção "CALIBRAGEM" e
introduza o valor correcto.
Consulte a secção "CONFIGURAÇÃO DA
UNIDADE PRINCIPAL" e volte a ligar o
computador.
Coloque a unidade principal na sombra para
que esta regresse ao seu estado normal. Os
dados não são afectados negativamente.
A unidade regressa ao estado normal quando a
temperatura aumentar.
PROBLEMA ITENS A VERIFICAR SOLUÇÃO
AVVIO DEL COMPUTER
1.A Al momento dell'acquisto il prodotto viene fornito con una batteria in dotazione nell'unità
principale. Tenere premuto il tasto MODE o e il tasto SETf simultaneamente per più di 3 secondi
per inizializzare il computer e cancellare tutti i dati.
IMPORTANTE! Accertarsi di inizializzare il computer prima dell'uso per evitare l'esecuzione
di eventuali errori.
2. I segmenti LCD saranno verificati automaticamente dopo avere inizializzato l'unità.
3. Premere il tasto MODE o per interrompere il test LCD, quindi il simbolo lampeggiante "Km/h".
RILEVAMENTO DEL COLLEGAMENTO DELL'UNITÀ PRINCIPALE
Il computer è dotato di un sensore di rilevamento di collegamento e di scollegamento (brevetto in
corso di registrazione) che permette di eliminare disturbi di interferenza quando l'unità principale
viene rimossa dalla staffa. L'unità principale è in grado di ricevere il segnale della ruota solo
quando è inserita nell'apposita staffa.
AVVIO/ARRESTO AUTOMATICO E ON/OFF AUTOMATICO
1. Il computer avvia il conteggio dei dati in automatico quando si inizia a pedalare e cessa il conteggio
quando si interrompe la pedalata. Il simbolo lampeggiante " " indica che il computer si trova in fase di
avvio.
2. Per conservare l'energia della batteria, il computer si spegne in automatico limitandosi a
visualizzare unicamente i dati " " quando rimane inutilizzato per oltre 20 minuti. L'alimentazione
viene riattivata premendo il tasto MODE o.
AZZERAMENTO DATI
Tenere premuto il tasto MODE fino a che la cifra viene cancellata dal display LCD, quindi
rilasciarlo. Il computer azzererà i dati DST, TM, MAX, AVG, GIRI/MIN MASSIMI, GIRI/MIN IN
MEDIA dai valori memorizzati per avviare un nuovo ciclo di riferimento.
CIRCONFERENZA DELLA RUOTA
z Misurazione accurata (Fig. a)
Far girare la ruota fino a quando il gambo della valvola si trova in corrispondenza del punto più
vicino al suolo e marcare quindi questo primo punto sul suolo. Salire in bicicletta e farsi spingere
da qualcuno fino a quando la valvola non raggiunge di nuovo il punto più basso. Segnare quindi il
secondo punto sul suolo e misurare la distanza tra i segni. Inserire il valore per impostare la
circonferenza della ruota.
zTabella di riferimento rapido (Fig. b): Ricavare un valore di circonferenza adeguato dalla
tabella.
SOSTITUZIONE BATTERIA UNITÀ PRINCIPALE
1. Il simbolo " " indica che la batteria è quasi esaurita.
2. Assicurarsi di sostituire la batteria con una batteria nuova entro qualche giorno dalla
visualizzazione di questo simbolo.
3. Tutti i dati saranno azzerati una volta sostituita la batteria, ma il computer consente di immettere
nuovamente in ODO il chilometraggio percorso dopo la sostituzione della batteria, registrando tali
dati prima di sostituire la batteria esaurita.
4. Inserire una batteria nuova tipo CR2032 e avviare l'unità principale.
ATTENZIONE
1. Non lasciare l'unità principale esposta alla luce diretta del sole quando non si usa la bicicletta.
2. Non lasciare l'unità principale sotto l'esposizione diretta dei raggi solari a meno che non si stia
utilizzando la bicicletta.
3. Non smontare l'unità principale o i suoi accessori.
4. Controllare periodicamente la posizione e la distanza del sensore e del magnete.
5. Pulire periodicamente i contatti del supporto e la parte inferiore dell'unità principale.
6. Non fare uso di diluenti, alcool o benzina per pulire l'unità principale o i suoi accessori quando sono
sporchi.
5. Ricordarsi di prestare attenzione alla strada quando si usa la bicicletta.
Velocità effettiva 0,0 – 199,9 Km/h o 120,0 miglia/h +/- 1%
1. Durante la pedalata la velocità effettiva viene sempre visualizzata in alto sul lato sinistro del
display. Viene visualizzata la velocità effettiva fino a 199,99 KM/h o 120,0 M/h (per diametri ruota
superiori a circa 600 mm).
2. Non appena si cessa la pedalata, il rilevamento della velocità continuerà per 4 secondi per la bici 1
e per 2 secondi per la bici 2: ciò permette di verificare che dalla ruota non venga inviato più alcun
segnale.
DST Distanza percorsa 0,00 – 999,99 Km o miglia +/- 0.1%
La funzione DST permette di accumulare i dati reltivi alla distanza dall'ultima operazione di
AZZERAMENTO per tutto il tempo che la bicicletta è in uso.
TM Tempo di percorrenza 0 00H:00M:00S-99H:59M:59S
1. La funzione TM permette di sommare il tempo di percorrenza dall'ultima operazione di
AZZERAMENTO.
2. Quando la bicicletta è in funzione, il conteggio iniziaerà in automatico continuando per 4 secondi
per la bici 1 e per 2 secondi per la bici 2: ciò permette di verificare che non venga più inviato alcun
segnale di rilevamento dalla ruota non appena si smette di pedalare.
Tuttavia, il computer sottrarrà automaticamente i secondi contati in eccesso (4 per la bici 1 e 2
secondi per la bici 2) per ottenere il tempo di percorrenza esatto.
MAX Velocità massima 0,0 – 199,9 Km/h o 120,0 miglia/h +/- 1%
Mostra la velocità più elevata dall'ultima operazione di AZZERAMENTO.
AVG Velocità media 0,0 – 199,9 Km/h / 0,0 – 120,0 miglia/h +/- 0.1%
1. Si calcola dividendo il fattore DST per il fattore TM. Il dato medio calcolato va dall'ultimo
AZZERAMENTO al momento attuale.
2. Visualizza “0,0” quando il fattore TM è inferiore a 4 secondi.
3. La visualizzazione viene aggiornata circa ogni secondo quando il fattore TM è superiore a 4
secondi.
4. Il computer visualizzerà un simbolo di errore quando il fattore TM è superiore a 100 ore o il fattore
DST è superiore a 1.000 km (o miglia). Azzerare l'unità per eseguire l'avvio.
ODO ODO-1/ ODO-2 0,0 – 999999 Km o miglia +/- 0.1%
1. L'odometro somma la distanza totale fino al momento in cui la bicicletta è in marcia: la bici 1 e la
bici 2 sono entrambe dotate di un proprio odometro, rispettivamente ODO 1 e ODO 2.
2. I dati ODO1 e ODO 2 non possono essere riportati a zero con l'operazione di AZZERAMENTO.
OROLOGIO Orologio 12 H AM/PM o 24 H
1:00:00 ~12:59:59 AM/PM o 0:00:00 ~ 23:59:59 +/- 0,003%
La funzione permette di visualizza l'ora corrente con orologio 12 H AM/PM o 24 H.
RPM GIRI/MIN attuali (giri al minuto) 0-199 rpm+/- 0.1%
1. I GIRI/MIN attuali sono i giri di pedalata al minuto (rpm). Il dato corrispondente è visualizzato
mediante il simbolo presente in alto a destra e viene aggiornato una volta al secondo.
2. L'intervallo di visualizzazione generale va da 0 (199) a 1 giro/min, con incrementi di 1 giro/min.
Permette di azzerare gli attuali dati di GIRI/MIN dopo 4 secondi quando la guarnitura non viene più
ruotata.
AVG RPM GIRI/MIN in media 0-99 giri/min+/- 1.5%
1. I GIRI/MIN in media sono calcolati dividendo i giri di pedalata complessivi per il tempo del giro di
pedalata (essi sono indipendenti dal tempo di percorrenza della ruota). I GIRI/MIN in media
vengono calcolati dall'ultima operazione di AZZERAMENTO al momento attuale e sono aggiornati
una volta circa al secondo.
2. Il computer visualizza uno “0” quando il tempo del giro di pedalata è inferiore a sei secondi o il giro
di pedalata totale è inferiore a 10 rotazioni (ambedue questi dati non sono visualizzati sul display).
3. Il computer visualizza il simbolo di errore quando il giro complessivo di pedalata è superiore a 1
milione di rotazioni o il tempo di giro di pedalata è superiore a 100 ore. Azzerare l'unità per
eseguire l'avvio.
MAX RPM GIRI/MIN MASSIMI 0-199 rpm+/- 1.5%
1. Permette di registrare il valore più alto di GIRI/MIN dall'ultima operazione di AZZERAMENTO.
2. L'intervallo di visualizzazione per i GIRI/MIN massimi è lo stesso dei giri/min effettivi.
/ Generatore di velocità
Questa funzione attiva la " " freccia del generatore di velocità quando la velocità effettiva è più
elevata rispetto alla velocità media. In caso contrario lampeggerà la freccia verso il basso " ".
* Osservazioni: tutti i dati di funzione vengono aggiornati all'incirca ogni secondo.
FUNZIONI SPECIALI PER L'UTENTE
DST Conto alla rovescia della distanza 0.0~999.9 Km o miglia
Quando il conto alla rovescia raggiunge lo 0, i dati relativi a TM, AVG, MAX, AVG_RPM,
MAX_RPM vengono arrestati.
1.ALLARME VISIVO
Se il ciclista intende ad esempio pedalare a 30 km preimpostando la distanza desiderata, il
computer lampeggerà quando si raggiungono i 30 km.
2. TEST
Il ciclista può preimpostare per esempio 1 Km come distanza di prova. Non è necessario azionare
alcun tasto mentre si pedala. Una volta raggiunto 1 Km, il computer arresta automaticamente i dati
TM, AVG, MAX, GIRI/MIN MEDI come riferimento.
TM Conto alla rovescia tempo 00H:00M:00S~99H:59M:59S
1. La funzione conto alla rovescia TEMPO permette di modificare il fattore TM da crescente a
decrescente. Inoltre, la visualizzazione lampeggia per avvisare l'utente e arresta i dati DST,
AVG, MAX, AVG_RPM e MAX_RPM IN MEDIA quando il conto alla rovescia raggiunge lo zero.
2. Le operazioni della funzione conto alla rovesciaTEMPO si ricollegano alle descrizioni contenute
nella sezione relativa al conto alla rovescia sulla DISTANZA del presente manuale.
PROBLEMA VERIFICA ELEMENTI RIMEDIO
Unità principale:
visualizzazione non
disponibile
Nessuna velocità
effettiva o dati
inesatti
Visualizzazione
display irregolare
Il display LCD è
nero
La visualizzazione
del display è
lenta
1. La batteria è esaurita?
2. La batteria è stata installata correttamente?
1. Il problema riguarda l'IMPOSTAZIONE
UNITÀ PRINCIPALE o un'altra schermata
di impostazione?
2. Le posizioni relative e la distanza tra
sensore e magnete sono corrette?
3. La circonferenza è corretta?
4. La distanza di rilevamento è
sufficientemente breve e l'angolazione di
posizionamento del sensore è corretto?
5. La batteria del sensore si sta scaricando?
6. Esiste qualche forte fonte di interferenza
ne le vicinanze?
L'unità principale è stata esposlungo alla
luce diretta del sole quando la bicicletta
non era in uso?
La temperatura è inferiore a 0°C (32°F)?
1. Sostituire la batteria.
2. Assicurarsi che il polo positivo de la
batteria sia rivolto verso il copribatteria.
1. Attenersi alla procedura di impostazione e
terminare l'operazione.
2. Fare riferimento alla
Installazioni
Fig. C-3
e alla Fig. D-4) e reimpostare
correttamente posizione e distanza.
3. Fare riferimento a "Impostazione
circonferenza" e immettere l valore
corretto.
4. Fare riferimento alla
Installazioni
Fig. D-3
per regolare la distanza o l'angolazione
presente tra l'unità principale e il sensore.
5. Inserire una batteria nuova.
6. A lontanarsi dalla fonte di interferenza.
Fare riferimento alla sezione
"Impostazione unità principale" e avviare di
nuovo il computer.
Collocare l'unità all'ombra per ritornare alla
condizione normale. Nessun effetto
avverso sui dati.
L'unità tornerà alla condizione normale con
l'aumento della temperatura.
1. Quando si seleziona la modalità DST :
azzeramento automatico dei dati relativi a DST, TM,
AVG/MAX, AVG_RPM/ MAX_RPM.
2. Avvio automatico del conto alla rovescia durante l'utilizzo
della bicicletta.
3. Quando il conto alla rovescia raggiunge lo zero, il
simbolo lampeggerà mentre i dati verranno arrestati:
successivamente, la funzione DST ripristinerà i dati
preimpostati.
4. Per azzerare tutti i dati e uscire dalla modalità di conto
alla rovescia DST, mantenere premuto il tasto per 3
secondi.
1. Quando si seleziona la modalità TM:
azzeramento automatico dei dati relativi a DST, TM, AVG/MAX,
AVG_RPM/ MAX_RPM.
2. Avvio automatico del conto alla rovescia durante l utilizzo della
bicicletta.
3. Quando il conto alla rovescia raggiunge lo zero, il simbolo lampeggerà
mentre i dati verranno arrestati: successivamente, la funzione
TM ripristinerà i dati preimpostati.
4. Per azzerare tutti i dati e uscire dalla modalità di conto alla rovescia
TM, mantenere premuto il tasto per 3 secondi.
Italiano
Italiano
IDENTIFICAZIONE DEI GUASTI
Prima di portare l nità a riparare, effettuare i seguenti controlli
DESCRIAIONE DELLE FUNZIONI
Sensore: Sensore magnetico senza contatti
Tipo di batteria: 1 batteria da 3 V (tipo CR2032)
Durata della batteria: Circa 2 anni (la batteria in dotazione può avere una durata inferiore,
considerato il tempo di spedizione e di stoccaggio dell nità)
Dimensioni/Peso: 45.8 x 54 x 17.2mm/ 31.5g
Regolazione circonferenza ruota: 0 mm a 3999 mm (incrementi di 1 mm)
Temperatura operativa: 0° C ~ 50° C (32° F ~ 122° F)
Temperatura di stoccaggio: - 10° C ~ 60° C (- 14° F ~ 140° F)
Solo modalità TM
2s
+
3s
2s
3s
5s
5s
3s
SET
MODE
Cancella tutto
Correggi valore
immesso
Premere il tasto MODE
per eseguire la selezione.
Passa al valore
immesso
successivo
Tenere premuto per 2
secondi il tasto MODE .
Passa alla funzione
successiva
Per passare alla funzione
successiva, premere il
tasto SET .
Esci dalla modalità
impostazione
Tenere premuto per 2
secondi il tasto SET .
Cambia
visualizzazione
Premere il tasto MODE per
visualizzare una schermata diversa.
Per reinizializzare l'unità principale,
mantenere premuti i tasti MODE + SET
per 3 secondi.
<IMPOSTAZIONE>
<FUNZIONAMENTO GENERALE>
Azzera dati
Tenere premuto per 3 secondi il
tasto MODE
(DST, TM, MAX, AVG,
M-RPM, A-RPM DATA).
Modifica dimensioni
ruota
(solo modalità ODO)
Tenere premuto per 5
secondi il tasto MODE .
Attiva modalità
DST o TM
Tenere premuto per 5
secondi il tasto MODE
Esci dalla modalità
DST o TM
Tenere premuto per 3
secondi il tasto MODE .
Azzeramento
dei dati
Premere il tasto SET per attivare
la modalità di impostazione.
Riding time
count down
5s
3s
Only DST mode
0~9
5s
3s
Distance count
down setting
DST Edzéstáv visszaszámláló 0.0~999.9 Km vagy miles
$PLNRUDV]iPOiOyHOpULDQXOOiWDNRPSXWHUQHPPpULWRYiEEDN|YHWNH]ĘDGDWRNDW70$9*
MAX, AVG_RPM, MAX_RPM.
),*<(/0(=7(7ė-(/=e6
3pOGiXOKDDNHUpNSiURVNPWDNDUNHUpNSiUR]QLDNNRUD]HOĘUHEHiOOtWRWWWiYROViJD]D]NP
megtétele után a jelzés villog.
2. TESZT
A funkciót tesztelheti, ha 1km távolságot állít be. Haladás közben nem szükséges semmilyen
JRPEPHJQ\RPiVD$]NPHOpUpVHXWiQDNRPSXWHUQHPPpULWRYiEEDN|YHWNH]ĘDGDWRNDW
TM, AVG, MAX, AVG_RPM, MAX_RPM.
70 (G]pVLGĘYLVV]DV]iPOiOy 0:00:00...99:59:59
$]HG]pVLGĘYLVV]DV]iPOiOyIXQNFLyD70IXQNFLyPĦN|GpVpWYLVV]DV]iPOiOiVUDYiOWR]WDWMD
$ILJ\HOPH]WHWĘMHOYLOORJpVDNRPSXWHUQHPPpULWRYiEEDN|YHWNH]ĘDGDWRNDW70$9*
MAX, AVG_RPM, MAX_RPM, ha a számláló eléri a nullát.
$]HG]pVLGĘYLVV]DV]iPOiOyIXQNFLyEHiOOtWiVDKDVRQOyD]HG]pVWiYYLVV]DV]iPOiOyIXQNFLy
PĦN|GpVpUĘOOHtUWDNKR]
A KOMPUTER ELINDÍTÁSA
1. A komputer elemmel együtt kerül forgalomba. Tartsa nyomva egyszerre a MODE o és a
SET gombot
f legalább 3 másodpercig a komputer elindításához és minden adat törléséhez
)217260LQGHQNpSSHQYpJH]]HHODIHQWLPĦYHOHWHWPLHOĘWWKDV]QiOQLNH]GHQpD
NRPSXWHUW(OOHQNH]ĘHVHWEHQHOĘIRUGXOKDWKRJ\DNRPSXWHUQHPPĦN|GLNPHJIHOHOĘHQ
$NRPSXWHUD]HOLQGtWiVXWiQDXWRPDWLNXVDQHOYpJ]LD]/&'NLMHO]ĘWHV]WMpW
3. Nyomja meg a MODE gombot
o az LCD teszt leállításához. Ekkor a Km/h felirat villog.
$8720$7,.86.,%(.$3&62/È6e5=e.(/ė5(1'6=(5
$NRPSXWHUHJ\DXWRPDWLNXVNLEHNDSFVROiVpU]pNHOĘUHQGV]HUUHOUHQGHONH]LNPHO\PHJyYMDD]
egységeket az interferenciától, amennyiben a komputert eltávolítja a tartóról. A komputer csak
akkor tudja fogadni az adatokat, ha rajta van a tartón.
AUTOMATIKUS LEÁLLÍTÁS ÉS KI/BEKAPCSOLÁS
1. A komputer automatikusan elkezdi az adatok mérését a kerékpár elindulásakor és leállítja a
mérést, ha megáll a kerékpár. A villogó ” ” felirat jelzi, hogy a komputer fogadja az adatokat.
ÓVINTÉZKEDÉSEK
$NRPSXWHUKDV]QiOKDWyHVĘEHQGHQHPKDV]QiOKDWyYt]DODWW
1HWHJ\HNLN|]YHWOHQQDSVWpVQHNDKDV]QiODWRQNtYOOpYĘNRPSXWHUW
3. Ne szerelje szét a komputert és alkatrészeit.
5HQGV]HUHVHQHOOHQĘUL]]HDV]HQ]RUpVDPiJQHVSR]tFLyMiWpVDNHWWĘWiYROViJiW
5. Tisztítsa rendszeresen a tartót és a komputert.
6. Ne használjon higítót, alkoholt vagy benzint a komputer tisztításához.
.HUpNSiUR]iVN|]EHQPLQGLJIRUGtWVRQNHOOĘILJ\HOPHWD]~WWHVWUH
KÜLÖNLEGES FUNKCIÓK
AVG RPM Átlag RPM 0-199 rpm +/- 1.5%
1. Ezt az értéket az összes pedál fordulat és a pedálforgással eltöltött idejének hányadosából
V]iPROMDDNRPSXWHU$]DGDWV]iPtWiVDIJJHWOHQDNHUpNIRUJiVLLGHMpWĘO$]$530DGDWD]
XWROVyW|UOpVpVD]DGRWWSLOODQDWN|]|WWLLGĘV]DNRWYHV]LILJ\HOHPEHpVPiVRGSHUFHQNpQWIULVVO
$NLMHO]ĘQMHOHQLNPHJKDDSHGiOIRUJiVLLGHMHNHYHVHEEPLQWPiVRGSHUFYDJ\DIRUGXODWRN
V]iPDNHYHVHEEPLQW(]HQDGDWRNHJ\LNHVHPMHOHQLNPHJDNLMHO]ĘQ
Ä(UURU´IHOLUDWMHOHQLNPHJDNLMHO]ĘQKDDIRUXODWRNV]iPDW|EEPLQWPLOOLyYDJ\DSHGiOIRUJiVL
ideje több, mint 100 óra. Ekkor törlésre van szükség.
MAX RPM Legnagyobb RPM 0-199 rpm +/- 1.5%
1. Az utolsó törlés óta mért legnagyobb pedálfordulatszámot mutatja.
2. A legnagyobb RPM mérési tartománya megegyezik a pillanatnyi RPM tartományával.
/ ÁTLAGSEBESSÉGHEZ VISZONYÍTOTT SEBESSÉG
A felfelé nyíl villog, amennyiben a pillanatnyi sebesség az átlagsebesség felett van
és a lefelé mutató nyíl villog, ha alatta van.
*Megjegyzés: Az összes funkció adatait másodpercenként frissíti a komputer.
hUHVNLMHO]Ę
Nincs p llanatnyi
sebesség vagy
rossz az adat
Rendellenes
NLMHO]Ę
$]/&'NLMHO]Ę
fekete
/DVV~DNLMHO]Ę
(OOHQĘUL]]HD]HOHPW|OW|WWVpJpW
(OOHQĘUL]]HKRJ\PHJIHOHOĘHQKHO\H]WHH
be az elemet a komputerbe.
$NLMHO]ĘDNRPSXWHUYDJ\HJ\pEIXQNFLy
beállítását mutatja?
0HJIHOHOĘDV]HQ]RUpVDPiJQHV
pozíciója és távolsága.
0HJIHOHOĘDEHiOOtWRWWNHUpNPpUHW"
0HJIHOHOĘDV]HQ]RUpVDNRPSXWHU
távolsága és pozíciója?
0HJIHOHOĘDV]HQ]RUEDQOpYĘHOHP
töltöttsége?
(OOHQĘUL]]HKRJ\YDQHDN|]HOEHQ
interferenciát okozó készülék.
Hosszabb ideig közvetlen napsütésnek
WHWWHNLDKDV]QiODWRQNtYOOpYĘNRPSXWHUW"
$KĘPpUVpNOHW & )DODWWYDQ"
1. Cserélje ki az elemet.
2. Bizonyosodjon meg róla, hogy az elem a
pozitív oldalával felfelé van.
1. A beállítási folyamat befejezése szükséges.
2. Kövesse a szerelési útmutató C-1 és D-4
ábráját és á lítsa be újra a pozíciót és a
távolságot.
ÈOOtWVDEH~MUDDPHJIHOHOĘNHUpNPpUHWHW
4. Kövesse a szerelési útmutató D-3 ábráját és
állítsa be újra a szenzor pozícióját és
távolságát.
5. Cserélje ki az elemet.
6. Távolodjon el az interferenciát okozó
NpV]OpNWĘO
Nézze meg a komputer beállítása menüt és
indítsa újra a komputert.
Helyezze árnyékban a komputert, és a normál
állapot visszaáll. Adatvesztés nincs.
A komputer visszatér a normál állapotba,
DPLQWDKĘPpUVpNOHWHPHONHGLN
352%/e0$(//(1ĝ5,==($=(*<6e*(70(*2/'É6
1. A DST módba való belépés.
Automatikusan nullázódnak a következő adatok: DST, TM,
AVG, MAX AVG_RPM, MAX_RPM
2. Kerékpározáskor automatikusan elindul a visszaszámlálás
3. Ha a számláló eléri a nullát, a jel villog és a komputer
nem méri tovább az adatokat, majd a DST visszaáll
alaphelyzetbe
4. Tartsa nyomva a MODE gombot az adatok törléséhez és a
DST módból való kilépéshez.
1. A TM módba való belépés.
Automatikusan nullázódnak a következő adatok: DST, TM,
AVG, MAX, AVG_RPM, MAX_RPM
2. Kerékpározáskor automatikusan elindul a visszaszámlálás
3. Ha a számláló eléri a nullát, a jel villog, és a komputer nem
méri tovább az adatokat, majd a TM visszaáll alaphelyzetbe
4. Tartsa nyomva a MODE gombot az adatok törléséhez és a
TM módból való kilépéshez.
+,%$(/+É5Ì7É6
(OOHQĘUL]]HDN|YHWNH]ĘNHWPLHOĘWWHONH]GLDKLEDMDYtWiVW
Jeladó:
Közvetlen kapcsolat né küli mágnes szenzor vezeték nélküli jeladóval.
A komputer elemszükséglete:
1db 3V-os elem (CR2032), élettartama kb. 2év
(Napi átlagosan 1.5 óra használattal számolva.)
Az elem élettartama:
Kb. 3 év (A gyári elem élettartama valamivel rövidebb a szállítás
és
UDNWiUR]iVLGĘWDUWDPDPLDWW
0pUHWpVV~O\
45.8x54x17.2mm / 31,5g.
Kerékméret határai:
0mm -3999mm
0ĦN|GpVLKĘPpUVpNOHW
0 °C - 50 °C (32 °F - 122 °F)
7iUROiVLKĘPpUVpNOHW
- 10 °C - 60 °C (14 °F - 140 °F)
TM módban
Riding time
count down
5s
3s
DST módban
0~9
5s
3s
Distance count
down setting
È/7$/È1260ĥ.g'e6!
Váltás a funkciók között
Nyomja meg a MODE gombot
a váltáshoz
Adatok törlése
Tartsa nyomva a MODE gombot
legalább 3 másodpercig (DST, TM
MAX, AVG, M-RPM, A-RPM ADAT)
Tartsa nyomva a MODE gombot
5 másodpercig
(csak ODO módban)
Kerékméret megváltoztatása
Tartsa nyomva a MODE gombot
5 másodpercig
Adatok megváltoztatása
Nyomja meg a SET gombot
a beállításokhoz
Tartsa nyomva egyszerre a MODE o és a
SET
f gombot legalább 3 másodpercig a
komputer újraindításához
Teljes törlés
%(È//Ë7È62.0ĥ.g'e6(!
Adatok beállítása
Nyomja meg a MODE
gombot a kiválasztáshoz
Váltás a
N|YHWNH]ĘDGDWUD
Tartsa nyomva a MODE
gombot
o
2 másodpercig
2s
Nyomja meg a SET gombot
DN|YHWNH]ĘIXQNFLyKR]
9iOWiVDN|YHWNH]Ę
funkcióra
Kilépés a beállítási
PHQEĘO
Tartsa nyomva a SET
gombot 2 másodpercig
DST vagy
TM mód beállítása
Tartsa nyomva a MODE gombot
3 másodpercig
Kilépés a DST
vagy TM módból
Magyar
Magyar
+
3s
2s
3s
5s
5s
3s
SET
MODE
2. Az elemek védelmében a komputer automatikusan kikapcsol és csak az látható, ha
legalább 20 percig használaton kívül van. A MODE gomb o megnyomásával a komputer ismét
bekapcsol.
7g5/e60ĥ9(/(7
7DUWVDQ\RPYDD02'(JRPERWDGGLJDPtJDNLMHO]ĘQOpYĘDGDWRNOHQHPQXOOi]yGQDN
A komputer törli a DST, TM, MAX, AVG, M-RPM, A-RPM adatokat.
A KERÉK KERÜLETE
zPontos Mérés (Fig. a)
Állítsa be a kereket úgy, hogy a szelep a földhöz legközelebbi pontban legyen. Jelölje meg ezt a
pontot a földön. Tolja a kerékpárt addig, amíg a szelep ismét a földhöz legközelebbi pontba kerül.
Jelölje meg ezt a pontot is és mérje le a távolságot a két pont között. A kapott értéket táplálja be a
komputerbe.
zA mellékelt táblázat segítségével határozza meg a kerék kerületét. (Fig. b)
A KOMPUTER ELEMCSERÉJE
1. A villogó ” ” felirat jelzi, ha elemcserére van szükség.
$IHOLUDWPHJMHOHQpVHXWiQOHJNpVĘEEQpKiQ\QDSSDOFVHUpOMHNLD]HOHPHW
(OHPFVHUHDONDOPiYDOPLQGHQDGDWW|UOĘGLNDNRPSXWHUEĘO/HKHWĘVpJHYDQD]RQEDQD]2'2DGDW
~MUDEHWiSOiOiViUDD]HOHPFVHUHXWiQH]pUWU|J]tWVHDPHJĘUL]QLNtYiQWDGDWRNDWPLHOĘWWHOWiYROtWMD
a régi elemet.
4. Cserélje ki az elemet (CR2032 típusú) és indítsa el a komputert.
FUNKCIÓK
BBB PILLANATNYI SEBESSÉG 0.0 – 199.9 Km/h vagy 120.0 Mile/h+/- 1%
$SLOODQDWQ\LVHEHVVpJPLQGLJDNLMHO]ĘEDOIHOVĘUpV]pQMHOHQLNPHJ$SLOODQDWQ\LVHEHVVpJIHOVĘ
határértéke 199.9 KM/h vagy 120.0 M/h (24” kerékméret felett).
2. Megálláskor a pillanatnyi sebesség kijelzése még 4 másodpercig folytatódik, a Kerékpár1 esetében
pVPiVRGSHUFLJD.HUpNSiUHVHWpEHQKDQHPpUNH]LNW|EEMHODMHODGyIHOĘO
DST NAPI KILOMÉTER 0.00 – 999.99 Km vagy Miles +/- 0.1%
$'67IXQNFLyU|J]tWLDPHJWHWWWiYROViJRWD]XWROVyW|UOpVWĘOV]iPtWYDHJpV]HQDGGLJ
amíg a kerékpár mozgásban van.
TM (/7(/7,'ė 0.0 – 199.9 Km/h or 120.0 Mile/h +/- 1%
$70IXQNFLyPXWDWMDD]XWROVyW|UOpVyWDHOWHOWLGĘW
2. A komputer elinduláskor automatikusan elindítja a mérést és még 4 másodpercig
folytatja a Kerékpár1 esetében és 2 másodpercig a Kerékpár2 esetében megálláskor,
YDODPLQWHOOHQĘU]LKRJ\QHPpUNH]LNHW|EEMHODMHODGyIHOĘO
$NRPSXWHUDXWRPDWLNXVDQOHYRQMDD]H]LGĘDODWWPpUWPiVRGSHUFHWD.HUpNSiUHVHWpEHQpV
másodpercet a Kerékpár2 esetében.
MAX LEGNAGYOBB SEBESSÉG 0.0 – 199.9 Km/h vagy 120.0 Mile/h +/- 1%
Az utolsó törlés óta mért legnagyobb sebességet mutatja.
AVG ÁTLAGSEBESSÉG 0.0 – 199.9 Km/h / 0.0 – 120.0 Mile/h +/- 0.1%
1. Ezt a DST és a TM adatok hányadosából számítja a komputer. Az átlagsebesség az utolsó törlés
pVD]DGRWWSLOODQDWN|]|WWLLGĘV]DNRWYHV]LILJ\HOHPEH
2. Az értéke ”0.0”, ha a TM kevesebb, mint 4 másodperc
3. Másodpercenként frissíti az adatot, ha a TM több mint 4 másodperc.
3. ”Error” felirat jelenik meg, ha a TM 100óra felett van vagy ha a DST 1000km (vagy mérföld) felett
van. Ekkor törlésre van szükség.
ODO ODO1 / ODO2 0.0 – 999999 Km vagy Miles +/- 0.1%
1. Az összes megtett út a kerékpár haladása közben megtett távolságot méri. ODO1 a Kerékpár1
esetében és ODO2 a Kerékpár2 esetében.
$]2'22'2pV72'2DGDWRNQHPW|U|OKHWĘHNDW|UOpVPĦYHOHWWHO
ÓRA 12HR AM/PM VAGY 24HR ÓRA
1:00:00 ~12:59:59 AM/PM vagy 0:00:00 ~ 23:59:59 +/- 0.003%
$]LGĘWPXWDWMDyUiV$030GpOHOĘWWGpOXWiQYDJ\yUiVIRUPiWXPEDQ
RPM Pillanatnyi RPM (Percenkénti pedálfordulatszám) 0-199 rpm +/- 0.1%
$SLOODQDWQ\L530DSHUFHQNpQWLSHGiOIRUGXODWV]iPRWPXWDWMD$]DGDWDNLMHO]ĘMREEIHOVĘROGDOiQ
jelenik meg, és másodpercenként frissül.
$PpUpVLWDUWRPiQ\pVSHUFHQNpQWLIRUGXODWN|]|WWYDQpVHJ\VpJJHOQĘYDJ\FV|NNHQ$
SLOODQDWQ\L530W|UOĘGLNKDDSHGiOOHJDOiEEPiVRGSHUFHQHPIRURJ


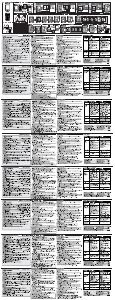
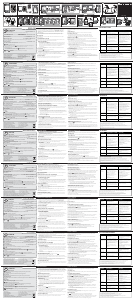
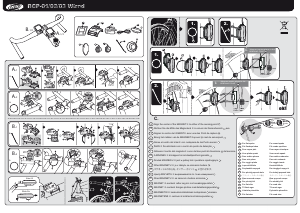

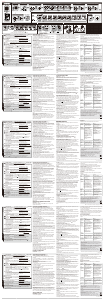

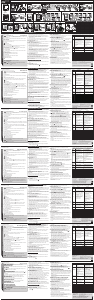
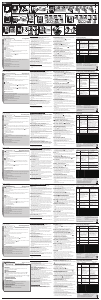
Dołącz do dyskusji na temat tego produktu
Tutaj możesz podzielić się swoją opinią na temat BBB BCP-04C Licznik rowerowy. Jeśli masz pytanie, najpierw dokładnie przeczytaj instrukcję. Zapytanie o instrukcję można złożyć za pomocą naszego formularza kontaktowego.