Oral Irrigator AQUAJET LD-A9
Instruction Manual
ENG
Irygator jamy ustnej AQUAJET LD-A9
Instrukcja obsługi
POL
Szájzuhany AQUAJET LD-A9
Használati utasítás
HUN
LD-A9
FIGURES
/
ILUSTRACJE / RAJZOK
.
.
.
.
ENG
BEFORE USING THE AQUAJET LDA9 ORAL IRRIGATOR HEREINAFTER REFERRED TO AS THE
IRRIGATOR, DEVICE, PRODUCT, PLEASE READ THIS INSTRUCTION MANUAL CAREFULLY
AND RETAIN IT FOR FUTURE REFERENCE.
THE FOLLOWING SAFETY SIGNAL WORDS ARE USED THROUGHOUT THIS MANUAL:
WARNING! INDICATES A POTENTIALLY HAZARDOUS SITUATION WHICH IF NOT
AVOIDED, MAY RESULT IN INJURY OR PROPERTY DAMAGE.
PROHIBITED! INDICATES EXPRESSLY FORBIDDEN ACTIONS AND DEVICE HANDLING
METHODS.
IMPORTANT! INDICATES MANDATORY ACTIONS AND INSTRUCTIONS TO BE STRICTLY
FOLLOWED TO ENSURE SAFE OPERATION.
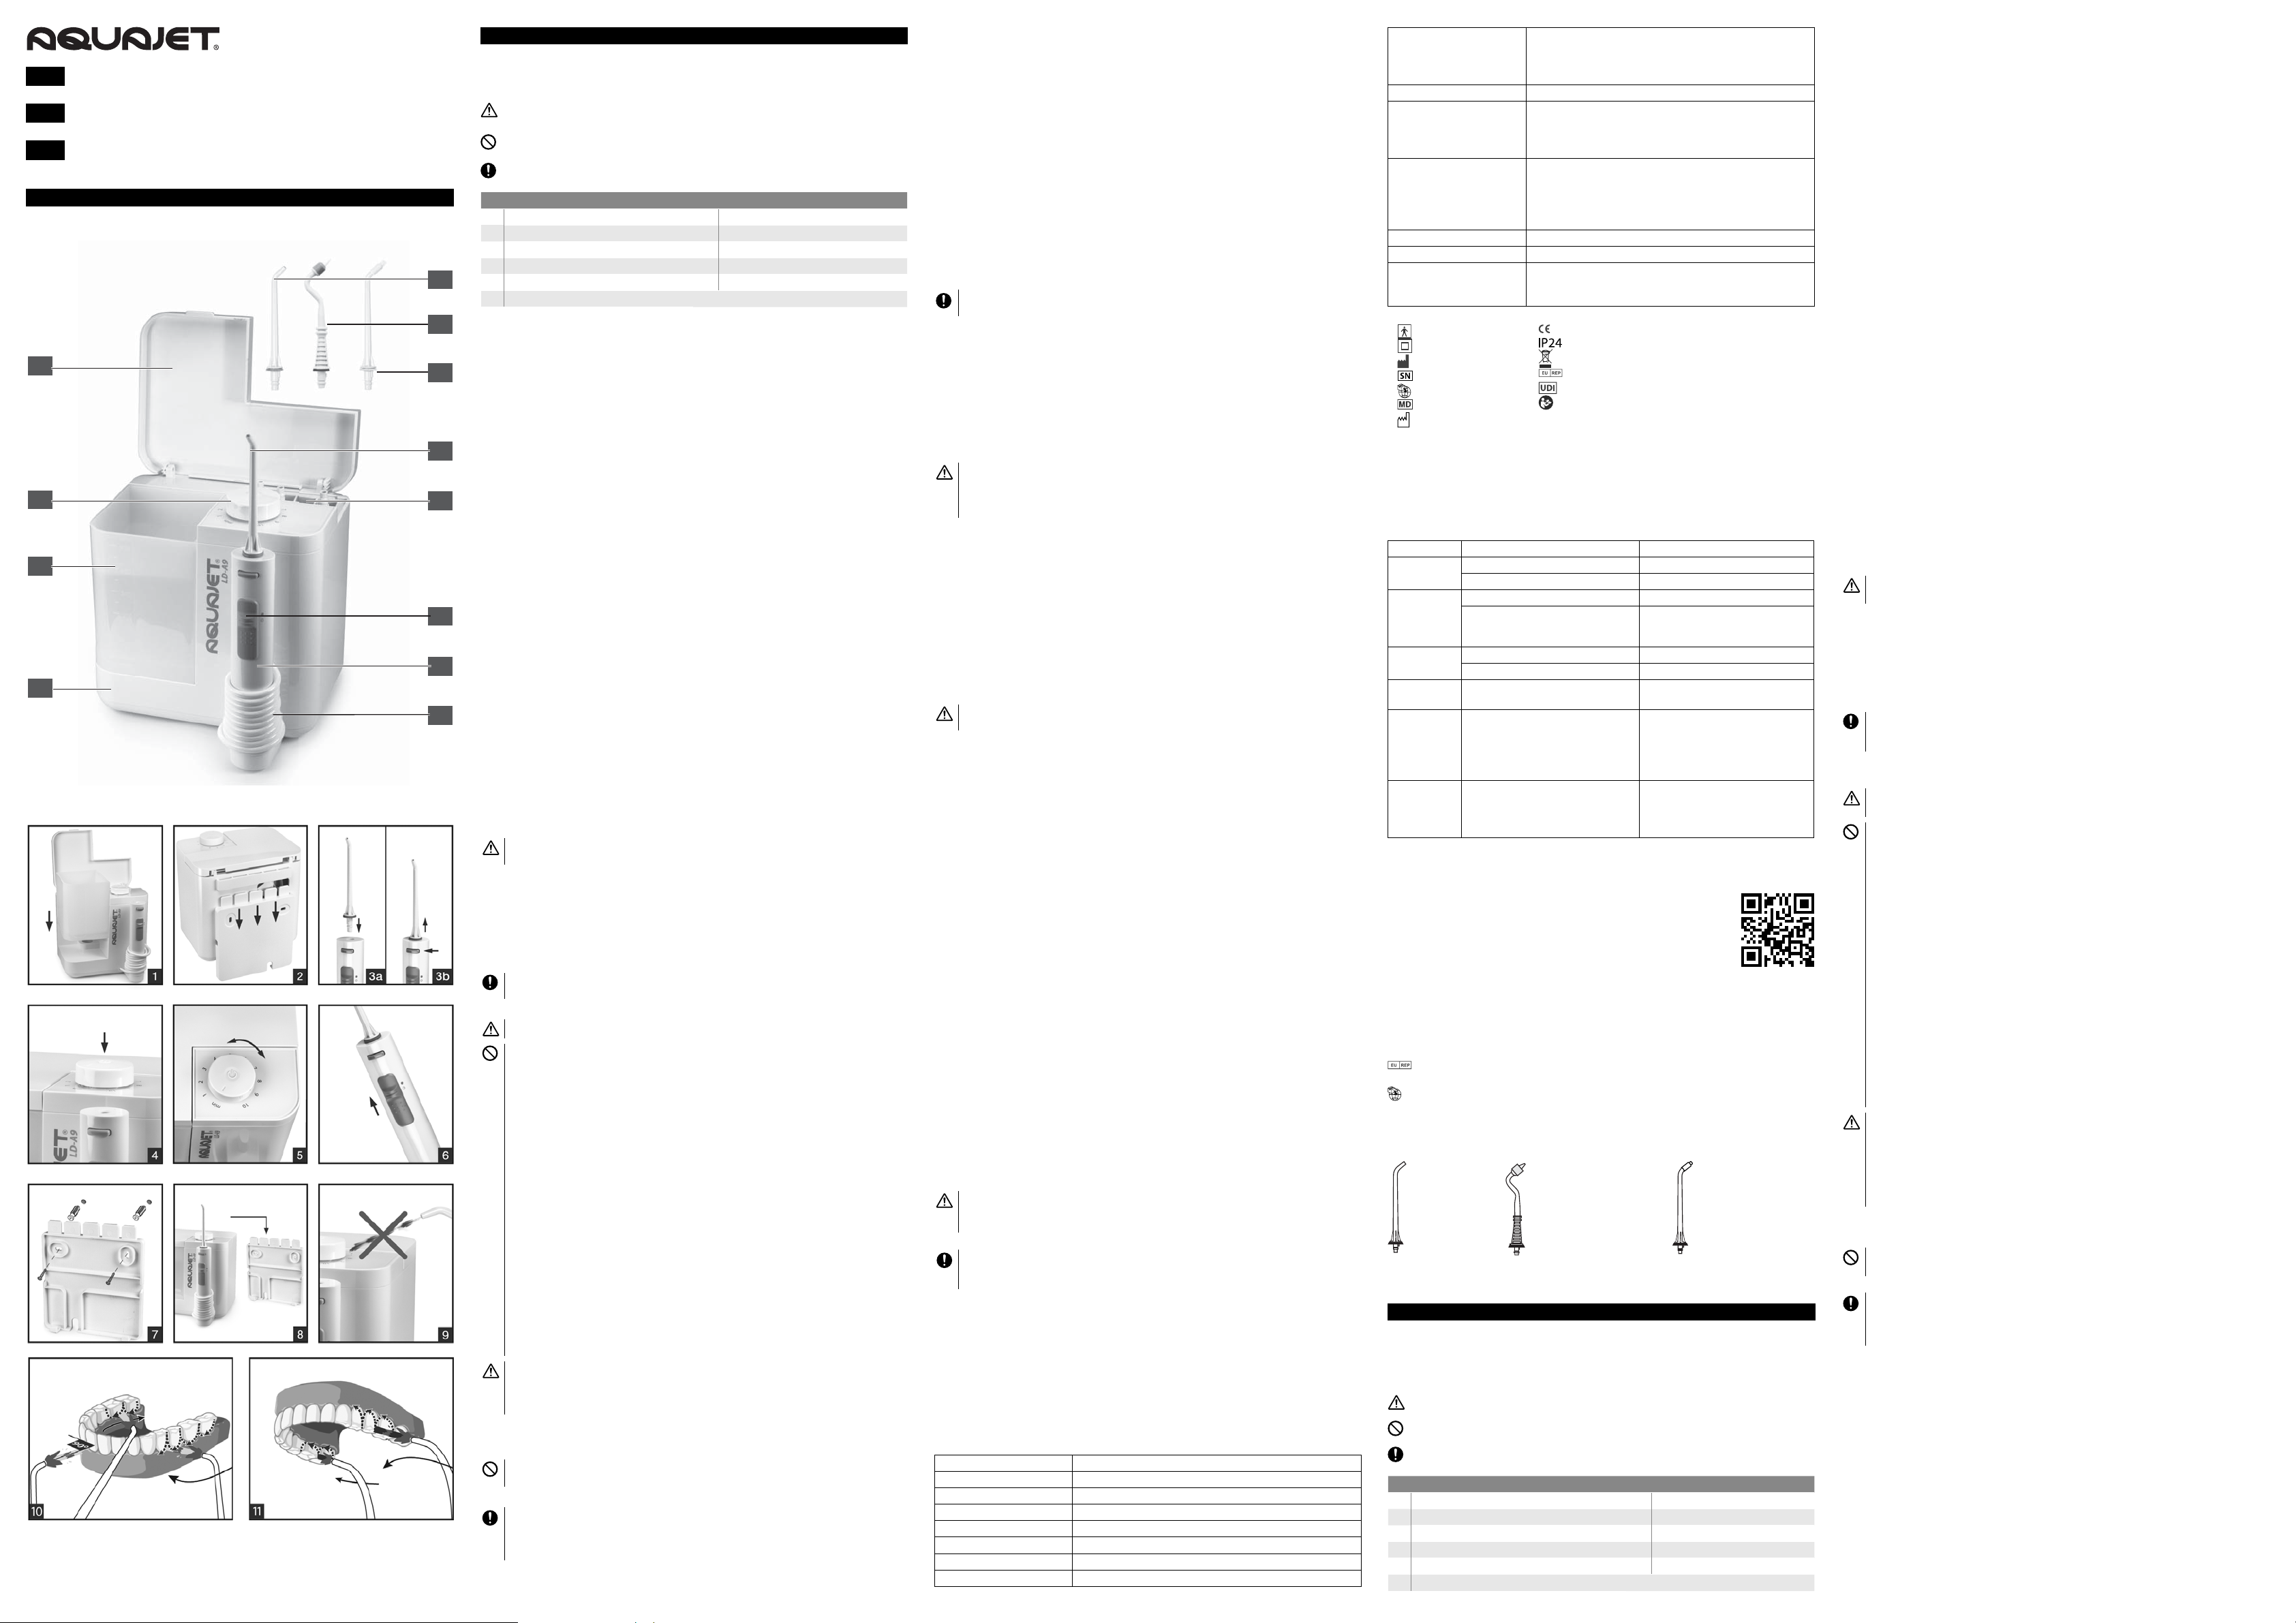
№ Parts list № Parts list
1 Cover 5.3 LD-SA05 nozzle
2 ON/OFF button and water pressure regulation knob 6 Nozzle compartment
3 Water container 7 Water supply switch
4 Device body 8 Irrigator handle
5.1 LD-SA01 nozzle 9 Tube
5.2 LD-SA02 nozzle
GENERAL
The oral mucosa is a complex organ of the human body that performs a wide variety of vital functions. The impaired blood
circulation in the oral cavity, the presence of various dental structures, insu cient hygienic care lead to the emergence
of various oral diseases, and, consequently, to a signi cant deterioration in the quality of life. Regular massaging e ect
of pulsating water jet on the soft tissues of the oral cavity stimulates blood ow, promotes disease prevention and
therapy, which increases the natural protective properties of the oral mucosa to restore the protective, secretory, sensory,
thermoregulatory and immune functions.
When it comes to dental care, most people tend to focus on “whiteness” of their teeth, neglecting the health of their gums.
Meanwhile, failure to massage and clean the interdental space and gingival crevice (the area between the tooth neck and
the gum line) leads to gradual tartar buildup, gum in ammation and persistent bad breath. As the in ammatory process
develops, the gum tissue gradually moves away from the tooth, allowing bacteria to penetrate deeper, until it reaches the
jawbone, whose structure is also subject to in ammatory destruction. Because of the bone tissue reduction, the gums also
begin to recede. There is a visible lengthening of the teeth, and the smile no longer looks as aesthetically pleasing. The
weakened support of the teeth by the gums and jawbones eventually leads to teeth loss.The space between your teeth
is where bacteria accumulate and multiply. Bacteria live in the soft plaque and as a result of their activity acid is formed,
which destroys the tooth enamel and leads to in ammation of the gum mucosa.Dental crowns and dentures are di cult
to clean by regular methods, which causes pathogenic bacteria to accumulate between the edges of the crown and the
gingival sulcus. This leads to the formation of tartar and in ammation of the oral mucosa.
MEDICAL DEVICE PURPOSE
The device is designed for massage and medicinal irrigation of the oral mucosa, which contributes to the prevention and
therapy of periodontal disease, gingivitis, periodontitis.
INDICATIONS FOR USE
The irrigator forms pulsating water jet, which a ects a particular area of the mouth, or the entire mouth, massaging the
soft tissues. Massage of the mouth soft tissues restores and stimulates blood circulation, which in turn is essential for
maintaining the health of the gums, teeth, and prolongs the life of the installed dental structures. Regular daily massage of
the mouth soft tissues the most e ective way to combat the natural loss of gums associated with age-related changes. In
addition to the basic massage action, the device provides a thorough hygienic care of the entire oral cavity, including poorly
accessible for a toothbrush/ oss interdental spaces, gingival folds/pockets, dental structures such as dentures, bridges,
crowns, braces. This prevents the development of pathogenic micro ora and in ammatory processes in the contact areas
of dentures and crowns with the oral mucosa, which is not achieved by other conventional means. Prevents formation of
tartar, gingivitis and many periodontal diseases.
Designed for use by adults and children.
Contraindications:
• Contraindicated for patients with periodontal abscesses and oral ulcers.
• Contraindicated for persons who cannot operate the device independently.
Side e ects: No side e ects have been identi ed.
AQUAJET LDA9 OPERATION BY CHILDREN
WARNING! AQUAJET LD-A9 oral irrigator is an electrical device! This device can be operated by the child only
under the supervision of an adult who reviewed this user manual.
The use of AQUAJET LD-A9 oral irrigator reduces the risk of dental diseases, facilitates oral care, and reduces the oral hygiene
several times if the child wears braces. Also, the children often are not patient enough for a thorough tooth brushing, and
the use of an irrigator helps maintain a superior oral hygiene.
The children can start using the oral irrigator since they begin using a toothbrush.
Despite the fact that the proper use of an oral irrigator cannot injure the mouth, always consult a pediatric dentist before
the rst use of an irrigator.
CONTRAINDICATIONS
Physician should review patients who previously require antibiotic premedication for dental treatment prior to
introducing oral irrigation (bacteremia).
Always follow the general safety precautions below when using electrical appliances, especially when children are present:
Always unplug this appliance immediately after using.
Do not handle the plug with wet hands.
Do not place or store product where it can fall or be pulled into a tub or sink, shower stall.
Do not use while bathing.
Do not place in or drop into water or other liquid.
Do not reach for any appliance that has fallen into the water. Unplug it immediately.
Never play a jet of water onto the gap between the device body and the ON/OFF button (Fig. 9). Otherwise, the
liquid may get into the control unit and damage the device.
Before using, check the power cord for damage.
Do not use this appliance if the power cord or plug is damaged, if it is not working properly, if it has been dropped or
damaged, or dropped into any liquid. Return the appliance to an authorized
service center nearby for examination and repair. Do not try to x it yourself.
When the appliance is used by, on, or near children, close supervision is very necessary.
An appliance should never be left unattended when it is plugged in. Use the appliance only for its intended use as
described in this manual. Do not use attachments or accessories not recommended by the manufacturer.
Keep the power cord away from hot or heated surfaces.
Remove the Water Container before lling. Fill with lukewarm water or appropriate oral rinse products only. Do not
over ll.
Never drop or insert any object into any opening or hose.
Do not operate where oxygen or aerosol sprays are being used.
Do not use outdoors.
Do not modify this device without authorization of the manufacturer.
Do not replace the internal components until service has been performed by an authorized representative or
manufacturer.
The device may only be used by children under the close supervision of adults.
All major maintains on the device must be performed by an authorized service center or distributor. The fuse is in the
device, which should be changed by authorized service if damaged.
The power supply cord is replaceable only by professional maintenance personnel or manufacturer.
HOW TO USE
Placing Water Container.
Use of alcohol containing liquids, liquids with suspended matters, oily liquids, as well as other liquids not intended
for irrigator application can entail irrigator failure!
Open a cover and remove a water container. Fill the container with warm water or special solution.
When using for the rst time, ll the container with warm water, press the On/O button, set the jet pressure knob
to the “min” position and slide the water supply switch up. Then move the knob gently several times to position “10”
and back, so that water lls all internal cavity. The device is ready for rst use when the water in the container is
completely used up.
Make sure that the temperature of the liquid in the container does not exceed 40°C. Do not pour hot solutions or water
into the container, because the oral mucosa is very sensitive and can be damaged by hot solution. Put the container back
in place (Fig. 1).
Power Cord And Plug.
The power cord is inserted into a special back-wall compartment (Fig. 2). Slide down the back cover and take out the power
cord. Place the back cover to its original position, route out the power cord through a hole provided. Plug the power cord
into a power outlet.
Attaching/detaching nozzle to the irrigator handle.
The device package includes nozzles with colored rims of di erent colors. Select an individually colored nozzle for each
family member. Always use your individually colored nozzle only. This will allow full compliance with the requirements of
personal hygiene.
Insert the nozzle into the irrigator handle until it clicks so that the nozzle guide aligns with the groove on the irrigator
handle (Fig. 3a). Now, this device is ready for use.
To detach the nozzle, press the nozzle release button and pull the nozzle while holding it by the notches (Fig. 3b).
Safe nozzle removal recommendations:
1. If the nozzle does not detach well from the irrigator handle or slips in your wet hands, use a dry cloth. Wrap a light, dry
cloth around the nozzle and detach it.
2. When removing the nozzle from the irrigator handle, DO NOT try turning the nozzle about its axis. Rotating the nozzle
may damage it.
Additional nozzles can be purchased separately. Buy only AQUAJET LD-SA01, LD-SA02 and LD-SA05 nozzles for this
device.
Power On Button.
Press the power on button (Fig. 4). At that, green indicator will light up. For the rst time use, please turn on the power on
button for seconds until water coming out.
Adjust Water Pressures.
The jet pressure can be continuously and smoothly adjusted by turning the knob (Fig. 5). Initially, it is recommended to set
the lowest pressure (the jet pressure knob is in min position), especially if your gums tend to bleed or if children are using
the AQUAJET. Gradually increase the water pressure over time until nding the most comfortable setting for yourself.
Consult your professional dentists for recommendation of water pressure setting, particularly if the consumers have mouth
disease.
Start to Use.
Make sure that the temperature of the liquid in the container does not exceed 40°C.
The device’s continuous operation should not exceed 5 minutes, this will be reminded by the light indicator, which
will start blinking shortly before the end of this time. If you use the device longer or forget to turn it o , it will do so
automatically (the device turns o after 5 minutes).
Lean over the sink. Bring the nozzle tip to your teeth or gums. Start up water jet with the water switch located on the
handle of irrigator (Fig. 6) by sliding it up. Keep your mouth slightly open to allow the water to run into the sink.
Point the nozzle perpendicularly to the far teeth of the lower dental arch. In slow movements, for 4–5 seconds, clean
the interdental space, holding the jet near the gums. Then, run the jet along the gum line at the base of the teeth to the
next interdental space. Repeat these movements as for the rst interdental space (Fig. 10), the dotted arrow indicates the
place where the water jet hits, the solid arrow is the direction of nozzle movement. You can shut o the jet at any time by
sliding the water supply switch on the irrigator handle. Do not direct the jet directly into the gum pocket, try to keep the
jet perpendicular to the tooth line. Do the same procedure with all the interdental spaces on the outside and inside of the
bottom teeth, one by one. Then repeat the procedure for the outside and inside of the upper dental arch (Fig. 11). If there
are arti cial prosthetic structures in the mouth, their places of contact with the gums, teeth or other dental appliances
should be washed more carefully with the jet.
Completing the Procedure
Turn the device o by sliding the switch on the irrigator handle and turn o the power with the On/O button on the main
unit body.
After use, always empty the Water Container, spray tube and nozzle entirely to prevent creating any bacteria from
the standing water. Do not turn o the device until all water is out of the container.
WALL MOUNTING INSTALLATION
Take o the rear panel by pushing it downward. Drill two bores in the wall and drive two plastic inserts into. Screw in the
rear panel (Fig. 7). Take the power cord out of the storage box and t it through the hole of rear panel. Do not press too hard
to damage the power cord. Fix the device on the back cover (Fig. 8).
GUARANTEE
The purchased device is warranted for 2 years from the date of sale. Warranty obligations shall be formalized with a
warranty card when the device is sold to a customer. Faults detected during the warranty period will be repaired free of
charge by a specialized service center within 21 business days from the date of device delivery to the service center. The
costs for the defective device transportation are borne by Little Doctor Europe Sp. z o. o. o. (door-to-door service), except for
faults that are not covered by the warranty. For the addresses of the warranty service providers, see INFORMATION ON THE
MANUFACTURER, AUTHORIZED REPRESENTATIVE AND IMPORTER or go to www.littledoctor.sg.
The warranty does not cover the following: consumables and accessories for individual use (tubes, nebulizers, masks,
mouthpieces, etc.); products with mechanical, thermal or chemical damage, or damage caused by violations of the rules
speci ed in the operating instructions; products with signs of modi cation, opening and/or repair by an unauthorized
service center (by an individual); products that have been connected to unrecommended power supplies or used with
unrecommended consumables; products that have been operated with non-remedied defects; products that are defective
through no fault of the manufacturer, such as: actions of third parties, natural phenomena and natural disasters, animals,
insects, foreign objects or liquids entering the device, etc.; internal and external contamination, scratches, cracks, scrapes
and other mechanical damage to the equipment occurring during its operation; products with illegible or altered serial
numbers or a damaged warranty seal; batteries, glass parts, light bulbs, as well as operations such as adjusting, cleaning
and other maintenance of the product.
The buyer has the right to replace the device with a serviceable one if an authorized service center nds a manufacturing
defect that cannot be eliminated or after 3 unsuccessful repairs of the same malfunction. The party submitting the claim must
properly prepare the device for shipment, protecting it from damage during transportation and enclose a completed warranty
card (with the seller’s stamp, date of sale and seller’s signature) and proof of purchase (invoice or receipt). The warranty does
not cover damages resulting from inadequate protection of the device during transportation. The warranty period is extended
for the time the device is under repair. Post-warranty repair of the device is performed at the user’s expense.
MAINTENANCE, STORAGE, REPAIR, AND DISPOSAL
1. The device is to be sanitized after shipping and storage and after each use.
Disconnect the power cord from the power outlet before cleaning the device. Wipe the device outside surface, including
the irrigator handle, with a cloth soaked in a solution with antimicrobial and detergent properties (soapy water, mild
detergent, hydrogen peroxide, etc.), wringing it out beforehand. The nozzle compartment can be removed and the space
under the nozzle compartment should also be cleaned periodically.
Do not use rough cloths, brushes, or abrasives to clean the device.
Use only mild detergents. Never use solvents or alcohol, as they can cause malfunction or damage the device
components.
Wipe all treated surfaces dry with a soft cloth.
In the conditions of dental treatment and prevention facilities, nozzles shall not be disinfected to be passed on for
use by other patients. After a patient treatment session is completed, the medical device is to be decontaminated
while the accessories are to be disposed of.
The container, nozzles, and nozzle compartment can be cleaned with mild detergents or in the dishwasher.
2. The device must be protected from direct sunlight and shocks.
3. Do not store or use the device close to heat sources and open ame.
4. Protect the device from contamination.
5. Do not allow the device to come into contact with corrosive solutions.
6. For any repairs please use authorized service centers only.
7. The month and year of production is indicated in the serial number after the letter A (where the rst two digits indicate
the year, the second two digits indicate the month). After the expected service life is over, periodically contact an authorized
service center to check the device’s condition and, if necessary, dispose of it per the local regulations. The manufacturer
does not provide any disposal instructions.
SPECIFICATIONS
Model LD-A9
Power source ~100-240 V / ~50/60 Hz
Power consumption 60 VA
Maximum water pressure not less than 930 kPa
Water jet pulsation frequency 400–1800 pulses/min
Maximum continuous use time 5 min
Automatic shutdown 4 min 45 s ± 5 s
Water ow rate, min/max ≤250 ml/min / ≥330 ml/min
Complete set Main unit, container, AQUAJET LD-SA01 nozzles (2 pcs.), AQUAJET LD-SA02
nozzle (1 pc.), AQUAJET LD-SA05 nozzle (1 pc.), panel for wall mounting, set
of screws and wall plugs, operation manual, warranty card, consumer package
(packaging).
Water Container Volume, no less than 500 mL
Operating conditions:
Temperature
Relative humidity
Atmospheric pressure
10°C to 35°C
30-80% Rh
86-106 kPa
Storage and transportation
conditions:
Temperature
Relative humidity
Atmospheric pressure
–20°C to +40°C
15-95% Rh
50-106 kPa
External dimension 160 (H) x 170 (W) x 168 (D) mm
Net Weight 1200 ± 20 g
Year and month of manufacture indicated in the bottom of the unit body in a serial number as
AYYMMA9XXXX, where YY is the year, and MM is the month of
manufacture
Symbols explanation:
Type BF product
Class II protection
Manufacturer
Serial number
Importer
Medical Device
Date of manufacture
Compliance with the Regulation (EU) 2017/745
Protection class IP
For disposal, refer to your local regulations
Authorized Representative in the EU
Unique Device Identi cation
Important: Read the instructions
The device manufacturing facility is ISO 13485 compliant. Device complies with the Regulation (EU) 2017/745 on medical
devices (MDR).
The revision date of this Manual is indicated on the last page as XX-XXXXX-YYMM-NN, where YY is the year, MM is the
month, and NN is the revision number.
Any serious incident that has occurred in relation to the device should be reported to the manufacturer and the competent
authority of the Member State in which the user and/or patient is established.
TROUBLESHOOTING
Problem Possible reason Solution
The device does
not work
No electricity in a socket Try other sockets
Poor contact between the plug and the socket Unplug the power plug and plug it back in
Pump is
functioning, but
there is no water
sprayed out
There is no water in the container Fill the container with water
Jet pressure knob is in the lowest position Slide the jet pressure knob upwards
Water pressure is
too low
Incorrect position of the jet pressure knob Adjust the pressure with the jet pressure knob
Incorrectly installed water container Correctly install the water container
The water
container leaks
The container rubber valve is loose Rinse the valve under running warm water
using a detergent
Adjusting the jet
pressure changes
the pulsation
frequency and the
compressor sound.
You can adjust the pressure by changing the
pulsation frequency.
This is not a defect.
The compressor
stops when the jet
pressure is set to
minimum.
If you turn o the water supply on the handle
with the jet pressure set to minimum, the
compressor may stop.
This is not a defect. The compressor will turn on
when you start the water supply again.
If in spite of the above recommendations you cannot achieve the correct results, stop using the device and contact the
maintenance organization. Do not try to repair the internal mechanism by yourself.
IMPORTANT INFORMATION REGARDING ELECTRO
MAGNETIC COMPATIBILITY EMC
This Device manufactured by Little Doctor International (S) Pte. Ltd. con rms to IEC60601-1-
2:2014 Electro Magnetic Compatibility (EMC) standard. Further documentation in accordance
with this EMC standard is available at Little Doctor International (S) Pte. Ltd. at the address
mentioned in this instruction manual or at www.littledoctor.sg. Refer to the EMC information for
Device on the website.
INFORMATION ON THE MANUFACTURER, AUTHORIZED
REPRESENTATIVE AND IMPORTER
Manufactured under control and for Little Doctor International (S) Pte. Ltd. (7500A BEACH ROAD #11-313 THE
PLAZA SINGAPORE 199591. Postal address: 3 Coleman Street #03-24 Singapore 179804).
Manufacturer: Little Doctor Electronic (Nantong) Co. Ltd. (No. 8, Tongxing Road Economic & Technical Development
Area, 226010 Nantong, Jiangsu, People’s Republic of China).
Little Doctor Europe Sp. z o.o. (57G Zawiła Street, 30-390 Kraków, Poland, phone: +48 12 2684746, 12 2684747,
fax: +48 12 268 47 53, e-mail: biuro@littledoctor.pl).
Little Doctor Europe Sp. z o.o., 57G Zawiła Street Kraków 30-390 Poland.
For more information please visit www.aquajet.sg
ADDITIONAL IRRIGATOR ACCESSORIES*
•
Special subgingival nozzle with a exible
nozzle for cleaning and hygiene of
di cult areas.
Made of plastic with a exible nozzle
For individual use.
Number in the package – 2 pcs.
Made of plastic.
For individual use.
Number in the package
– 2 pcs.
AQUAJET LD-SA01 Nozzle
Special orthodontic nozzle with
a toothbrush for clearing dental
brackets.
Made of plastic.
For individual use.
Number in the package – 2 pcs.
AQUAJET LD-SA05 NozzleAQUAJET LD-SA02 Nozzle
__________
* Sold separately
POL
PRZED UŻYCIEM IRYGATORA DOUSTNEGO AQUAJET LDA9 NAZYWANEGO DALEJ
W TEKŚCIE IRYGATOR, URZĄDZENIE, WYRÓB, PRODUKT, NALEŻY UWAŻNIE
PRZECZYTAĆ NINIEJSZĄ INSTRUKCJĘ OBSŁUGI I ZACHOWAĆ JĄ W CELU PÓŹNIEJSZEGO
WYKORZYSTANIA.
INFORMACJE DOT. BEZPIECZEŃSTWA SĄ OZNAKOWANE W TEJ INSTRUKCJI OBSŁUGI
PONIŻSZYMI SYMBOLAMI:
OSTRZEŻENIE! WSKAZUJE NA WYMAGANIA, KTÓRYCH NIEPRZESTRZEGANIE MOŻE
SPOWODOWAĆ OBRAŻENIA LUB USZKODZENIA MATERIALNE.
ZABRONIONE! WSKAZUJE NA ZAKAZANE CZYNNOŚCI ORAZ NIEDOZWOLONE
SPOSOBY UŻYTKOWANIA.
WAŻNE! WSKAZUJE NA OBOWIĄZKOWE DZIAŁANIA ORAZ WSKAZÓWKI, KTORYCH
NALEŻY ŚCIŚLE PRZESTRZEGAĆ, ABY ZAPEWNIĆ BEZPIECZNĄ PRACĘ.
№ Elementy urządzenia № Elementy urządzenia
1 Pokrywa 5.3 Nasadka LD-SA05
2 Przycisk Włącz/Wyłącz i regulator ciśnienia strumienia 6 Pojemnik na nasadki
3 Pojemnik na wodę 7 Wyłącznik dopływu wody
4 Obudowa urządzenia 8 Rączka irygatora
5.1 Nasadka LD-SA01 9 Rurka
5.2 Nasadka LD-SA02
OGÓLNE INFORMACJE
Błona śluzowa jamy ustnej – to bardzo ważna powłoka, pokrywająca przewody w ciele człowieka i pełniąca szereg
ważnych funkcji życiowych. Naruszenie krążenia w jamie ustnej, obecność różnych struktur i konstrukcji stomatologicznych,
nieodpowiednia higiena, wszystko to razem prowadzi do występowania różnych schorzeń jamy ustnej, a w konsekwencji
do znacznego pogorszenia jakości życia człowieka. Regularny masaż pulsującym strumieniem wody tkanek miękkich jamy
ustnej stymuluje przepływ krwi, wspomaga pro laktykę i terapię chorób, co wzmacnia naturalne właściwości ochronne
błony śluzowej jamy ustnej w przywracaniu funkcji ochronnych, wydzielniczych, sensorycznych, termoregulacyjnych
i odpornościowych. Jeśli chodzi o pielęgnację zębów, większość ludzi koncentruje się na „bieli” zębów, nie przywiązując
wagi do zdrowego stanu dziąseł. Tymczasem, jeśli nie masujemy i nie czyścimy przestrzeni międzyzębowych i szczelin
dziąsłowych (obszar między szyjką zęba a dziąsłem), doprowadzamy do stopniowego odkładania się kamienia nazębnego,
zapalenia dziąseł i uporczywego nieprzyjemnego zapachu z ust. W miarę rozwoju procesu zapalnego tkanka dziąseł
stopniowo odsuwa się od zęba, umożliwiając bakteriom penetrację w głąb, aż do kości szczęki, których struktura również
ulega uszkodzeniu w wyniku stanu zapalnego. W wyniku zaniku tkanki kostnej dziąsła zaczynają się cofać – pojawia się
widoczne wydłużenie zębów, a uśmiech nie wygląda już tak estetycznie. Osłabienie podparcia zębów poprzez dziąsła i kości
szczękowe ostatecznie prowadzi do utraty zębów. Przestrzeń między zębami – to miejsce gromadzenia się i namnażania
bakterii. Bakterie żyją w miękkiej płytce nazębnej i w wyniku ich oddziaływania powstaje kwas, który niszczy szkliwo
zębów i prowadzi do zapalenia błony śluzowej dziąseł. Korony i protezy zębowe trudno wyczyścić w sposób standardowy,
co powoduje gromadzenie się bakterii chorobotwórczych między krawędziami korony a bruzdą dziąsłową. Prowadzi to do
powstawania kamienia nazębnego i stanów zapalnych błony śluzowej jamy ustnej.
PRZEZNACZENIE WYROBU MEDYCZNEGO
Urządzenie przeznaczone jest do masażu i leczniczej irygacji błony śluzowej jamy ustnej, co przyczynia się do pro laktyki i
leczenia chorób przyzębia, zapalenia dziąseł, paradontozy.
WSKAZANIA DO STOSOWANIA
Pulsujący strumień wody wytwarzany przez irygator oddziałuje na określony fragment jamy ustnej lub całą jamę ustną i
masuje tkanki miękkie. Masaż tkanek miękkich jamy ustnej przywraca i stymuluje krążenie krwi, co z kolei jest niezbędnym
warunkiem zachowania zdrowia dziąseł, zębów, a także przedłuża żywotność urządzeń dentystycznych w jamie ustnej.
Okresowy, codzienny masaż tkanek miękkich jamy ustnej jest najskuteczniejszym sposobem walki z naturalnym ubytkiem
dziąseł związanym ze zmianami zachodzącymi z wiekiem. Oprócz zasadniczego działania masującego, urządzenie daje
możliwość dokładnej higienizacji całej jamy ustnej, w tym miejsc trudno dostępnych dla szczoteczki/nici dentystycznej
przestrzeni międzyzębowych, fałdów/kieszonek dziąsłowych, struktur zębowych takich jak protezy, mosty, korony, aparaty
ortodontyczne. Zapobiega to rozwojowi patogennej mikro ory i procesom zapalnym w miejscach styku protez i koron z
błoną śluzową jamy ustnej, czego nie można osiągnąć innymi konwencjonalnymi sposobami. Zapobiega powstawaniu
kamienia nazębnego, zapaleniom dziąseł i wielu chorobom przyzębia. Przeznaczone do stosowania przez dorosłych i
dzieci.
Przeciwwskazania:
• Pacjenci z ropniami przyzębia i owrzodzeniami w jamie ustnej.
• Przeciwwskazany dla osób, które nie mogą samodzielnie obsługiwać urządzenia.
Skutki uboczne: Nie stwierdzono żadnych skutków ubocznych.
KORZYSTANIE Z IRYGATORA PRZEZ DZIECI
WAŻNE! Irygator doustny AQUAJET LD-A9 to urządzenie elektryczne! Korzystanie z urządzenia przez dziecko jest
dozwolone tylko pod nadzorem osoby dorosłej, która szczegółowo zapoznała się z niniejszą instrukcją obsługi.
Używanie irygatora AQUAJET LD-A9 przez dzieci zmniejsza ryzyko chorób zębów, ułatwia pielęgnację jamy ustnej, a podczas
noszenia aparatu ortodontycznego kilkakrotnie skraca czas poświęcony na higienę jamy ustnej. Dzieciom często brakuje
cierpliwości i wytrwałości w dokładnym myciu zębów, użycie irygatora pozwala na bardzo dokładną higienę jamy ustnej.
Dzieci mogą rozpocząć użytkowanie irygatora doustnego, gdy tylko zaczną korzystać ze szczoteczki do zębów. Prawidłowe
stosowanie irygatora doustnego nie może spowodować obrażeń jamy ustnej, zleca się jednak przed pierwszym użyciem
irygatora skonsultować się ze stomatologiem dziecięcym.
ŚRODKI OSTROŻNOŚCI
Zaleca się, aby pacjenci, u których podczas leczenia stomatologicznego wymagane było wcześniej przeprowadzenie
premedykacji z użyciem antybiotyków (bakteriemia), przed pierwszym użyciem irygatora skonsultowali się z
lekarzem dentystą.
Podczas korzystania z urządzeń elektrycznych, zwłaszcza w obecności dzieci, należy zawsze przestrzegać ogólnych środków
bezpieczeństwa, wymienionych niżej:
Zawsze po użyciu należy wyłączyć urządzenie.
Jeżeli urządzenie nie jest używane, należy odłączyć je od sieci elektrycznej, wyciągając wtyczkę z gniazdka.
Nie dotykać wtyczki zasilania mokrymi rękami.
Nie należy umieszczać urządzenia w wodzie, pod bieżącą wodą lub w kabinie prysznicowej.
Korzystanie z urządzenia w trakcie kąpieli jest niedozwolone.
Nie dotykaj urządzenia, jeżeli wpadło do wody.
Należy wówczas natychmiast odłączyć je od sieci elektrycznej.
Przed użyciem należy upewnić się, że przewód zasilający nie jest uszkodzony. Nie używać urządzenia, jeśli przewód
zasilający jest uszkodzony.
Nie kieruj strumienia wody w szczelinę między korpusem urządzenia a przyciskiem włączania/wyłączania (rys. 9).
Może to spowodować przedostanie się cieczy do jednostki sterującej i uszkodzenie urządzenia.
Przewód zasilający nie może dotykać gorących lub rozgrzanych powierzchni.
Jeżeli urządzenie nie działa, nie próbuj go naprawić samodzielnie.
Skontaktuj się ze specjalistycznym punktem serwisowym.
Nie należy zostawiać włączonego urządzenia bez nadzoru.
Należy używać tylko tych akcesoriów, które są przeznaczone do użytku z tym urządzeniem opisanym w niniejszej
Instrukcji. Nie należy korzystać z akcesoriów, których korzystanie nie zaleca producent.
Nie należy wkładać przedmiotów w otwory urządzenia.
Nie należy korzystać z urządzenia w trakcie używania w pobliżu aerozolów w spreju.
Urządzenie przeznaczone jest wyłącznie do użytku w pomieszczeniach zamkniętych.
Nie należy mody kować danego urządzenia bez zgody producenta.
Przed serwisowaniem przez autoryzowanego przedstawiciela lub producenta nie należy wymieniać wewnętrznych
elementów.
Korzystanie z urządzenia przez dzieci jest dozwolone wyłącznie pod ścisłym nadzorem osób dorosłych.
Wszelkie naprawy urządzenia powinny być wykonywane wyłącznie przez autoryzowany punkt serwisowy lub
dystrybutora.
Bezpiecznik znajduje się wewnątrz urządzenia; jeśli jest uszkodzony, musi zostać wymieniony w autoryzowanym
centrum serwisowym.
Przewód zasilający może być wymieniany wyłącznie przez profesjonalny personel serwisowy lub przez
producenta.
SPOSÓB UŻYTKOWANIA
Napełnianie zbiornika.
Używanie płynów zawierających alkohol, płynów zawierających zawiesiny, płynów oleistych oraz innych płynów nie
przeznaczonych do użytku w irygatorze grozi uszkodzeniem irygatora!
Otwórz pokrywę i wyjmij pojemnik na wodę. Napełnij go ciepłą wodą lub specjalnym roztworem.
Przy pierwszym użyciu napełnij pojemnik ciepłą wodą, naciśnij przycisk Włącz/Wyłącz, ustaw regulator strumienia
na „min” i przesuń wyłącznik dopływu wody w górę. Następnie kilkakrotnie płynnie przesuń regulator do pozycji
„10” i z powrotem tak, aby woda wypełniła wszystkie wewnętrzne przestrzenie. Urządzenie będzie gotowe do
użycia, kiedy woda z pojemnika zostanie w całości zużyta.
Upewnij się, że temperatura płynu w pojemniku nie przekracza 40°C. Nie wlewaj do pojemnika gorących roztworów
ani wody, ponieważ błona śluzowa jamy ustnej jest bardzo wrażliwa i może ulec uszkodzeniu pod wpływem gorącego
roztworu. Umieść pojemnik na miejscu (rys. 1).
Podłączanie zasilania.
Kabel zasilający znajduje się w specjalnym schowku w tylnej ściance urządzenia (rys. 2). Zsuń tylną pokrywę i wyciągnij
kabel zasilający. Umieść tylną pokrywę w pierwotnej pozycji, wykorzystując w celu przełożenia kabla zasilającego specjalny
otwór. Podłącz przewód zasilający do gniazdka elektrycznego.
Zakładanie/zdejmowanie nasadki z rączki irygatora.
W komplecie urządzenia znajdują się nasadki z obwódkami o różnych kolorach. Należy wybrać dla każdego członka rodziny
jego własną nasadkę określonego koloru. Używaj wyłącznie własnej nasadki w wybranym kolorze. Zapewni to pełną
zgodność z wymogami higieny osobistej. Umieść końcówkę w rączce irygatora aż usłyszysz kliknięcie, tak, aby końcówka
zespoliła się z otworem w rączce irygatora (rys. 3a). Urządzenie jest gotowe do użytku. Aby zdjąć końcówkę, naciśnij przycisk
służący do jej odłączania i pociągnij za nią, trzymając za karbowaną część końcówki (rys. 3b).
Zalecenia dot. bezpiecznego odłączania końcówki:
1. Jeżeli nasadkę trudno odłączyć od rączki irygatora lub wyślizguje się ona z ręki z powodu wilgoci, wykorzystaj suchy
kawałek tkaniny. Owiń nasadkę cienką suchą tkaniną i ponownie spróbuj ją odłączyć.
2. Podczas odłączania końcówki od rączki irygatora pociągnij ją, NIE OBRACAJĄC wokół osi. Kręcenie końcówką może ją
uszkodzić.


Dołącz do dyskusji na temat tego produktu
Tutaj możesz podzielić się swoją opinią na temat Aquajet LD-A9 Irygator. Jeśli masz pytanie, najpierw dokładnie przeczytaj instrukcję. Zapytanie o instrukcję można złożyć za pomocą naszego formularza kontaktowego.