GB / IE
GB / IEGB / IEGB / IEGB / IE
GB / IEGB / IEGB / IEGB / IE
GB / IEGB / IEGB / IE
Inden ibrugtagning
Batterier indsættes
Tryk på batteribeholderdækslets
6
,
15
åbningstast
8
,
16
og klap det op.
Batterierne indsættes i batteribeholderen
7
,
14
. Vær
herved opmærksom på den rigtige polaritet. Denne vises
i batteribeholderen.
Klapbatteribeholdrdækslet
6
,
15
ned igen. Åbningsta-
sten
8
,
16
griber hørbar fat.
Bemærk: I tænd / sluk-tasten
2
af forlygten er der en
batteri-indikator. Hvis denne lyser rød, skal batterierne
skiftes.
Bemærk: I baglygtens indre, under LED’erne, er der en
batteri-indikator. Denne lyser grøn. Lyser denne svagt eller
slet ikke, skal batterierne skiftes.
Rens batteri og apparatkontakter inden indsættelse, hvis
det er nødvendigt.
Fjern brugte batterier fra apparatet omgående. Der er
øget fare for udløb!
Batterier hører ikke til i husholdningsaffald!
Hver forbruger er forpligtet ved lov til at bortskaffe batterier
korrekt!
OBS! RISIKO FOR EKSPLOSIN! Hold
batterierne væk fra børn, kast ikke batterier i
ild, kortslut ikke batteriet og skil dem ikke ad.
Ved tilsidesættelse af de tidligere nævnte henvisninger
kan batterierne aflades udover deres slutspænding. Så
er der fare for udløb. Hvis batterierne er løbet ud i dit
apparat, tag dem ud omgående for at undgå skader på
apparatet!
Undgå kontakt med hud, øjne og slimhinder. Ved kontakt
med batterisyre skal det ramte sted skylles med rigeligt
vand og / eller lægehjælp søges!
Husk, at beskadigelser grundet usagmæssig håndtering,
tilsidesættelse af betjeningsvejledningen eller indgreb af
uautoriserede personer er udelukket fra garantien.
Produkt må under ingen omstændigheder skilles ad.
Usaglige reparationer kan resultere i alvorlige farer for
brugeren. Lad udelukkende fagfolk reparere produktet.
LED-lamperne er ikke skiftelig.
Sikkerhedshenvisninger
til batterier
Fjern batterierne fra produktet, hvis det ikke bruges i
længere tid.
OBS! RISIKO FOR EKSPLOSIN!
Genoplad
aldrig batterierne!
Vær opmærksom på den rigtige polaritet ved indsættelsen!
Denne vises i batteribeholderen.
Sikkerhedshenvisninger
LIVSFARE OG RISIKO
FOR ULYKKER FOR SMÅBØRN OG
BØRN! Lad aldrig børn være uden opsyn
med emballage. Der er risiko for kvælning grundet em-
ballagen. Børn undervurderer tit farerne. Hold altid børn
væk fra produktet. Produktet er ikke noget legetøj.
Dette produkt er ikke beregnet til at blive brugt af personer
(inklusive børn) med indskrænkede fysiske, sensoriske eller
mentale evner eller manglende erfaring og / eller mang-
lende viden, medmindre de er under opsyn af en person,
som er ansvarlig for vedkommendes sikkerhed eller har
fået anvisninger om hvordan produktet benyttes af samme.
Børn skal være under opsyn, for at sikre, at de ikke leger
med produktet.
DKDKDKDK
DKDKDK
LED Bike Light Set
Introduction
The operating instructions form part of this product.
They contain important information on safety, assem-
bly and disposal. Make yourself familiar with all
the operating instructions and safety advice for the product
before use. Use the product only as described and for the
indicated purposes. If you pass the product on to anyone else,
please ensure that you also pass on all the documentation
with it.
Proper use
The product is intended to be used as a light source on bicycles
for illuminating the road. The light provided is in addition to
dynamo lighting. The distribution of light must not be obstructed
by other parts of the bicycle. The product is intended for outdoor
use. Any use other than that described here or modification
to the product is not permitted and could lead to injury and / or
damage to the product. The manufacturer accepts no liability
for loss or damage arising from improper use. The product is
not intended for commercial use.
Description of parts
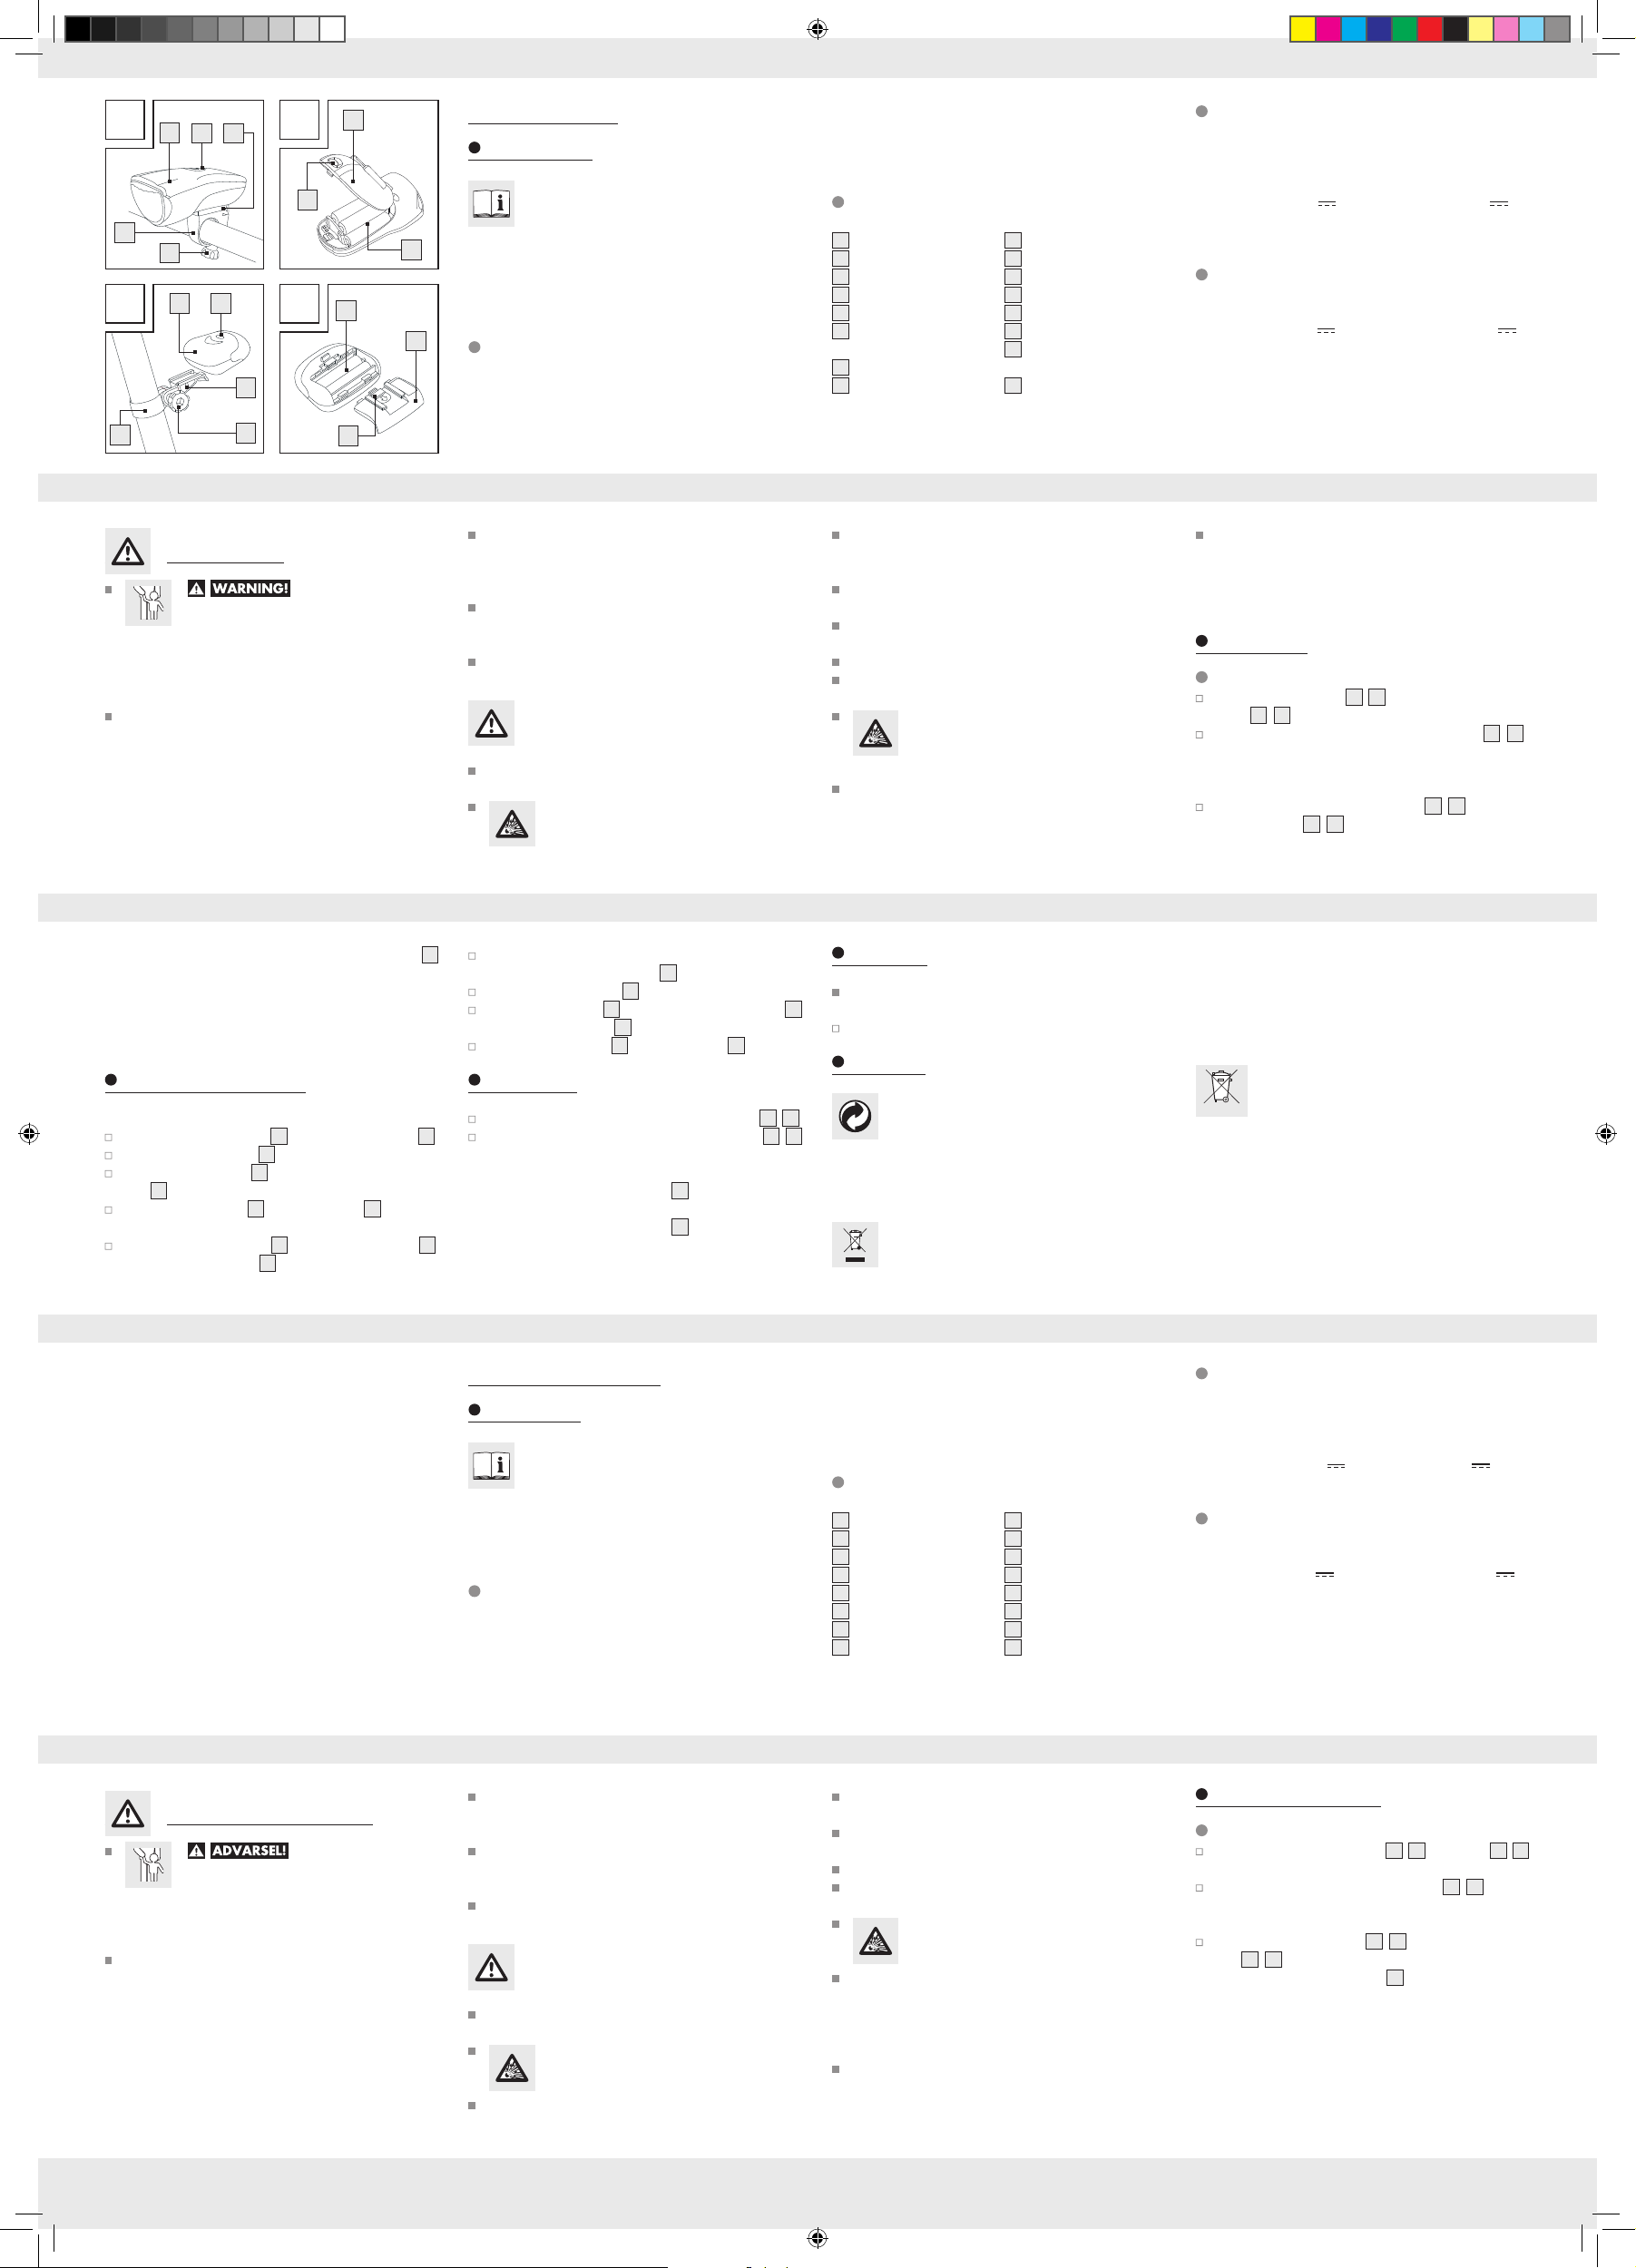
Front light:
1
Light housing
2
On / Off Button
3
Bracket
4
Clamping bolt
5
Mounting ring
6
Battery compartment
cover
7
Battery compartment
8
Opening button
Rear light:
9
Light housing
10
On / Off Button
11
Bracket
12
Clamping bolt
13
Mounting ring
14
Battery compartment
15
Battery compartment
cover
16
Opening button
Technical data
Front light:
Rated power: 3 W
LED class: 1
Batteries: 4 x AA
(1.5 V )
Rear light:
Bulbs: 5 LEDs
LED class: 1
Batteries: 2 x AAA
(1.5 V )
Battery
operating life: up to 50 hrs
Included items
1 LED front light
1 Front bracket
4 Batteries, AA, 1.5 V
1 Operating instructions
1 LED rear light
1 Rear bracket
2 Batteries, AAA, 1.5 V
Please note that damage arising from improper handling,
non-observance of the operating instructions or interference
with the inside of the device by unauthorised persons is
excluded from the warranty.
Never take the product apart. Unsatisfactory repairs can
lead to considerable danger for the user. Have repairs
carried out by a suitably qualified or experienced specialist.
The LED bulbs are non-replaceable.
Safety advice concerning
batteries
Remove the batteries if you are not going to use the
product for an extended period.
CAUTION! RISK OF EXPLOSION!
Never attempt to recharge the batteries!
Safety advice
DANGER OF LOSS OF
LIFE OR ACCIDENT TO INFANTS AND
CHILDREN! Never leave children unsuper-
vised with the packaging materials. Packaging materials
present a suffocation hazard. Children often underestimate
danger. Always keep children away from the product. The
product is not a toy!
This device is not intended to be used by persons (including
children) with restricted physical, sensory or mental abilities
or with insufficient experience and / or knowledge, unless
they are supervised by a person who is responsible for
their safety or they have received instruction on how to
use the device from such a responsible person. Children
should be supervised in order to ensure that they do not
play with the product.
Make sure you insert the batteries the right way round
(polarity). The correct polarity is shown inside the battery
compartment.
If necessary clean the contacts on the batteries and on
the device itself before inserting them.
Remove exhausted batteries from the device immediately,
Otherwise the batteries are more likely to leak.
Batteries do not belong in household refuse.
Every consumer is obliged to dispose of batteries properly
in accordance with the regulations.
CAUTION! RISK OF EXPLOSION! Keep
batteries away from children. Do not throw
batteries into a fire. Never short-circuit them
or take them apart.
If you disregard the above instructions and advice, your
batteries may discharge beyond their minimum voltage,
thus increasing the chance of leakage. If your batteries
leak, remove them from the device immediately to prevent
it from being damaged.
Do not let the fluid from a leaking battery come into contact
with your skin, eyes or mucous membranes. In the event
of contact with fluid leaking from a battery, thoroughly
flush the affected area with water and / or seek the advice
of a doctor!
Before use
Inserting the batteries
Press the opening button
8
,
16
of the battery compartment
cover
6
,
15
and lift it up.
Insert the batteries into the battery compartment
7
,
14
.
Make sure you fit the batteries the right way round (polar-
ity). The correct polarity is shown inside the battery com-
partment.
Lower the battery compartment cover
6
,
15
again. The
opening button
8
,
16
can be heard to engage.
When doing this, ensure that the nut, which is loose in
the recess in the mounting ring
13
, does not fall out.
Place the mounting ring
13
around the saddle post.
Refasten the bracket
11
back on to the mounting ring
13
with the clamping bolt
12
.
Push the light housing
9
on to the bracket
11
.
Operation
Switch on the lights by pressing the On / Off button
2
,
10
.
Switch the lights off by pressing the On / Off button
2
,
10
again or for a second time.
Note: The front light has two illumination settings.
20 lux: Press the On / Off button
2
once for cycling in
dark, unlit areas.
10 lux: Press the On / Off button
2
for a second time
for cycling in lit areas.
Note: If the LEDs fail then the whole light must be replaced.
Note: There is a battery indicator in the On / Off button
2
of the front light. This lights up red when the batteries need
to be replaced.
Note: There is a battery indicator inside the rear light
below the LEDs. This lights up green. If this glows weakly
or not at all, then the batteries need to be replaced.
Assembling the lights
Front light:
Release the clamping bolt
4
from the mounting ring
5
.
Place the mounting ring
5
around the handlebar.
Turn the clamping bolt
4
to tighten it into the mounting
ring
5
.
Push the light housing
1
on to the bracket
3
.
Rear light:
Release the clamping bolt
12
from the mounting ring
13
and remove the bracket
11
.
Cleaning
Do not use corrosive or abrasive cleaning agents. Other-
wise damage to the product may occur.
Use a slightly damp, fluff-free cloth for cleaning the product.
Disposal
The packaging is wholly composed of environ-
mentally friendly materials that can be disposed
of at a local recycling centre.
Contact your local refuse disposal authority for more details
of how to dispose of your worn-out product.
In the interest of the environment, do not throw
out your product with your household refuse. Take
it to a suitable centre where it can be disposed of
properly. Your local council will be able to tell
you where the collection centres are located and
their opening times.
Defective or exhausted batteries must be recycled in accordance
with Directive 2006 / 66 / EC. Return the batteries and / or
the device through the appropriate collection facilities.
Pb
Improper disposal of rechargeable
batteries can damage the environment!
Batteries must not be disposed of with the household refuse.
They may contain toxic heavy metals and require to be handled
as special waste. The chemical symbols of heavy metals are:
Cd = cadmium, Hg = mercury, Pb = lead For this reason, you
must dispose of discarded batteries at a communal disposal
centre.
LED-sæt med batterilys
Indledning
Betjeningsvejledningen er del af dette produkt. Den
indeholder vigtige henvisninger for sikkerhed,
montering og bortskaffelse. Gør dig fortrolig med
alle betjenings- og sikkerhedshenvisninger inden første brug
af produktet. Anvend produktet kun som beskrevet og til de
nævnte anvendelsesområder. Udlever alle dokumenter, når
produktet gives videre til tredje mand.
Anvendelse efter bestemmelsen
Produktet tjener som lyskilde for cykler til vejbanebelysning.
Belysningen er beregnet som tilføjelse til dynamo-belysningen.
Belysning med LED-batterilampe-sættet alene er udelukkende
tilladt for race-cykler under 11 kg. Lysfordelingen må ikke for-
ringes af en anden cykeldel. Produktet er beregnet til brug
udendørs. Anden anvendelse end tidligere beskrevet eller en
Product description:
LED Bike Light Set
Art. No.: 97331-6
Model No.: XC-992 / XC-998
Model: DuoLux / Kompakt Plus
ændring på produktet er ikke tilladt og kan resultere i tilska-
dekomst og / eller beskadigelser på produktet. For skader,
som er opstået på grund af anvendelse mod bestemmelsen,
står producenten ikke til ansvar. Produktet er ikke beregnet til
erhvervsmæssig brug.
Beskrivelse af delene
Forlygte:
1
lygtehus
2
tænd / sluk-tast
3
holder
4
låseskrue
5
holderring
6
batteribeholderdæksel
7
batteribeholder
8
åbningstast
Baglygte:
9
lygtehus
10
tænd / sluk-tast
11
Holder
12
låseskrue
13
holderring
14
batteribeholder
15
batteribeholderdæksel
16
åbningstast
Tekniske specifikationer
Forlygte:
Nominel effekt: 3 W
LED-klasse: 1
Batteri: 4 x AA
(1,5 V )
Baglygte:
Lyskilde: 5 LED’er
LED-klasse: 1
Batteri: 2 x AAA
(1,5 V )
Lysetid: op til 50 timer
Leveringsomfang
1 LED-forlygte
1 holder foran
4 batterier, AA, 1,5 V
1 betjeningsvejledning
1 LED-baglygte
1 holder bagved
2 batterier, AAA, 1,5 V
A
2
1
B
8
6
7
3
C
9 10
11
4
5
12
13
D
14
15
16

Dołącz do dyskusji na temat tego produktu
Tutaj możesz podzielić się swoją opinią na temat Crivit IAN 64303 Lampa rowerowa. Jeśli masz pytanie, najpierw dokładnie przeczytaj instrukcję. Zapytanie o instrukcję można złożyć za pomocą naszego formularza kontaktowego.